How can labelling help me manage issues on a repository?
How do I add labels to issues?
What are the recommended labels, and when should I use them?
Objectives
After following this section, participants will be able to:
Explain the value of labelling issues.
Apply labels to issues.
Explore the set of labels recommended by The Carpentries.
Create milestones to help plan and track progress on their
project.
Issue Triage
Maintainers typically do not have time to respond immediately to
every new issue and comment that is added to their repository. In a more
common scenario, a Maintainer visits their repository and finds several
new issues and pull requests, plus some new comments and changes to
those that were open at the end of their previous visit.
A good first step to take in these circumstances is issue
triage: time spent processing the open issues and figuring out what
should be prioritised, what can be closed, what needs to be brought to
the attention of others in the community (co-Maintainers, Curriculum
Advisors, would-be contributors, Core Team, etc), and so on.
Callout
The Value of Teamwork
This triage process is usually made much easier, more efficient, and
more fun when co-Maintainers of a lesson can meet synchronously to work
through issues and pull requests together.
Community members have reported positive experience with short,
regularly scheduled (e.g. monthly) coworking sessions with their
Maintainer team, using screen-sharing and focussed discussion to
distribute tasks and collaboratively determine how to process and
respond to contributions.
It can also be a good opportunity for Maintainers to get to know each
other better, and to share their skills and experience with using Git,
GitHub, and the lesson infrastructure.
Labelling Issues
The triage process can be improved with effective use of
labels applied to issues. Labels are tags that can be applied
to issues (and pull requests), annotating them according to their
status, type, complexity, etc. When labels are applied to an issue, they
appear next to it in the issue listing for the repository. Clicking on a
label will show you a list of all issues with that label.
When returning to a lesson repository after some time away, labels
applied to old issues can help to remind you of their context, and
labels can be added or updated as you triage the issue list.
Carpentries Issue Labels
The Carpentries maintains an
expanded set of issue labels, which is larger than the default set
provided by GitHub and intended to provide a more precise categorisation
of issues typically encountered with a lesson. This label set is
available on all Carpentries lesson repositories and lessons built
from one of our repository templates.
Inviting Community Contributions
Lesson repositories are open source and publicly-visible, and you can
expect some spontaneous contributions from the wider community. However,
in some circumstances, you may want to bring particular items to the
attention of community members.
When you want or need to refer
an issue/contribution to the Curriculum Advisory Committee for your
lesson, you should add the status:refer to cac label, and
mention the CAC in the relevant issue/pull request discussion thread
(e.g. @datacarpentry/curriculum-advisors-image).
Adding this label will help members of the CAC more easily identify
and browse through the items they need to discuss, increasing the
likelihood that you will receive a timely response.
Help Wanted & Good First Issue
The help wanted and good first issue labels
can be useful to draw attention from new contributors. In particular,
the help wanted label can be used to flag issues that the
Maintainers would particularly appreciate external support on.
The good first issue label is used to identify issues
that do not require in-depth knowledge of the project and its
infrastructure, etc. Newcomers to the project can use this label to find
opportunities to make their first contribution. GitHub provides a view
of all of a repository’s issues with the good first issue
label on the /contribute page for that repository, e.g. https://github.com/github/docs/contribute
Labels can be applied to issues in batches from the issue listing
page. Check the box next to each issue you want to apply a given label
to, then click the “Label” dropdown in the top bar of the listing, and
choose the label(s) you want to apply to these issues.
Planning Your Next Iteration
Developing a lesson is a project and, like most projects, it consists
of multiple tasks. Keeping track of the list of tasks the team has to
do, their progress on each, prioritising tasks for future development,
sprints and releases, etc., quickly becomes a non-trivial task in
itself. Without a project management tool/framework, it can be hard to
keep track of what’s done, or what needs doing, and particularly
difficult to convey that to others in the team or share the
responsibilities.
Different tools and platforms exist to help you with project planning
and management – for example, Asana,
Trello, Miro, GitHub itself, even sticky notes on a
white board. Different tools will work best for different teams of
collaborators, but making sure you use a tool to plan and manage work on
your lesson development project is better than making it up as you go
along.
Milestones
Carpentries lessons are developed in GitHub so it is convenient to
use its features to keep track of different components of the project
and their current status.
GitHub offers two features for task/project management:
Projects and Milestones. Projects offer a more
advanced set of functions and are particularly useful when you need to
work on related tasks spread across multiple repositories. Milestones
are comparatively simple and a great place to start, especially if your
efforts are focused on a single repository. The focus will be on
Milestones in this session but we recommend that you learn
more about Projects if you want to take advantage of the full range
of GitHub’s features for project management.
Milestones are a way of organising issues on your project into
smaller units of work (e.g. deliverables) that have deadlines and the
progress of which needs to be closely tracked (e.g. release management).
They are good for managing time-bound, structured iterations and working
in short sprints on batches of issues, which makes them a great fit for
the
iterative process of lesson development recommended in Collaborative
Lesson Development Training.
Here are some helpful features of Milestones:
You can add a title and description to the Milestone,
e.g. “Issues to be addressed before October pilot workshop” or
“Accessibility Enhancement Drive”.
The Milestone represents a subset of issues on your repository,
e.g. the things you want to work on next or a set of issues that share a
theme. Issues are assigned to a Milestone in a similar way to adding a
label.
The Milestone can be given a target completion date.
A progress bar indicates how close you are to completing the
Milestone in terms of the number of completed issues versus the total
number of issues.
The order of issues listed in the Milestone can be adjusted manually
by dragging the issue up and down the list, e.g. to indicate task
priority to yourself and your collaborators.
Testimonial
Community members’ perspectives on project
management
Sven van der Burg, Research Software Engineer at the Netherlands
eScience Center, describes his group’s approach to piloting and
contributing back to someone else’s lesson in The Carpentries
Incubator:
We are not direct maintainers of the lesson, but these issues are
important for us to fix before teaching the next edition of the
workshop, because we don’t want to run into them again. Of course other
users of the lesson would also benefit from the issues being
fixed.
Therefore, we organised a one-day sprint in which we gathered
together colleagues from different teams to work on improving the
lesson. By all working together on one day, together in the same room,
we were able to focus and get a lot done in a short amount of time,
while not being distracted by the hundreds of other things we are all
working on. Of course, we contacted the lesson maintainers to make sure
that our efforts would be welcome by opening an
issue in their lesson repository.
We used a Microsoft Planner board to organise our work and keep
track of what needs to happen:
In this way, we could adapt the lesson to our own needs and
contribute to the lesson in The Carpentries Incubator in a smooth way
that does not take away focus on other projects of me and my
colleagues.”
Renata Curty, Research Facilitator for Social Sciences at UCSB,
describes her group’s approach:
Our group uses issues and labels and sets milestones in GitHub to
organize our lesson development work.We also use a spreadsheet
to track higher-level decisions, tasks, and assignees and record ideas
and discussion points in our meeting notes before converting them into
more detailed issues.We have been meeting regularly (weekly or
biweekly) to maintain momentum, which helps us to make small but steady
progress.We are currently working on a modularized version of
the workshop that will allow instructors to choose what to teach based
on the time, cohort needs, and learners’ entry knowledge.
Callout
Referencing issues
It can be helpful to refer to issues and pull requests in
conversations elsewhere in a repository. Every issue and PR has a unique
number (based on the order in which they were created). These numbers
can be used, preceded by #, to reference a given issue or
PR.
Additionally, pull requests (and commit messages) that include
particular phrases will trigger the automatic closure of an issue:
“closes”
“fixes”
“resolves”
One of the above words followed with the # and the
number of an issue, e.g. “fixes #34”, included in the
description of a pull request (the first comment in the PR discussion
thread) will tell GitHub that the issue can be automatically closed if
the pull request is merged.
Key Points
Labelling issues can help you prioritise issues and bring them to
the community’s attention.
Labels can be added to an issue using the right sidebar menu of the
GitHub web interface.
The Carpentries provides a recommended set of labels, and has
systems and processes that work with some of these.
What features does GitHub provide to facilitate reviewing pull
requests?
What are the different options for the outcome of a pull request
review, and when should I use each one?
Objectives
After following this section, participants will be able to:
Create comments on particular lines and ranges of lines in the
changes proposed by a pull request.
Suggest specific changes to a pull request.
Select the “approve”, “comment”, or “request changes” outcomes of a
pull request review.
Reviewing pull requests is one of the most important tasks for a
maintainer. The way you review a pull request, and communicate with the
person who opened it, can have an enormous impact on their motivation to
contribute again. It also sets expectations for them and others about
your priorities and quality standards for the project. When done well,
reviews can be an enjoyable, educational, collaborative experience for
both maintainer and contributor.
GitHub provides several features that can improve your experience as
a reviewer, and make it easier for contributors to follow up on your
review.
Title and description
A good title and description for a pull request should give the
reviewer an immediate impression of the goal(s) and scope of the changes
it contains. Pull
request templates, covered later, are one way to help contributors
provide this information.
Line-by-line comments
The specific changes proposed in a pull request can be viewed in its
Files Changed tab. It is usually most helpful to provide
feedback and ask questions on the lines that have been changed. You can
comment on a particular line by hovering the cursor over it and clicking
the + button on the left-hand side. Comments can be added
on their own, or as part of a Review: a commentary on the pull
request as a whole. When choosing the latter, comments are only
published after the reviewer has finished the whole review. To comment
on a range of lines, click-and-hold the + button for the
first line in the range, drag your cursor down the range, then
release.
Suggesting changes
As well as adding comments line-by-line, you can also suggest
specific changes, e.g. to fix a typo, suggest improved wording, etc. To
do this, take the same approach to start a comment on a line or range of
lines, then click the “add a suggestion” button (plus/minus symbol
inside a document icon), and edit the source content that appears in the
input box with your suggested improvement. Suggesting specific changes
makes it much easier for contributors to a) understand your suggestions,
and b) implement them. Suggested changes will be commited to the pull
request branch as co-authored by the pull request author and
reviewer.
Finishing a review
When you have finished commenting on particular lines, and suggesting
changes, you can finish your review by clicking the “Review changes” or
“Finish your review” button near the top-right of the screen. This is
the place to add general comments and questions, and to summarise your
review. If nothing else, do not forget to thank the contributor for
taking the time to contribute! Choose one of the three options:
“Comment” - a general comment, with no firm outcome. This option can
be a good choice if you plan to close the pull request after completing
your review.
“Approve” - approve the PR for merging. Some people use this when
suggesting only very minor or optional changes - if you want to do this,
make sure you are explicit about what changes you are suggesting etc
before the PR can be merged
“Request changes” - indicates that changes would be required to the
PR before you would be willing to merge it. It also requires another
review before the changes can be merged if the main branch
has been protected (see branch protection rules below).
Agree with your team how you will use reviews
When collaborating regularly with other developers/maintainers on a
project, it can be helpful to discuss and agree upon when and how you
will use pull requests and reviews in your development process. Where
quality control and shared ownership is important, teams may prefer for
all changes to pass through pull requests, perhaps even requiring at
least one approving review before changes can be merged. (Branch
protection rules can be set in GitHub to enforce such requirements.)
Other teams prefer less formal process, with pull requests used only
when a team members specifically wants to invite feedback and discussion
on their changes.
However you decide to integrate pull requests into your development
process, we recommend discussing it as a team and making agreements
about how you will work together.
You can add “saved replies” to your GitHub account
These can be used to automatically input a template response, on
issues, PRs, etc
Use these if you find that you are often saying the same or similar
things to people
Key Points
Use line-specific comments and suggestions, and indicate the outcome
of your review to help the contributor respond effectively.
The “approve” and “request changes” options on a review can help the
contributor understand if they need to take further action.
How will I know when something happens or needs my attention on the
lesson project?
What communication channels should we set up to aid
collaboration?
What can we do to encourage regular progress on the project?
Objectives
After following this section, participants will be able to:
Manage GitHub notifications to receive relevant updates about
activity on their repository.
Choose a routine and channels for working with collaborators on the
project.
Staying in the Loop
GitHub provides a useful notification feature for collaborative work
- mentions. The mention system notifies team members when
somebody else references them in an issue, comment or pull request. You
can use mentions to notify people when you want to check a detail with
them, or let them know something has been fixed or changed (this is much
easier than writing out all the same information again in an email!). In
repositories belonging to an organisation rather than an
individual user, Teams of users can be created and mentioned
collectively, sending a notification to all its individual members.
Typing @ in GitHub will bring up a list of all accounts
and teams linked to the repository that can be mentioned. You can also
mention people who aren’t linked with the repository, but they won’t be
listed in the @ drop-down list so you will need to know
their GitHub username in order to mention them.
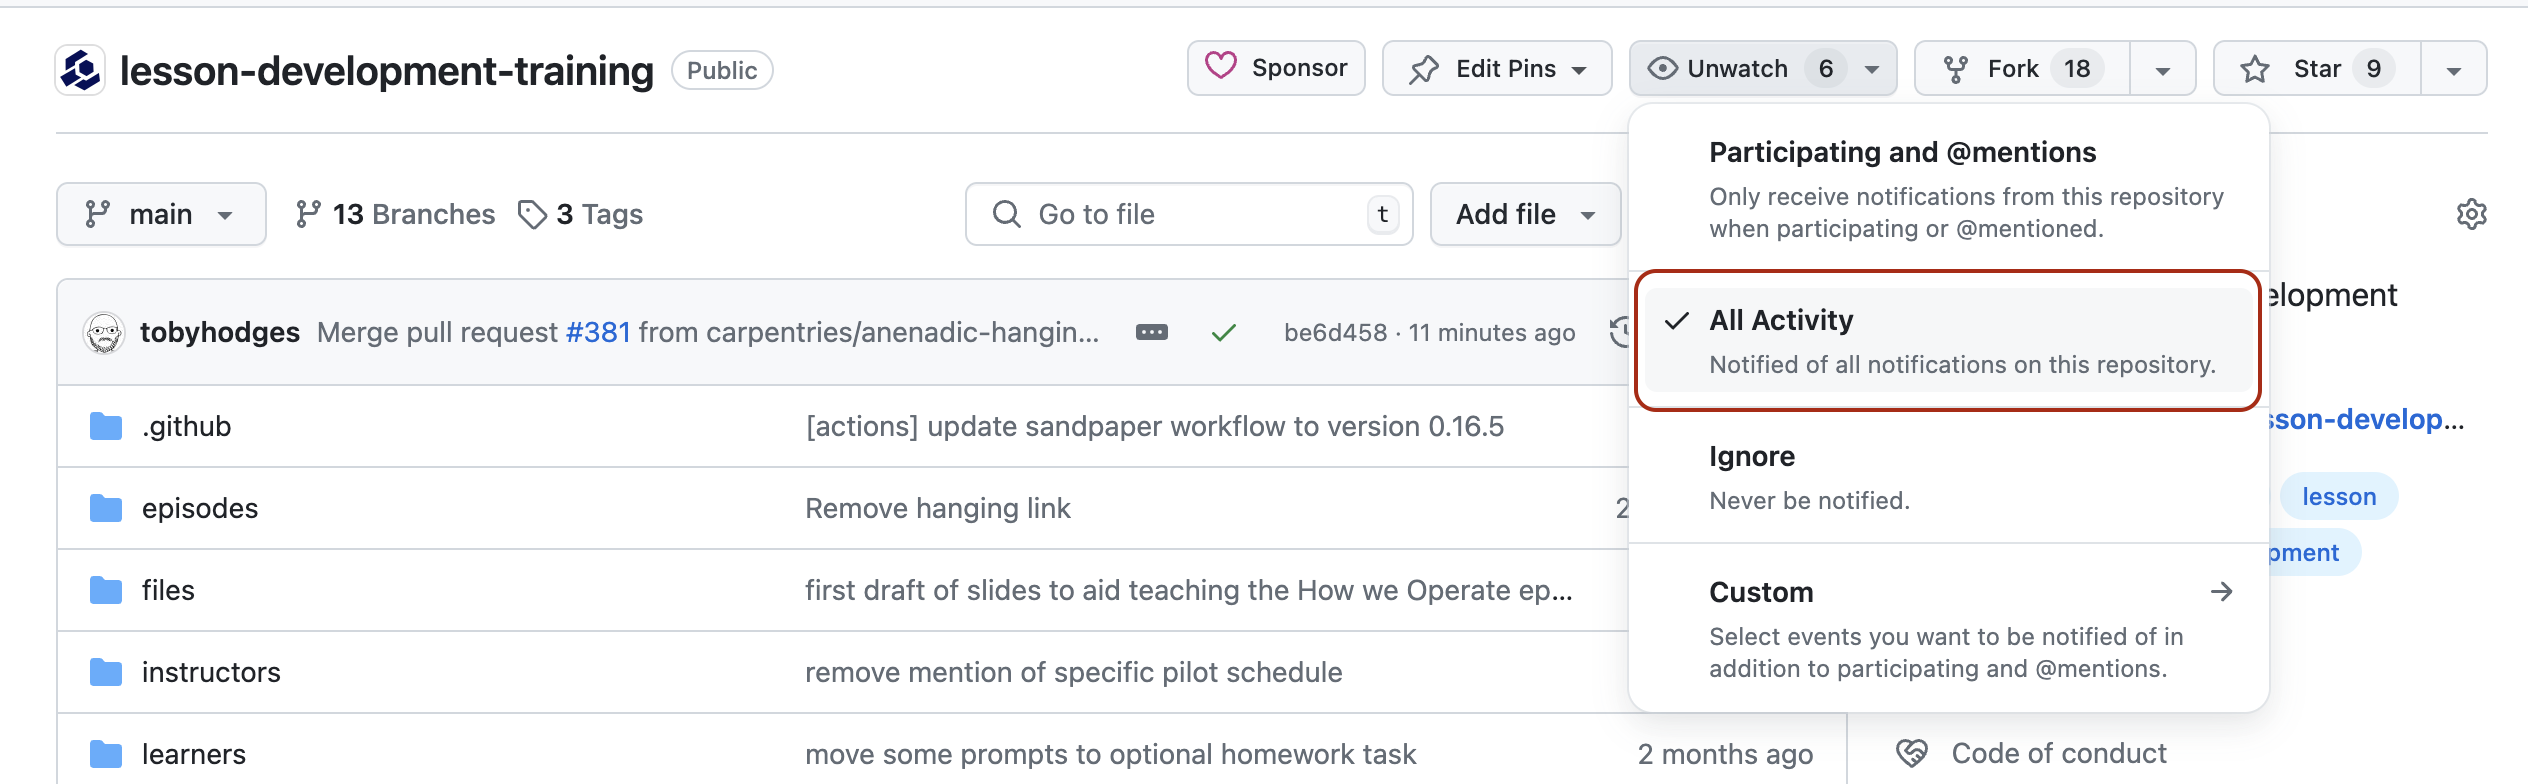
When Will I Be Notifed?
By default, a user will be notified when they are mentioned, assigned
an issue, asked to review something, and when some activity occurs on an
issue or pull request that they opened or commented on previously. These
settings can be adjusted for individual projects via a dropdown on the
landing page of the repository.
GitHub’s different notification settings menu
when watching repository events with ‘All Activity’ highlighted
You can choose to ignore a project, meaning that GitHub will never
notify you about activity on that repository even if you are mentioned
directly. Or you might prefer to “watch” the project, receiving updates
on any activity on the repository e.g. whenever somebody opens a new
issue or pull request, or comments on an existing one. There is also the
option to further customise notifications.
How Will I Be Notified?
In the settings for your GitHub account, you can also choose where
these notifications will appear. GitHub can send you emails to multiple
addresses or add notifications to an “inbox” page in the
GitHub web interface. You can configure where you want different kinds
of notifications to be sent, and even customise these settings from
project to project.
If you work on multiple projects, or the projects you follow on
GitHub are particularly active, the volume of notifications you receive
can quickly become overwhelming. Here are some approaches you can take
to help you stay on top of things, and distinguish the high-priority
tasks and important updates from the regular traffic.
Email Notifications
If you want to filter, organise, and redirect email notifications
from GitHub, here are some characteristics of the messages that you make
use of:
All GitHub notifications are sent from the address
notifications@github.com.
Notification emails are sent to the address
repo-name@noreply.github.com, where repo-name
is the name of the repository where the notification was triggered.
The email subject begins with [org-or-user/repo-name],
where org-or-user is the name of the organisation or the
username of the user who owns the repository and repo-name
is the name of the repository where the notification was triggered.
In addition to your email address, the cc field of the message
contains an address that describes the type of event that triggered the
notification.
author@noreply.github.com for activity on an issue or
pull request that you opened.
mention@noreply.github.com for a mention of your
username.
team-mention@noreply.github.com for a mention of a team
you are a member of.
The email header (metadata) includes a mailing-list
field with an identifier in the form
repo-name.org-or-user.github.com, which can be used to
filter by the project and/or its owner.
Most email clients provide configuration for rules that can be set to
redirect messages to particular folders, and/or to annotate them with a
mark or flag, based on this kind of information. Here is the
documentation for setting such rules in Gmail.
Notifications on GitHub.com
The GitHub notifications inbox page includes several preconfigured
filters:
Group notifications by repository.
Review notifications for a particular repository.
Review particular types of notification e.g. mentions, issue
assignments, etc.
You can also create your own, more sophisticated filters, using the
search bar, e.g. all mentions for all repositories in a particular
organisation.
Whatever strategy you choose, one of the most important habits that
will help you stay on top of your projects and tasks is to remember to
check these notifications frequently.
Working Together
Talking to Each Other
In addition to tracking and responding to activity on your
repository, effective teams typically maintain other channels of
communication. These channels can be useful for more informal
communication and back-and-forth discussion that is less suitable for a
public discussion thread on GitHub.
Slack is commonly used in the
Carpentries community for quick, day-to-day message exchange. You should
join the Carpentries
Slack workspace to connect with other lesson developers. Once you
join, you can join the lesson-dev channel, which is
dedicated to discussion of lesson development, and create a channel for
your own project under the
Carpentries public Slack workspace. If you need more complex team
communications (e.g. multiple channels) you can create your own Slack workspace. Workspaces can
be created for free but carry some restrictions e.g. on message volume
and history, and file storage. The Carpentries Slack is an enterprise
workspace and is not subject to these limits.
Collaborators may also choose other platforms to discuss lesson
development or receive contributions from newcomers who are not yet
fluent in using GitHub’s systems of communication. The Carpentries can
assist with creating a mailing list specific to the development of your
lesson on our TopicBox
platform for managing threaded email discussions. Also make sure to join
the Incubator
lesson developers mailing list on TopicBox to keep an eye on
announcements and discussions relating to lesson development within the
Carpentries community.
The exact channels and cadance of your communication will largely
depend on the personal preferences of your team members. The best thing
you can do is devote time in an upcoming meeting/coworking session to
discuss and agree on where and how you will communicate about the
project.
Making Progress
The following practices have been shown to help maintain steady
progress with lesson development:
Being responsive to notifications about activities and
mentions.
Scheduling regular co-working/sprinting sessions with team members
(e.g attaching your sprint sessions to other open source community
activities, which may offer goodies, rewards and prizes for
participants, can provide motivation and activity spikes).
Working alongside other members of The Carpentries community at
Maintainer or lesson development co-working sessions.
Blocking time in your calendar for issue triage/solo material
writing.
Planning lesson pilots in advance to help set targets.
Key Points
GitHub’s notification settings can be customised to provide the
updates you need in the places where you want them.
Effective communication is essential to good collaboration.
Regular progress can be achieved by ensuring your team members have
frequent opportunities to discuss the project.
What can I do to attract contributors to my project?
How can I help them make good contributions when they get
there?
Objectives
After following this section, participants will be able to:
Adjust a repository to attract potential new collaborators.
Create and modify issue and pull request templates in GitHub.
Identify channels they can use to attract contributions from
relevant community members.
Maintain a welcoming repository
It is important to make collaborative projects as welcoming for
newcomers and as easy to get involved in as possible.
Document your project
One way to make sure you achieve this is to spend time on
‘external-facing’ features, such as documentation, that will make the
project more accessible to newcomers. Such documentation will be useful
to yourself and other team members as well, e.g. if you are trying to
come back to the project after a break or are reusing it for a new
collaboration in the future.
Your lesson documentation should contain the following information,
which should be kept up to date:
A structured, up-to-date README. The README, often a
README.md or README.txt file, represents the
first piece of documentation that people will find when they arrive at
your lesson repository. You should aim to capture all the information
that a potential contibutor or user might need to understand what the
project is and how to work with it. Consider including the following
information:
lesson title
lesson description
Information about how to use the project – This
might be a link to the rendered version of the lesson or to further
documentation, or installation instructions and some examples of
usage.
List of current maintainers – Let people know who
is responsible for the project and how to contact them.
Contributing information – Summarise the kinds of
contributions you are (or are not) seeking and how to get involved,
linking to the repository CONTRIBUTING.md file for more
details.
Credits/acknowledgements – Acknowledging past
maintainers and others who have helped build the project and templates
and resources you have used and adapted gives would-be contributors
confidence that their efforts will be credited too.
Citation – Tell people how they should cite your
project. This could be a summary of the detailed information you provide
in a separate CITATION.cff file (see below).
License – Summarise the licensing terms of the
project, linking to the project’s full license file (see below).
An up-to-date CITATION.cff file. – A file containing
information about the authors of the project, other projects and
resources it is based on or refers to, its license, the DOI of the
latest version, etc, in Citation
File Format (CFF) (a specialised kind of YAML file). If your lesson
repository contains a CITATION.cff file, GitHub will
automatically show the citation information in the sidebar. CFF is also
recognised and supported by other platforms including Zenodo and the Zotero reference manager.
CONTRIBUTING.md – A contributing guide describing how
people can send their contributions, what kinds of contribution will be
credited and in what ways. Carpentries lesson repositories already have
a generic Carpentries CONTRIBUTING.md file to get you
started, which you should review and modify to fit the needs of your
project and team.
LICENSE.md – A file containing the licensing terms of
the project, including the conditions under which others may re-use,
adapt, and distribute its contents. Without a license other people
cannot use your material at all. Use GitHub’s license choosing tool or
find another pre-existing license that fits your needs (e.g. from
Creative Commons). Do not write your own!
We have prepared the following templates to help lesson developers
get started with writing the README and contributing guide for their
project:
We recommend that lesson developers obtain a Digital
Object Identifier (DOI) as soon as feels appropriate, at the latest
when the lesson reaches the beta phase. You can use this DOI in the
citation information (e.g. in
the identifiers field of your
CITATION.cff), to allow people to cite a particular
version of your lesson, e.g. a snapshot of the lesson when it entered
beta testing, captured as a Zenodo record.
Cultivate and present a welcoming project culture
Many potential contributors will “lurk” on an open source project
before making their first contribution and many occasional contributors
are probably paying attention to activity on the repository too. People
often feel intimidated about contributing to a project for the first
time and anything you can do to reduce that barrier and encourage them
to participate will help you grow the community around your project.
Be intentional about your public communications
All projects have a culture, much of which will be visible on a
public GitHub repository, whether maintainers try to actively establish
and nurture it or not. Investing time and energy in communicating in a
polite and friendly way, even among a small group of team members who
collaborate with each other all the time, shows newcomers how they can
expect to be received when they make their first contribution. Modeling
respectful behaviour between maintainers demonstrates something
important about the culture of your project to anybody watching (or
looking back at past discussion threads).
Discuss with your team members how you want to work together then
document those norms and work to maintain them.
Be responsive
It helps to process and respond to contributions quickly, especially
when somebody is participating in the project for the first time. Longs
delays between opening an issue or pull request and a first response
from a maintainer can be demotivating. Similarly, after waiting a long
time for a response, the contributor may no longer have time to follow
up, having moved on to other tasks and projects.
Not every contribution is a good fit for a project and you probably
will not want to accept every suggested change, especially in the later
stages of its development. If you receive a pull request or issue that
does not fit your lesson, consider the following points to help you
politely decline without demotivating the contributor:
Thank them for taking the time to contribute.
Explain why the contribution does not fit into the
lesson, and offer suggestions for improvement if you’re able to.
Link to relevant documentation, if you have it.
Notes about the design and scope of the project and any relevant
discussion threads can be very helpful here. If you notice similar
repeated requests/contributions, you might want to address them in your
documentation (e.g. in the CONTRIBUTING.md file) to save
yourself time in future.
Your project will benefit most when newcomers make meaningful
contributions and they will feel more motivated to get involved when
they can see that their contributions will be welcomed and make an
impact.
Boost visibility for newcomers
Anything you can do to draw attention to issues where new
contributions would be easy and/or particularly impactful can help to
get newcomers involved in your project. The Carpentries provides a
number of ways to further raise the visibility of the lesson among the
broader community and encourage community members to contribute to its
further development.
Maintaining a list of issues with the help wanted and
good first issue labels from lesson repositories on The Carpentries
website. Projects in The Carpentries Incubator and Carpentries Lab
can opt into including their issues in the Help Wanted Issues page by
adding the helpwanted-list topic to their GitHub
repository.
Helping maintainers organise and promote collaborative development
sessions for their projects.
The examples listed above can be adapted to other project settings:
the important takeaway message is that maintainers should invest time in
outreach, rather than passively hoping for newcomers to spontaneously
appear.
Long discussion threads with no clear resolution or action steps can
be another barrier for would-be contributors to overcome. One good
technique for maintainers to mitigate this is to periodically summarise
the current state of a discussion, to make it easier for newcomers to
understand what is needed to make progress on a given issue or pull
request. (Other contributors may find this helpful too!) As the context
and details of an issue change and become clearer over time, it can be
similarly helpful to adjust the title and opening comment of the
discussion. Bear in mind that editing an existing comment will not
trigger a notification to those subscribed to the thread in the same way
that a new comment would: you should post a new comment to make sure
that everyone involved is aware of your changes.
Guide contributors with issue and pull request templates
Templates
for new issues and pull requests can guide newcomers and experienced
contributors to provide the information you need to be able to process
and respond to their contributions efficiently.
A pull request template specifies Markdown content that will be
present by default in the description box of any new pull request on the
project. Use it to prompt contributors to provide any information that
will help you process and review their proposed changes. Issue templates
can also contain a default description for a new issue or define a more
structured set of prompts for contributors to respond to by templating a
form that contributors must complete to open an issue.
Multiple templates can be specified for issues and pull requests on a
project, providing different guidance for contributors making different
kinds of contributions (e.g. reporting a bug, asking a question,
providing feedback from a pilot workshop, etc).
Issue form templates are specified with YAML and saved with the
.yml filename extension. GitHub’s web interface has some
built-in checks and syntax highlighting to help you compose them. Pull
request templates and non-form issue templates are written as Markdown
files (.md extension) with metadata such as default labels
and assignee for the resulting issue specified as YAML front matter at
the top of the file. The issue and pull request
templates used in most Carpentries projects could be a good starting
point for your project.
When might it be helpful to use the github.dev IDE?
How can I open pull requests from the github.dev IDE?
Objectives
After following this section, participants will be able to:
Open a repository in the github.dev IDE.
Create branches, modify and commit files, and open pull requests
from the github.dev IDE.
Populate a CITATION.cff file for their project with the
cff-init webtool.
Another Way to Work
The GitHub browser interface is great for looking through files and
folders, viewing the project history and details of specific changes,
and managing issues and pull requests. But it has some limitations. It
is common practice to edit multiple files in one go and package them
together in one commit, but the GitHub browser interface can only edit
and commit single files at a time. It can be helpful to refer to the
contents of other files even when only making edits to a single
file.
Developers often clone a project locally to obtain more flexibility
in how they work with a repository, to preview changes before they
commit, etc. However, it can be cumbersome to make a clone of every
project you want to contribute to.
In recent years, GitHub has provided something like a middle ground:
an integrated
development environment (IDE) to work with your repository without
leaving the web browser. This IDE interface, called github.dev, is
available on all GitHub repositories.
Launching the github.dev IDE
There are a few different ways to access the IDE interface:
Navigate in the standard GitHub interface to a file you want to
modify. Select the downward arrow next to the edit button (pencil icon),
and choose “github.dev” from the dropdown list.
Edit the URL in your browser address bar to replace
github.com with github.dev then hit
Enter.
Press the . key while viewing the contents of any file or
directory in your repository (including the repo home page).
After taking any of the steps above, the IDE interface will launch in
our browser tab. It can take a few moments to get started but then you
should find yourself in an IDE view of the repository.
The new interface will feel familiar to participants who are already
making frequent use of an IDE, especially VS Code. For those less
familair, a short tour of the interface:
The window is arranged in panels.
The main, central panel provides an editing view of the source files
you open, and can display a rendered preview of Markdown files. At
launch, this central panel will display a preview of the rendered
README.md.
To open such a Markdown preview, right-click on a .md
file in the sidebar and select “Open Preview”.
The left side of the screen includes a sidebar with a series of
icons to switch between different menus/tools in this sidebar. At
launch, the sidebar displays a file explorer tool, from which you can
open existing files for editing, create new directories and files, etc.
Other modes of that sidebar provide an interface to search, version
control, the extension marketplace for VS Code, GitHub, etc.
The bottom panel includes a console and a terminal interface. These
can be used to run shell commands and source code in the repository, see
the output/error messages, etc.
Paste the current contents of CITATION.cff into the box
and select Parse then Start Editing. For the purposes
of Citation File Format, our lesson repository is a
Dataset.
Adjust a few fields in this edit interface, e.g. Title of the
dataset, the author (use your own details or make some up), the
abstract, etc.
When you are done editing, select Copy to clipboard near
the top-right, and paste the new contents into your
CITATION.cff file (replacing the current content).
2. Link to the Lesson Citation page from README.md
Open your README.md for editing. (You cannot edit the
file from the preview that was opened by deault when we launched the IDE
interface.)
Add a new section heading at the bottom of the file,
e.g. ## Cite this Project
Add a link under that heading, pointing to the Acknowledgements
and Citations page of the lesson site. The URL to that page is
<base url of your lesson site>/citation.html.
3. Commit the changes and open a pull request
Open the version control interface in the left sidebar. The two
modified files are staged for commit by default, but we do not
want to commit the changes yet. We should first switch to a new
branch, so that we can open a pull request and get the changes reviewed
before they are merged.
Find main in the toolbar right at the bottom of the
screen. Select that part of the toolbar and choose Create new
branch from the dropdown that appears at the top of the window.
Enter a name for the new branch, e.g. citation-page.
Confirm that you want to switch to that new branch.
Now commit the changes in the version control sidebar. Write a short
commit message, e.g. “populated CFF and linked to citation page”, then
select Commit & Push.
Open a pull request to merge these changes into the
main branch. Select the three dots at the top-right of the
version control sidebar interface, then select Pull Request
-> Create Pull Request. Provide a title and description for
the PR then select Create Pull Request.
To return to GitHub’s standard repository web interace, select
GitHub from the very bottom-left of the window, then Go to
Repository from the dropdown that opens at the top of the window.
From here, you can find the newly-opened PR, review and merge it as
discussed earlier.
Codespaces: preview changes to your lesson in the browser
Repositories that contain a .devcontainer directory can
be launched in a codespace: a configured development
environment running inside a container, hosted on GitHub’s systems in
the cloud. That directory includes files that specify the configuration
of the codespace environment. (.devcontainer use is not
limited to Codespaces: the same directory can be used to setup an
equivalent environment for development in a local version of VS Code.)
Our lesson template includes a .devcontainer describing the
software required running The Carpentries Workbench, which means that we
can launch a Codespace running the lesson infrastructure in the
github.dev IDE.
From the home page of your lesson repository, select
Code -> Codespaces -> Create Codespace on
main. This will launch the github.dev interface again, but this
time in an environment that includes The Carpentries Workbench R
packages. The initial launch can take a few minutes to
complete.
Once the IDE has finished setting up, you will get a similar IDE
interface but with a console prompt starting with
rstudio@codespaces-. Typing R into that
console prompt and pressing Enter will launch an R
session.
In that R session, run the following commands to build the lesson
and launch a server to provide live previews of the lesson as we make
changes:
R
library(sandpaper)sandpaper::serve()
This lesson preview will appear in a new browser tab. The URL is
shareable, so you can use it to show your colleagues/co-maintainers how
some new version of the lesson would look after changes on your working
branch have been merged.
Let’s test it out! Make some changes to the index.md
of the lesson, or one of the episode source files. This will trigger a
rebuild of the relevant pages and, after a short time, the preview will
refresh, with the new changes visible.
This kind of live preview can be very helpful for source repositories
of GitHub Pages websites. A similar approach, with
.devcontainer and codespaces, can be valuable for software
projects as well: providing a fully configured development environment
for the software, with unit tests etc, dramatically reducing the barrier
for new contributors to engage with the project.
Caution
Codespaces can cost money!
It can cost you money to run these codespaces on GitHub’s systems: users
and organisations have quotas of free usage, which is tracked in
terms of time and storage space. Minor usage typically falls below the
limits of these quotas but if you do exceed them, you will either be
unable to keep using your codespaces until the next billing period
begins, or you will be charged for continued usage. We recommend that
you review the billing documentation linked above, and consider the
following advice:
Stop your codespaces when you are not using them.
Back in the standard web interface of your repository, select
Code -> Codespaces then use the three dot menu next
to a running Codespace. Choose Stop codespace when you have
finished working with the codespace.
Delete unused codespaces. If you do not expect to
need it again, select Auto-delete codespace so that a codespace
does not accrue storage costs after it has been stopped. You can view a
list of all codespaces for a repository by selecting Code ->
Codespaces -> three dot menu -> Manage
codespaces and clean up old Codespaces from that listing.
Discussion
Stop and delete your codespace
Following the steps described in the callout above, stop the
codespace you launched while following this episode, and select
Auto-delete codespace to ensure that it is not stored.
Key Points
The github.dev IDE is a more flexible interface for working with
repositories in the web browser.
The IDE interface can be helpful when you need to make substantial
changes to a repository but it is inconvenient or impossible to clone it
locally.
Changes can be staged and commited, and pull requests opened, from
the version control sidebar tab of the IDE interface.