Our lesson template is kept in the carpentries/styles repository. The styles
repository is carefully curated so that changes made to it are easily mergeable by downstream
lessons. The styles repository contains various bits that take Markdown files and render them as a
lesson web page. For more information on how to develop lessons and maintain them, see our
lesson-example. It will walk you through the basics of lesson design and how to
use GitHub, Markdown and Jekyll for lesson development. Follow the instructions below to make your
own empty lesson in your own GitHub account. Once you’ve done that you can just write Markdown code
and have lesson web pages just like the lesson-example and all of our other
lessons, but with your lesson content.
Requirements
- A GitHub account
- A working Python 3.4+ environment to run the lesson initialization script
- (Optional) A local install of bundler which will require the Ruby language to be installed.
Setup for local rendering of the lessons (optional)
Though not essential, it is desirable to be able to preview changes on your own machine before pushing them to GitHub.
In order to preview changes locally, you must install the software described below.
If you don’t install bundler as indicated in this section, you will not be able to preview the
lessons locally (in other words, you won’t be able to run make serve or make site).
However, you can still edit the files that make up the lessons. You will only be able to see the
changes once your edits have been merged in the main repository.
Windows
For Windows, there are two main ways to setup your system to be able to render the lessons.
- Option 1 relies on the Windows Subsystem for Linux (WSL). WSL allows you to run a Linux environment directly from Windows.
- Option 2 relies on using Windows built-in applications.
Option 1 - Using the Windows Subsystem for Linux (WSL)
If your version of Windows supports it, using the WSL will make the installation of the tools needed easier. Instructions to install Linux distributions from Windows 10/Windows Server are available from the Microsoft website.
Once you have installed a Linux distribution, you can follow the installation instructions for Linux listed below. If you install a distribution other than Ubuntu, you will need to adjust the commands that install the packages.
Option 2 - Using Windows built-in applications
With the instructions below, you’ll be able to preview websites for non-R based lessons. You’ll be able to do so from the Git Bash terminal or from the “Command Prompt with Ruby” that comes with the Ruby installation. You won’t be able to use the
makecommands as Make isn’t available from the Git Bash terminal (see the optional section below for more info).
Ruby, go to https://rubyinstaller.org/ choose Ruby+DevKit for your system (typically x64), and the most recent version available. During the installation process, choose to install the MSYS2 toolchain. On the last step of the installation screen, make sure that “Run ‘ridk install’” is checked. This will bring a terminal window with 3 options, press “Enter” (for the default installation). After this step completes, you’ll be prompted again, and press “Enter” again (for the default option). Once the installation is complete, restart your system.
Navigate to the folder that contains the lesson, and you can now use
bundle
  exec jekyll serve
from your Git Bash terminal to preview the lessons.Optional (but recommended)
With these instructions, you’ll be able to use the
makecommands and render all lessons including those that use R. However, you won’t be able to do so from the Git Bash terminal, but from the other terminals (Windows Powershell, cmd.exe, or the Command Prompt with Ruby).
In the File Explorer, right-click on “This PC” icon, and click on “Properties”. Click on “Advanced System Settings”, and click on the button “Environment Variables”. Click on the variable “Path”, and then the “Edit” button. Click on the “New” button and add
C:\Ruby26-x64\msys64\usr\binand click “OK”. Click “New” again and addC:\Ruby26-x64\binand click “OK” again. (use the File Explorer to make sure this is the correct path for your Ruby and MSYS2 installation). If you’re working on R-based lessons and R isn’t already listed there, you need to add it by addingC:\Program Files\R\R-3.x.x\bin(using the correct path and R version number for your installation).Open the “Command Prompt with Ruby” (if it was open before you edited the Path, close it and re-open it).
Regardless of the option you chose, go to the section For Everyone.
macOS
-
First make sure you have Homebrew installed
To install Homebrew, open the Homebrew website and copy/paste the first command on that page into your Terminal. You may also want to check the requirements first. The command for installing Homebrew will look something like:
/bin/bash -c "$(curl -fsSL https://raw.githubusercontent.com/Homebrew/install/HEAD/install.sh)"If you’re not sure whether you have brew installed, type
brew helpIf you have Homebrew installed, you should see something like:
Example usage: brew search [TEXT|/REGEX/] brew info [FORMULA...] brew install FORMULA... brew update brew upgrade [FORMULA...] brew uninstall FORMULA... brew list [FORMULA...] Troubleshooting: brew config brew doctor brew install --verbose --debug FORMULA Contributing: brew create [URL [--no-fetch]] brew edit [FORMULA...] Further help: brew commands brew help [COMMAND] man brew https://docs.brew.sh -
Ruby –
brew install ruby -
bundler –
gem install bundler --user-install -
Go to the section For Everyone
Linux (Ubuntu)
Currently, GitHub pages uses Jekyll 3.9.0 which is not compatible with version of Ruby >= 3. Previously, the version of Ruby that was provided by your system package manager were older than Ruby 3 and could be used. As more distributions are upgrading the version of Ruby they provide, it becomes more difficult to rely on the version of Ruby they provide. Instead, we recommend that you use rbenv (an utility that allows you to have and use different version of Ruby on your system) installed with homebrew. Using homebrew instead of compiling ruby from source with rbenv allievates complications with dependencies between your operating system and specific versions of Ruby.
-
Install Homebrew:
/bin/bash -c "$(curl -fsSL https://raw.githubusercontent.com/Homebrew/install/HEAD/install.sh)" -
Install rbenv and ruby-build using homebrew:
brew install rbenv ruby-build -
Set up rbenv:
rbenv init -
Install the Ruby version needed for the lessons:
rbenv install 2.7.3 -
Inside the directory for the lesson, check that you are using Ruby 2.7.3 by typing
rbenv
version
, if this commands does not return 2.7.3, type:rbenv local 2.7.3 rbenv shell 2.7.3 -
Install bundler with:
gem install bundlerYou should not need to use
sudoto install gems as they should get installed within your home directory. To check where the gems will be installed type:gem env homeThis command should show you a path to your home directory.
gemis the package management framework for Ruby. It was installed as part of Ruby in the step above.bundleris also a package manager but at the scale of a project instead of being system-wide. It makes it easier to manage dependencies. -
Clean up. To make sure that the gems installed are compatible with Ruby 2.7.3 and to avoid issues with other versions that you might have used in the past, run:
make clean
For Everyone
-
The GitHub Pages Ruby Gem
Make sure there is a
Gemfileat the root of your lesson repository. The content of this file should match theGemfilefound in the styles repository. -
Generate the lesson
Now you are ready to run jekyll to build your website and run a local server. To do this run:
make serveThere will be several lines of output after this. If there were errors or warnings you can use them to fix your lesson and run again if it failed. If it was successful the last few lines will include
Server address: http://127.0.0.1:4000andServer running... press ctrl-c to stop. You can see your rendered site by pointing your browser to the address shown.
For R-based lessons
You will need a recent version of R (>= 3.5.0). Installation instructions are available from the CRAN website.
We use the knitr, and remotes to format
lessons written in R Markdown and figure out needed packages to execute the code in the lesson. You
will need to install the remotes package to build R lessons (and this example lesson), the other
packages will be installed automatically during the rendering of the lesson. You can install this
package by opening an R terminal and typing:
install.packages('remotes', repos = 'https://cran.rstudio.com')
Troubleshooting
-
Check your version of Ruby:
ruby -vYou need Ruby 2.1.0 or later (currently GitHub pages uses Ruby 2.7.1). If you have an older version of Ruby, if possible upgrade your operating system to a more recent version. If it’s not possible, consider using rbenv.
rbenv install 2.7.1And then instructing
rbenvto use it in your lesson development process by executing the following command from your lesson directory:rbenv local 2.7.1 -
RubyGems is a tool which manages Ruby packages. It should have been installed along with Ruby and you can test your installation by running
gem --version -
If you want to run
bin/lesson_check.py(which is invoked bymake lesson-check) you will need the PyYAML module for Python 3.
Creating a New Lesson
We will assume that your user ID is timtomch and the name of your
new lesson is data-cleanup.
We recommend using the GitHub Importer whenever possible but sometimes users experience problems with the Importer failing to correctly import repositories. On previous occasions, the issue has been solved quite quickly so we recommend that you wait 24 hours before trying to import the repository again. If you can’t wait and are familiar with using Git on the command line, follow the alternative instructions below to set up your new repository. If using command line git is also not an option for you, please reach out to team@carpentries.org for help.
If you are looking to create a lesson intended for The Carpentries Incubator, there is a dedicated template and instructions included in the repository.
-
We’ll use the GitHub’s importer to make a copy of this repo in your own GitHub account. (Note: This is like a GitHub Fork, but not connected to the upstream changes)
-
Put the URL of the styles repository, that is https://github.com/carpentries/styles in the “Your old repository’s clone URL” box. Do not use the URL of this repository, as that will bring in a lot of example files you don’t actually want.
-
Select the owner for your new repository. In our example this is
timtomch, but it may instead be an organization you belong to. -
Choose a name for your lesson repository. In our example, this is
data-cleanup. -
Make sure the repository is public.
-
At this point, you should have a page like this:
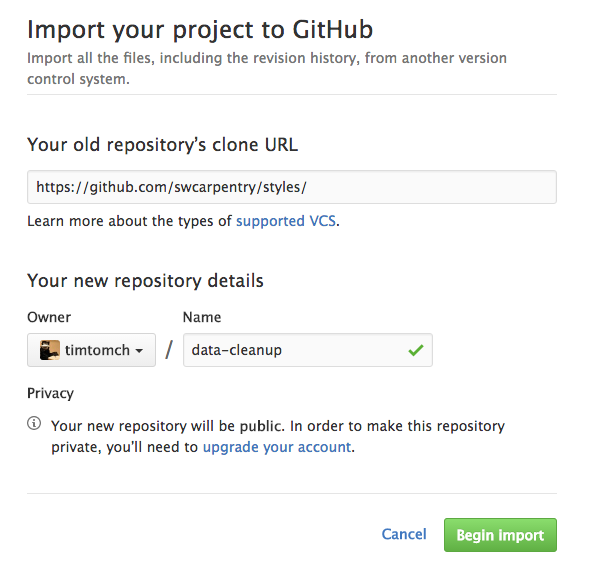
You can now click “Begin Import”. When the process is done, you can click “Continue to repository” to visit your newly-created repository.
-
If you want to work on the lesson from your local machine, you can now clone your newly-created repository to your computer:
$ git clone -b gh-pages https://github.com/timtomch/data-cleanup.gitNote that the URL for your lesson will have your username and chosen repository name.
-
Go into that directory using:
$ cd data-cleanupNote that the name of your directory should be what you named your lesson on the example this is
data-cleanup. -
To be able to pull upstream style changes, you should manually add the styles repository as a remote called
template:$ git remote add template https://github.com/carpentries/styles.gitThis will allow you to pull in changes made to the template, such as improvements to our CSS style files. (Note that the user name above is
carpentries, nottimtomch, since you are adding the master copy of the template as a remote.) -
Configure the
templateremote to not download tags:$ git config --local remote.template.tagOpt --no-tags -
Make sure you are using the
gh-pagesbranch of the lesson template:$ git checkout gh-pagesThis will ensure that you are using the most “stable” version of the template repository. Since it’s being actively maintained by the Software Carpentry community, you could end up using a development branch that contains experimental (and potentially not working) features without necessarily realising it. Switching to the
gh-branchensures you are using the “stable” version of the template. -
Run
bin/lesson_initialize.pyto create all of the boilerplate files that cannot be put into the styles repository (because they would trigger repeated merge conflicts). -
Create and edit files as explained further in the episodes of this lesson.
-
(requires Jekyll Setup from below) Preview the HTML pages for your lesson:
$ make serveAlternatively, you can try using Docker:
$ make docker-serve -
Commit your changes and push to the
gh-pagesbranch of your repository:$ cd data-cleanup $ git add changed-file.md $ git commit -m "Explanatory message" $ git push origin gh-pages
Creating a New Lesson using Git commands
If the GitHub Importer is failing, you can instead follow the instructions below that use Git commands to achieve the same result. We’ll use Git to make a copy of this repo in your own GitHub account. The effect is like a GitHub fork, but not connected to the upstream changes.
Create an empty repo on GitHub, using GitHub’s new repository tool to go to the the “Create new repository” page.
Select the owner for your new repository. In our example this is
timtomch, but it may instead be an organization you belong to.Choose a name for your lesson repository. In our example, this is
data-cleanup.Make sure the repository is public. Don’t initialize any files, i.e. leave boxes unchecked at the bottom of that page. Then, click on the green “Create repository” button to create the repository.
- Clone the the styles repository, that is https://github.com/carpentries/styles to a local directory called
data-cleanup, using a bash shell to run the command:$ git clone -b gh-pages https://github.com/carpentries/styles.git data-cleanupDo not use the URL of this repository (https://github.com/carpentries/lesson-example), as that will bring in a lot of example files you don’t actually want.
Go into your new local directory using:
$ cd data-cleanupNote that in this and the previous step, the name of your directory should be what you named your lesson; on the example this is
data-cleanup.Link the local directory you just created with the new Github repository you created,
$ git remote set-url origin https://github.com/timtomch/data-cleanup.git
$ git push origin gh-pages
Again, the name of the remote should be
<username>/<mylesson>, your username followed by what you named your lesson; on the example this istimtomch/data-cleanup. You can check that this has worked by refreshing the webpage fromstep 5, e.g.
https://github.com/timtomch/data-cleanup.To be able to pull upstream style changes, you should manually add the styles repository as a remote called
template:$ git remote add template https://github.com/carpentries/styles.gitThis will allow you to pull in changes made to the template, such as improvements to our CSS style files. (Note that the user name above is
carpentries, nottimtomch, since you are adding the master copy of the template as a remote.)Configure the
templateremote to not download tags:$ git config --local remote.template.tagOpt --no-tagsMake sure you are using the
gh-pagesbranch of the lesson template:$ git checkout gh-pagesThis will ensure that you are using the most “stable” version of the template repository. Since it’s being actively maintained by The Carpentries community, you could end up using a development branch that contains experimental (and potentially not working) features without necessarily realising it. Switching to the
gh-pagesbranch ensures you are using the “stable” version of the template.- Create all of the boilerplate files that cannot be put into the styles X repository (because they would trigger repeated merge conflicts), by running:
$ python bin/lesson_initialize.pyEdit
_config.ymlandindex.mdfor the lesson you are creating.Create and edit files as explained further in the episodes of this lesson.
(requires Jekyll Setup from above) Preview the HTML pages for your lesson:
$ make serveAlternatively, you can try using Docker:
$ make docker-serveCommit your changes and push to the
gh-pagesbranch of your repository:$ cd data-cleanup $ git add changed-file.md $ git commit -m "Explanatory message" $ git push origin gh-pages
Notes
-
SSH cloning (rather than the HTTPS cloning used above) will also work for those who have set up SSH keys with GitHub.
-
Once a lesson has been created, please submit changes for review as pull requests that contain Markdown files only.
-
Some people have had intermittent errors during the import process, possibly because of the network timing out. If you experience a problem, please re-try; if the problem persists, use the instructions above to import the repository manually using Git commands, otherwise, please get in touch.
Setup Instructions for a specific existing lesson
-
Installation instructions for core lessons are included in the workshop template’s home page, so that they are all in one place. The
setup.mdfiles of core lessons link to the appropriate sections of the workshop template page. -
Other lessons’
setup.mdinclude full installation instructions organized by OS (following the model of the workshop template home page).