Lesson Design
Overview
Teaching: min
Exercises: minQuestions
How do we design lessons?
Objectives
Visit our new curriculum development guide.
Key Points
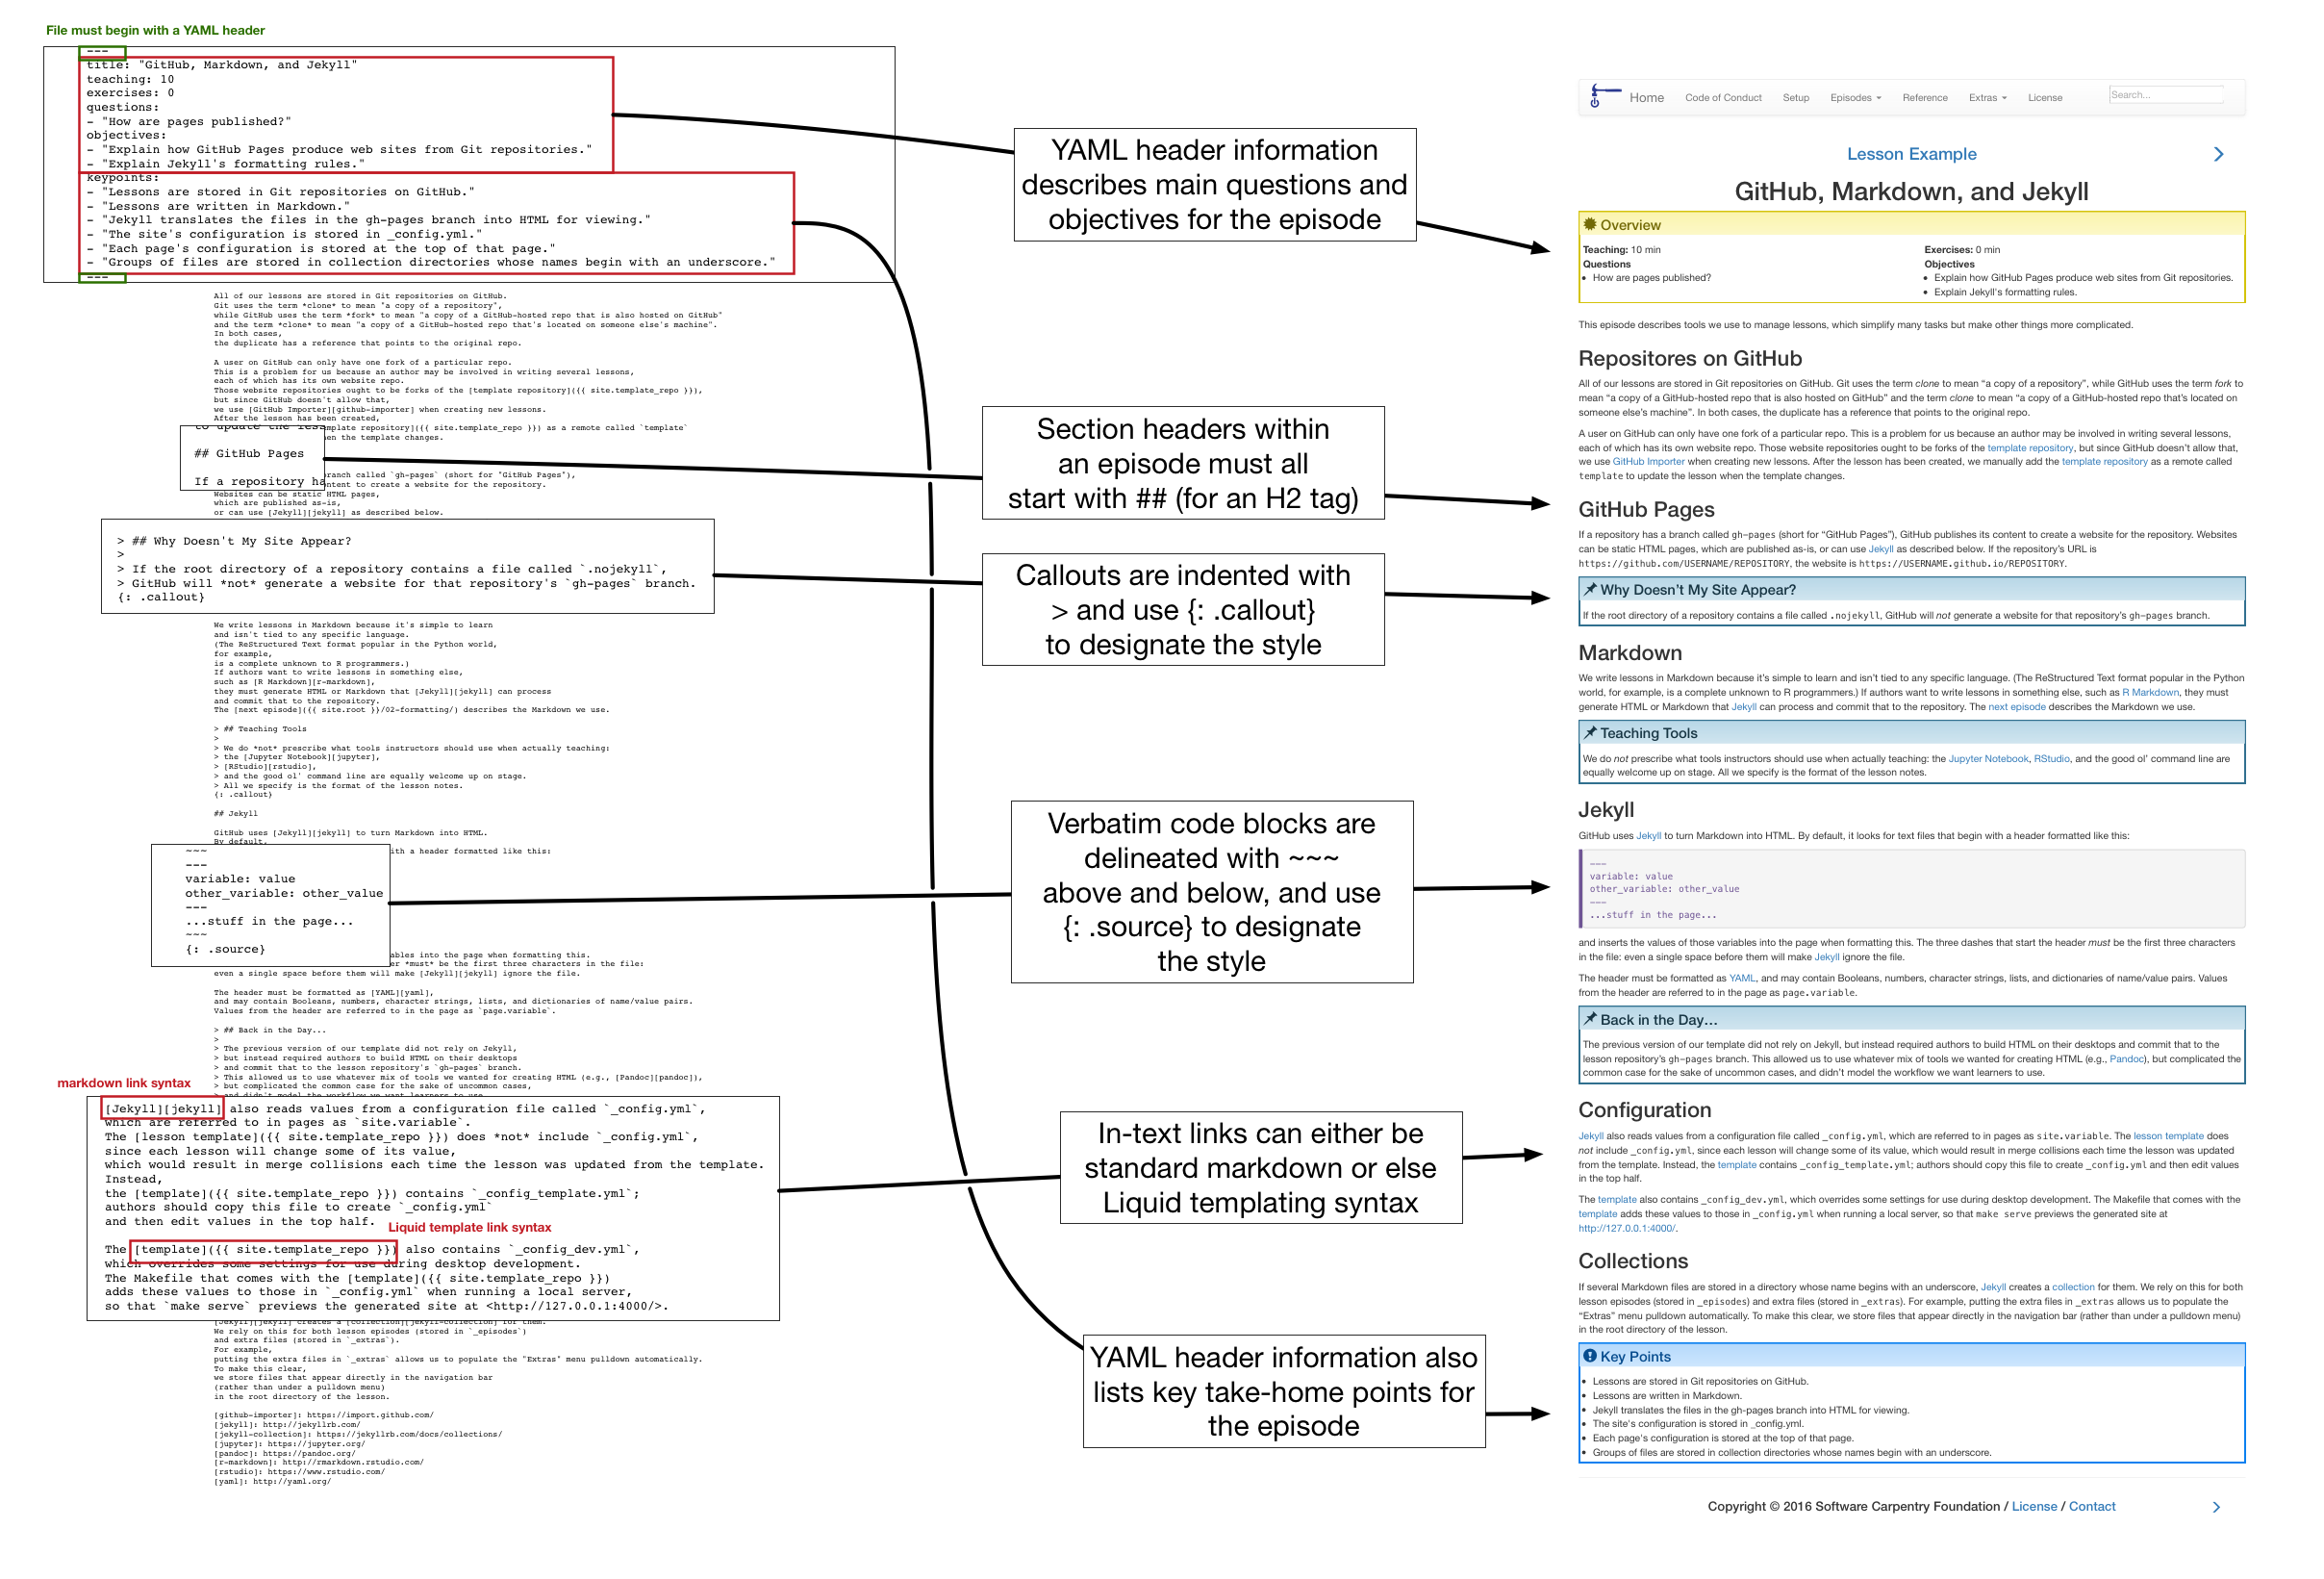
GitHub, Markdown, and Jekyll
Overview
Teaching: 10 min
Exercises: 0 minQuestions
How are pages published?
Objectives
Explain how GitHub Pages produce web sites from Git repositories.
Explain Jekyll’s formatting rules.
This episode describes the tools we use to build and manage lessons. These simplify many tasks, but make other things more complicated.
Background Resources
Find out more about setting up a lesson and contributing changes, including information on using GitHub.
Repositories on GitHub
Our lessons are stored in Git repositories (or “repos”) on GitHub. We use the term fork to mean “a copy of a GitHub-hosted repo that is also hosted on GitHub” and the term clone to mean “a copy of a GitHub-hosted repo that’s located on someone else’s machine”. In both cases, the duplicate has a reference that points to the original repo.
In an ideal world, we would put all of the common files used by our lessons (such as the CSS style files and the image files with project logos) in a template repo. The master copy of each lesson would be a fork of that repo, and each author’s working copy would be a fork of that master:

However, GitHub only allows a user to have one fork of any particular repo.
This creates a problem for us because an author may be involved in writing several lessons,
each with its own repo.
We therefore use GitHub Importer to create new lessons.
After the lesson has been created,
we manually add the template repository as a remote called template
to update the lesson when the template changes.

GitHub Pages
If a repository has a branch called gh-pages (short for “GitHub Pages”),
GitHub publishes its content to create a website for the repository.
If the repository’s URL is https://github.com/USERNAME/REPOSITORY,
the website is https://USERNAME.github.io/REPOSITORY.
GitHub Pages sites can include static HTML pages, which are published as-is, or they can use Jekyll as described below to compile HTML and/or Markdown pages with embedded directives to create the pages for display.
Why Doesn’t My Site Appear?
If the root directory of a repository contains a file called
.nojekyll, GitHub will not generate a website for that repository’sgh-pagesbranch.
We write lessons in Markdown because it’s simple to learn and isn’t tied to any specific language. (The ReStructured Text format popular in the Python world, for example, is a complete unknown to R programmers.) If authors want to write lessons in something else, such as R Markdown, they must generate HTML or Markdown that Jekyll can process and commit that to the repository. A later episode describes the Markdown we use.
Teaching Tools
We do not prescribe what tools instructors should use when actually teaching: the Jupyter Notebook, RStudio, and the good ol’ command line are equally welcome up on stage. All we specify is the format of the lesson notes.
Jekyll
GitHub uses Jekyll to turn Markdown into HTML. It looks for text files that begin with a header formatted like this:
---
variable: value
other_variable: other_value
---

...stuff in the page...
and inserts the values of those variables into the page when formatting it. The three dashes that start the header must be the first three characters in the file: even a single space before them will make Jekyll ignore the file.
The header’s content must be formatted as YAML,
and may contain Booleans, numbers, character strings, lists, and dictionaries of name/value pairs.
Values from the header are referred to in the page as page.variable.
For example,
this page:
---
name: Science
---
Today we are going to study {{page.name}}.
is translated into:
<html>
  <body>
    <p>Today we are going to study Science.</p>
  </body>
</html>
Back in the Day…
The previous version of our template did not rely on Jekyll, but instead required authors to build HTML on their desktops and commit that to the lesson repository’s
gh-pagesbranch. This allowed us to use whatever mix of tools we wanted for creating HTML (e.g., Pandoc), but complicated the common case for the sake of uncommon cases, and didn’t model the workflow we want learners to use.
Configuration
Jekyll also reads values from a configuration file called _config.yml,
which are referred to in pages as site.variable.
The lesson template does not include _config.yml,
since each lesson will change some of its value,
which would result in merge collisions each time the lesson was updated from the template.
Instead,
the template contains a script called bin/lesson_initialize.py
which should be run once to create an initial _config.yml file
(and a few other files as well).
The author should then edit the values in the top half of the file.
Collections
If several Markdown files are stored in a directory whose name begins with an underscore,
Jekyll creates a collection for them.
We rely on this for both lesson episodes (stored in _episodes)
and extra files (stored in _extras).
For example,
putting the extra files in _extras allows us to populate the “Extras” menu pulldown automatically.
To clarify what will appear where,
we store files that appear directly in the navigation bar
in the root directory of the lesson.
The next episode describes these files.
Key Points
Lessons are stored in Git repositories on GitHub.
Lessons are written in Markdown.
Jekyll translates the files in the gh-pages branch into HTML for viewing.
The site’s configuration is stored in _config.yml.
Each page’s configuration is stored at the top of that page.
Groups of files are stored in collection directories whose names begin with an underscore.
Lesson Organization
Overview
Teaching: 10 min
Exercises: 0 minQuestions
How are the files in a lesson organized?
Objectives
Explain overall organization of lesson files.
Each lesson is made up of episodes, which are focused on a particular topic and include time for both teaching and exercises. The episodes of this lesson explain the tools we use to create lessons and the formatting rules those lessons must follow.
Why “Episodes”?
We call the parts of lessons “episodes” because every other term (like “topic”) already has multiple meanings, and because it encourages us to think of breaking up our lessons into chunks that are about as long as a typical movie scene, which is better for learning than long blocks without interruption.
Our lessons need artwork, CSS style files, and a few bits of Javascript. We could load these from the web, but that would make offline authoring difficult. Instead, each lesson’s repository is self-contained.
The diagram below shows how source files and directories are laid out, and how they are mapped to destination files and directories:

Collections
As described earlier, files that appear as top-level items in the navigation menu are stored in the root directory. Files that appear under the “extras” menu are stored in the
_extrasdirectory, while lesson episodes are stored in the_episodesdirectory.
Helper Files
As is standard with Jekyll sites,
page layouts are stored in _layouts
and snippets of HTML included by these layouts are stored in _includes.
Each of these files includes a comment explaining its purpose.
Authors do not have to specify that episodes use the episode.html layout,
since that is set by the configuration file.
Pages that authors create should have the page layout unless specified otherwise below.
The assets directory contains the CSS, Javascript, fonts, and image files
used in the generated website.
Authors should not modify these.
Standard Files
When the lesson repository is first created,
the initial author should create a README.md file containing
a one-line explanation of the lesson’s purpose.
The lesson template provides the following files which should not be modified:
CONDUCT.md: the code of conduct.LICENSE.md: the lesson license.Makefile: commands for previewing the site, cleaning up junk, etc.
Starter Files
The bin/lesson_initialize.py script creates files that need to be customized for each lesson:
CONTRIBUTING.md- Contribution guidelines.
The
issuesandrepolinks at the bottom of the file must be changed to match the URLs of the lesson: look for uses ofFIXME. _config.yml- The Jekyll configuration file.
This must be edited so that its links and other settings are correct for this lesson.
carpentryshould be either “dc” (for Data Carpentry), “lc” (for Library Carpentry), “swc” (for Software Carpentry), “cp” (for Carpentries), or “incubator” (for lessons in The Carpentries Incubator).titleis the title of your lesson, e.g., “Defence Against the Dark Arts”.emailis the contact email address for the lesson.
CITATION- A plain text file explaining how to cite this lesson.
AUTHORS- A plain text file listing the names of the lesson’s authors.
index.md- The home page for the lesson.
- It must use the
lessonlayout. - It must not have a
titlefield in its YAML header. - It must open with a few paragraphs of explanatory text.
- That introduction must be followed by a single
.prereqblockquote detailing the lesson’s prerequisites. (Setup instructions appear separately.) - That must be followed by inclusion of
syllabus.html, which generates the syllabus for the lesson from the metadata in its episodes.
- It must use the
reference.md- A reference guide for the lesson.
The template will automatically generate a summary of the episodes’ key points.
- It must use the
referencelayout. - Its title must be
"Reference". - It should include a glossary, laid out as a description list.
- It may include other material as appropriate.
- It must use the
setup.md- Detailed setup instructions for the lesson.
Note that we usually divide setup instructions by platform,
e.g.,
include level-2 headings for Windows, macOS, and Linux
with instructions for each.
The workshop template
links to the setup instructions for core lessons.
- Its title must be
"Setup".. - It should include whatever setup instructions are required.
- Its title must be
_extras/about.md- General notes about this lesson. This page includes brief descriptions of The Carpentries, and is a good place to put institutional acknowledgments.
_extras/discussion.md- General discussion of the lesson contents for learners who wish to know more:
This page normally includes links to further reading
and/or brief discussion of more advanced topics.
- Its title must be
"Discussion". - It may include whatever content the author thinks appropriate.
- Its title must be
_extra/figures.mdand_includes/all_figures.html- Does nothing but include
_includes/all_figures.html, which is (re)generated bymake lesson-figures. This page displays all the images referenced by all of the episodes, in order, so that instructors can scroll through them while teaching. _extras/guide.md- The instructors’ guide for the lesson.
This page records tips and warnings from people who have taught the lesson.
- Its title must be
"Instructors' Guide". - It may include whatever content the author thinks appropriate.
- Its title must be
Figures
All figures related with the lesson must be placed inside the directory fig at the root of
the project.
RMarkdown
Episodes may also be written with RMarkdown.
Save RMarkdown episode files with the extension .Rmd in the _episodes_rmd directory.
These will be converted to Markdown files when the lesson site is built.
The resulting .md files will be saved to the _episodes directory,
where they will form part of the Episodes collection.
See the Using RMarkdown episode for more information about writing lessons with RMarkdown.
Episode Order
By default, the order of Episodes and Extras in the lesson is determined by
the name of the file,
e.g. an episode with the filename 01-introduction.md appears before
a lesson with the filename 02-cheese-rolling.md.
To override this default ordering,
define the episode_order and/or extras_order parameters in _config.yml.
The value of these parameters should be an array of filenames
with the extension removed, e.g.
episode_order:
    - introduction
    - first_steps
    - running
    - jumping
    - gymnastics
    - olympics
    - conclusion
Some lesson developers have found this useful when using the lesson template to
create more modular material and/or when working with material in the early
stages of development that is likely to be added to and reorganised.
Any files in the relevant collection folder (e.g. _episodes) not included in
the array will be omitted from the lesson navigation (but will still be built).
Ordering RMarkdown Episodes
Regardless of whether
episode_orderhas been defined in_config.ymlto determine the order that episodes appear in the lesson site, episodes written in RMarkdown will always be executed and converted to Markdown in alphabetical order. If a lesson contains multiple episodes in RMarkdown and these episodes depend on each other e.g. variables created in one episode are used in another, care should be taken to ensure these episodes are executed in the correct order. In these cases, it is recommended to adopt a numeric naming system for episode files e.g.01-getting-started.Rmd,02-loading-data.Rmdetc.
Key Points
Auxiliary files are stored in the _layouts, _includes, and assets directories.
The code of conduct, license, Makefile, and contribution guidelines should not be modified.
The README, authors’ list, and citation instructions must be updated for each lesson.
The home page, reference guide, setup instructions, discussion page, and instructors’ guide must be updated for each lesson.
The Makefile stores commonly-used commands.
Formatting
Overview
Teaching: 10 min
Exercises: 0 minQuestions
How are The Carpentries lessons formatted?
Objectives
Explain the header of each episode.
Explain the overall structure of each episode.
Explain why blockquotes are used to format parts of episodes.
Explain the use of code blocks in episodes.
A lesson consists of one or more episodes, each of which has:
- a YAML header containing required values
- some teachable content
- some exercises
The diagram below shows the internal structure of a single episode file (click on the image to see a larger version):
Maximum Line Length
Limit all lines to a maximum of 100 characters.
bin/lesson_check.py will report lines longer than 100 characters
and this can block your contributions of being accepted.
The two reasons behind the decision to enforce a maximum line length are (1) make diff and merge easier in the command line and other user interfaces and (2) make update of translation of the lessons easier.
Locations and Names
Episode files are stored in _episodes
or, for the case of R Markdown files, _episodes_rmd
so that Jekyll will create a collection for them.
Episodes are named dd-subject.md,
where dd is a two-digit sequence number (with a leading 0)
and subject is a one- or two-word identifier.
For example,
the first three episodes of this example lesson are
_episodes/01-design.md,
_episodes/02-tooling.md
and _episodes/03-formatting.md.
These become /01-design/index.html, /02-tooling/index.html, and /03-formatting/index.html
in the published site.
When referring to other episodes, use:
[link text]({{ page.root }}{% link _episodes/dd-subject.md %})
i.e., use Jekyll’s link tag and the name of the file.
Episode Header
Each episode’s YAML header must contain:
- the episode’s title
- time estimates for teaching and exercises
- motivating questions
- lesson objectives
- a summary of key points
These values are stored in the header so that Jekyll will read them
and make them accessible in other pages as site.episodes.the_episode.key,
where the_episode is the particular episode
and key is the key in the YAML header.
This lets us do things like
list each episode’s key questions in the syllabus on the lesson home page.
Episode Structure
The episode layout template in _layouts/episode.html automatically creates
an introductory block that summarizes the lesson’s teaching time,
exercise time,
key questions,
and objectives.
It also automatically creates a closing block that lists its key points.
In between,
authors should use only:
- paragraphs
- images
- tables
- ordered and unordered lists
- code samples (described below).
- special blockquotes (described below)
Authors should not use:
- sub-titles (instead, use H2 subheadings (
##) in the episode files) - HTML layout (e.g.,
divelements).
Linking section IDs
In the HTML output each header of a section, code sample, exercise will be associated with an unique ID (the rules of the ID generation are given in kramdown documentation, but it is easier to look for them directly in the page sources). These IDs can be used to easily link to the section by attaching the hash (
#) followed by the ID to the page’s URL (like this). For example, the instructor might copy the link to the etherpad, so that the lesson opens in learners’ web browser directly at the right spot.
Formatting Code
Inline code fragments are formatted using backticks (`).
Longer code blocks are formatted by opening and closing the block with ~~~ (three tildes),
with a class specifier after the block:
~~~
for thing in collection:
    do_something
~~~
{: .source}
which is rendered as:
for thing in collection:
    do_something
The class specified at the bottom using an opening curly brace and colon, the class identifier with a leading dot, and a closing curly brace. The template provides three styles for code blocks:
.source: program source.
.output: program output.
.error: error messages.
Syntax Highlighting
The following styles like .source, but include syntax highlighting for the
specified language.
Please use them where possible to indicate the type of source being displayed,
and to make code easier to read.
.language-bash: Bash shell commands:
echo "Hello World"
.language-html: HTML source:
<html>
<body>
<em>Hello World</em>
</body>
</html>
.language-make: Makefiles:
all:
    g++ main.cpp hello.cpp -o hello
.language-matlab: MATLAB source:
disp('Hello, world!')
.language-python: Python source:
print("Hello World")
.language-r: R source:
cat("Hello World")
.language-sql: SQL source:
CREATE PROCEDURE HelloWorld AS
PRINT 'Hello, world!'
RETURN (0)
Alternative Syntax highlighting
The majority of our lessons that use styles will have the three tilde syntax, but this is a historical artifact and not commonly used outside of kramdown. You can specify a code block by using three backticks followed by the class instead of the syntax above.
```html
<html>
<body>
<em>Hello World</em>
</body>
</html>
```
<html> <body> <em>Hello World</em> </body> </html>NOTE: this syntax will not work for error, output, or warning code blocks.
Historical Artifacts
This code block syntax with three tildes followed by an inline attribute list is a departure from the original markdown syntax. You may be wondering why Carpentries lessons used this syntax in the first place if it was so different from original markdown.
At the time this guide was originally written, Lessons in The Carpentries were using Jekyll with kramdown to render Markdown to HTML and back then, kramdown did not recognise three backticks as code blocks.
Highlighting for other languages
You may use other
language-*classes to activate syntax highlighting for other languages. For example,~~~ title: "YAML Highlighting Example" description: "This is an example of syntax highlighting for YAML." array_values: - value_1 - value_2 ~~~ {: .language-yaml }will produce this:
title: "YAML Highlighting Example"
description: "This is an example of syntax highlighting for YAML."
array_values:
    - value_1
    - value_2
Note that using
.language-*classes other than.language-bash.language-html,.language-make,.language-matlab,.language-python,.language-r, or.language-sqlwill currently cause one of the tests in the lesson template’smake lesson-checkto fail for your lesson, but will not prevent lesson pages from building and rendering correctly.
Special Blockquotes
We use blockquotes to group headings and text
rather than wrapping them in div elements.
in order to avoid confusing Jekyll’s parser
(which sometimes has trouble with Markdown inside HTML).
Each special blockquote must begin with a level-2 header,
but may contain anything after that.
For example,
a callout is formatted like this:
> ## Callout Title
>
> text
> text
> text
>
> ~~~
> code
> ~~~
> {: .source}
{: .callout}
(Note the empty lines within the blockquote after the title and before the code block.) This is rendered as:
Callout Title
text text text
code
The lesson template defines styles for the following special blockquotes:
.calloutAn aside or other comment.
.challengeAn exercise.
.checklistChecklists.
.discussionDiscussion questions.
.keypointsKey points of an episode.
.objectivesEpisode objectives.
.prereqPrerequisites.
.solutionExercise solution.
.testimonialA laudatory quote from a user.
.cautionA warning.
Note that .challenge and .discussion have the same color but different icons.
Note also that one other class, .quotation,
is used to mark actual quotations
(the original purpose of the blockquote element).
This does not add any styling,
but is used to prevent the checking tools from complaining about a missing class.
Most authors will only use .callout, .challenge, and .prereq,
as the others are automatically generated by the template.
Note that .prereq is meant for describing things
that learners should know before starting this lesson;
setup instructions do not have a particular style,
but are instead put on the setup.md page.
Note also that solutions are nested inside exercises as shown below:
> ## Challenge Title
>
> This is the body of the challenge.
>
> ~~~
> it may include some code
> ~~~
> {: .source}
>
> > ## Solution
> >
> > This is the body of the solution.
> >
> > ~~~
> > it may also include some code
> > ~~~
> > {: .output}
> {: .solution}
{: .challenge}
The double indentation is annoying to edit, but the alternatives we considered and discarded are worse:
-
Use HTML
<div>elements for the challenges. Most people dislike mixing HTML and Markdown, and experience shows that it’s all too easy to confuse Jekyll’s Markdown parser. -
Put solutions immediately after challenges rather than inside them. This is simpler to edit, but clutters up the page and makes it harder for tools to tell which solutions belong to which exercises.
Applying a Shadow to Images
By default, images in the lesson are displayed without borders or shadows.
In some circumstances, it may be desirable to make images stand out
from the background of the page,
for example, when using screenshots that include text on white background.
You can add a drop shadow effect to images by applying the
image-with-shadow class to them:
{: .image-with-shadow }
Key Points
Lesson episodes are stored in _episodes/dd-subject.md.
Each episode’s title must include a title, time estimates, motivating questions, lesson objectives, and key points.
Episodes should not use sub-titles or HTML layout.
Code blocks can have the source, regular output, or error class.
Special sections are formatted as blockquotes that open with a level-2 header and close with a class identifier.
Special sections may be callouts or challenges; other styles are used by the template itself.
Using RMarkdown
Overview
Teaching: 10 min
Exercises: 2 minQuestions
How do I write a lesson using RMarkdown?
Objectives
Explain how to use RMarkdown with the new lesson template.
Demonstrate how to include pieces of code, figures, and challenges.
This episode demonstrates all the features that can be used when writing a lesson in RMarkdown.
When rendering a lesson written in RMarkdown, the lesson template does two things:
- It identifies the dependencies (the R packages) that your lesson uses and installs them in your library.
- It converts the RMarkdown files (the files in the
.Rmdextension in the_episodes_rmdfolder) into Markdown files in the_episodesfolder.
Depending on whether it uses the remote theme (most lessons in the
Carpentries Incubator, and most R-based Data Carpentry lessons) or the theme
from the styles repository, the details of how the site is created differ. In
practice, little changes for you unless you want to host a functioning version
of the site as a fork. The section “Hosting a fork” below provides more
information.
Structure of a RMarkdown file in the _episodes_rmd folder
Our template requires that the YAML header of your RMarkdown file includes the
source: Rmd in addition of the other entries that are expected. For instance, the YAML header for
this episode is:
---
source: Rmd
title: "Using RMarkdown"
teaching: 10
exercises: 2
questions:
- "How to write a lesson using RMarkdown?"
objectives:
- "Explain how to use RMarkdown with the new lesson template."
- "Demonstrate how to include pieces of code, figures, and challenges."
keypoints:
- "Edit the .Rmd files not the .md files"
- "Run `make serve` to knit documents and preview lesson website locally"
---
RMarkdown episode files should include an extra source field in the page
front matter, telling the lesson template to point to the RMarkdown file
in the source repository, instead of the knitted Markdown equivalent:
---
source: Rmd
title: Episode Title
[...]
Every episode written in RMarkdown must include the block below at the beginning of the page body i.e. after the page front matter.
```{r, include=FALSE}
source("../bin/chunk-options.R")
knitr_fig_path("05-")
```
The first line ensures that the chunks have the correct styling in the rendered website. The second line is optional but allows you to ensure that figures that are generated by the lessons will have the same prefix for each episode (you should use a different prefix for each episode using the episode number for instance).
The rest of the lesson should be written as a normal RMarkdown file. You can include chunks for codes, just like you would normally do. Output of code chunks will be generated as part of the knitting process.
Normal output:
```{r}
1 + 1
```
will be rendered as
1 + 1
[1] 2
Output with error message:
```{r}
x[10]
```
will be rendered as
x[10]
Error: object 'x' not found
Similarly, any figures generated by code chunks will be embedded below the chunk in the page:
```{r plot-example, fig.cap="An example figure plotting carat of diamonds against their price, with the colour of the data points based on the cut of the diamond."}
library(ggplot2)
ggplot(diamonds, aes(x = carat,  y = price, color = cut)) +
    geom_point()
```
will be rendered as
library(ggplot2)
ggplot(diamonds, aes(x = carat,  y = price, color = cut)) +
    geom_point()
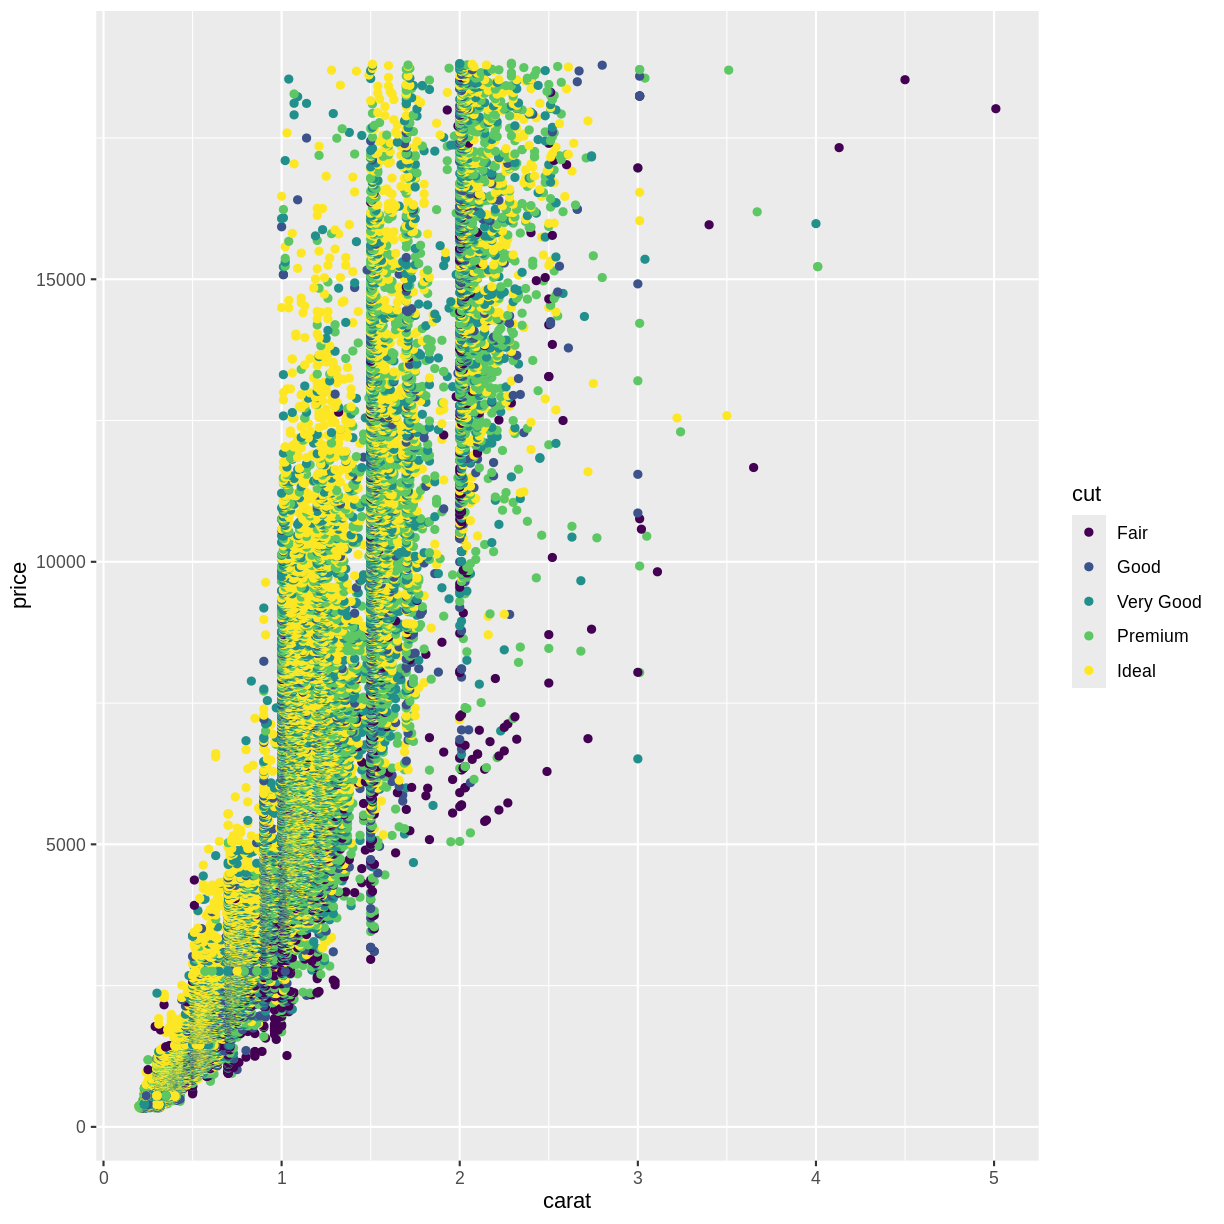
An example figure plotting carat of diamonds against their price, with the colour of the data points based on the cut of the diamond.
The alternative text for these embedded images will be the same as
the figure caption specified with the fig.cap parameter.
If you would like the value of the figure’s alternative text to be different to
its caption, you can specify the fig.alt parameter on the code chunk too.
If you do not specify fig.cap or fig.alt, the figure will be given generic
alternative text, which may reduce the accessibility of your lesson
e.g. by providing less information to learners using screen readers.
For the challenges and their solutions, you need to pay attention to where the
> go and where to leave blank lines. You can include code chunks in both the
instructions and solutions. For instance this:
> ## Challenge: Can you do it?
>
> What is the output of this command?
>
> ```{r, eval=FALSE}
> paste("This", "new", "template", "looks", "good")
> ```
>
> > ## Solution
> >
> > ```{r, echo=FALSE}
> > paste("This", "new", "template", "looks", "good")
> > ```
> {: .solution}
{: .challenge}
will generate this:
Challenge: Can you do it?
What is the output of this command?
paste("This", "new", "template", "looks", "good")Solution
[1] "This new template looks good"
On Branch Names and Automation
For lessons that do not use R, the code included in the lessons is not evaluated. Each time a new commit is pushed to the repository, GitHub can take these files and directly render their content using Jekyll to create the lesson website. Because it is a one-step process, we can use the same branch (
gh-pages) to develop the lesson and render its content as a website. However, for R-based lessons, we first need to convert the RMarkdown to Markdown, and then, we need to instruct GitHub to generate the lesson website from the rendered Markdown files. Because of this two-step process, we use two branches: one is used to develop the content of the lesson (typicallymain) and the other is only used to host the files that will generate the lesson website (gh-pages). To automatically convert the files from RMarkdown to Markdown, and push these Markdown files to GitHub, we rely on a GitHub Actions workflow (typically in the.github/workflows/website.ymlfile in the lesson repository).
Key Points
Edit the .Rmd files not the .md files
Run
make serveto knit documents and preview lesson website locally
Style Guide
Overview
Teaching: 10 min
Exercises: 0 minQuestions
What style should be used for Carpentries lessons?
How are keyboard key combinations written?
How are short spans of code written?
Objectives
Explain keyboard key combination.
Locate documentation for general matters of style in The Carpentries.
Identify uses of the span of code Markdown feature.
This episode contains lesson-specifc style guidance and related implementation details related to The Carpentries lesson template. For more general matters of style, see the The Carpentries Style Guide.
Emphasis
Markdown treats asterisks (*) indicators of emphasis, and renders text marked up like this in italics. We use emphasis
-
to highlight a word, phrase, or character where it is itself the object of discussion.
For example,
We want to output the lines that do not contain the word *the*.This is preferable instead of the use of quotation marks.
See the “Keyboard Key” section for characters or keyboard keys that the learn should type.
- for words and phrases that are still regarded as unfamiliar.
-
for titles of books, periodicals, plays, films, TV, radio series, and music albums.
For example,
We will use a file that contains three haikus taken from a 1998 competition in *Salon* magazine.
Strong Emphasis
Markdown treats double asterisks (**) as indicators of strong emphasis, and renders text marked up like this in boldface. We use strong emphasis
-
to highlight a newly introduced term, often one that is going to be defined or explained. For example,
We are all familiar with **graphical user interfaces**
Span of Code
Markdown treats backtick quotes (`) as indicators of a span of code. We use span of code
-
to highlight part of some code where it is itself the object of discussion.
For example,
For example, `range(3, 10, 2)` produces -
to highlight one command where it is itself the object of discussion.
For example,
you can run it by opening a terminal and typing `bash`.When the object of discussion is the program or language in a broad sense, we don’t use span of code. For example,
The most popular Unix shell is Bash. -
to highlight one function where it is itself the object of discussion.
For example,
`len` is much faster than any function we could write ourselves. -
to highlight one file name where it is itself the object of discussion.
For example,
`my_file.txt` can also be viewed in your GUI file explorer. -
to highlight any sequence of character that the user is expected to type.
Keyboard Key
When making reference to a keyboard key that the reader should press
the HTML tag <kbd> must be used to enclose the key label.
For example, “to delete the cell press D” should be written as
to delete the cell press <kbd>D</kbd>
The table below covers most of the keyboard key labels.
| Keyboard key | Style Note | Example |
|---|---|---|
| Letters | Always capital. | <kbd>A</kbd> |
| Numbers | <kbd>1</kbd> |
|
| Punctuation mark | <kbd>*</kbd> |
|
| Function | Capital F followed by the number. | <kbd>F12</kbd> |
| Alt | Only first letter capital. | <kbd>Alt</kbd> |
| Backspace | Only first letter capital. | <kbd>Backspace</kbd> |
| Command | Only first letter capital. | <kbd>Command</kbd> |
| Ctrl | Only first letter capital. | <kbd>Ctrl</kbd> |
| Delete | Only first letter capital. | <kbd>Delete</kbd> |
| End | Only first letter capital. | <kbd>End</kbd> |
| Esc | Only first letter capital. | <kbd>Esc</kbd> |
| Home | Only first letter capital. | <kbd>Home</kbd> |
| Insert | Only first letter capital. | <kbd>Insert</kbd> |
| Page Down | Use “PgDn”. | <kbd>PgDn</kbd> |
| Page Up | Use “PgUp”. | <kbd>PgUp</kbd> |
| Print Screen | Use “PrtScr”. | <kbd>PrtScr</kbd> |
| Return | Only first letter capital. We use “Return” instead of “Enter”. | <kbd>Return</kbd> |
| Shift | Only first letter capital. | <kbd>Shift</kbd> |
| Spacebar | Only first letter capital. | <kbd>Spacebar</kbd> |
| Tab | Only first letter capital. | <kbd>Tab</kbd> |
| Down arrow | Use Unicode “Downwards arrow” (8595). | <kbd>↓</kbd> |
| Left arrow | Use Unicode “Leftwards arrow” (8592). | <kbd>←</kbd> |
| Right arrow | Use Unicode “Rightwards arrow” (8594). | <kbd>→</kbd> |
| Up arrow | Use Unicode “Upwards arrow” (8593). | <kbd>↑</kbd> |
Keyboard Key Combination
When making reference to a keyboard key combination that the reader should press, insert a plus sign without space between each one of the keys. For example, “press Ctrl+X to quit nano” should be written as:
press <kbd>Ctrl</kbd>+<kbd>X</kbd> to quit nano.
Links
Please label links with meaningful texts, in order to improve
accessibility. Please avoid
click here or similar.
Menu Items
Use double quotes for menu and submenu items. For multiple menu and submenu options in a sequence, use the right angle bracket or greater than sign.
e.g.:
“Help” > “Check for updates”
Title Casing
Lesson and episode titles should be written in title case e.g.
Saving the World, One Commit at a Time
An exception should be made where the title includes the name of a tool/library/command that must be typed in lower case when used, e.g.
Data Visualisation with
matplotlib
(In HTML files, such as the workshop schedule and syllabus files in the
workshop webpage template,
tool/command/library names such as matplotlib in the example above can be correctly formatted
using <code></code> tags.)
Key Points
The Carpentries Handbook contains a style guide.
Keyboard actions are described using the
<kbd>HTML tag.A backtick (`) indicates a span of code and is used to enclose code excerpts, segments of text to type, and filenames within in narrative text.
Checking and Previewing
Overview
Teaching: 5 min
Exercises: 0 minQuestions
How can lesson formatting be checked?
How can lessons be previewed?
Objectives
Run the lesson checking script and interpret its output correctly.
Preview a lesson locally.
The lesson template comes with several utilities to simplify lesson development and maintenance.
Checking
The template includes a Python program to check
whether lesson files conform to our template.
You can run this using make lesson-check,
which in turn invokes bin/markdown_ast.rb to parse Markdown files
and bin/lesson_check.py to check their structure.
The former is written in Ruby,
and uses Jekyll’s own Markdown parser (called Kramdown)
so that we are guaranteed to be checking the same dialect of Markdown that Jekyll uses on GitHub.
The latter is written in Python 3,
and executes all of the checks.
The template also includes bin/repo_check.py,
which can be invoked by running make repo-check.
This program looks in _config.yml to find the repository’s URL,
then checks that the repository has the right labels set up for issues and pull requests.
Other checks will be added as time goes by.
Previewing
Jekyll can be used in two ways:
to compile source files into HTML pages in the _site directory,
or to do that and also run a small web server at http://0.0.0.0:4000/
so that the pages can be previewed.
We recommend using the latter,
since it gives a more accurate impression of what your lesson will actually look like.
The Makefile in the root directory of the project contains commands for building the site.
make site builds files but does not run a server,
while make serve builds the files and runs a server.
(It also re-builds the site whenever it notices changes in the source files.)
Run make on its own to get a full list of commands.
In order to use Jekyll and/or the checking script, you may need to install it and some other software. The setup instructions explain what you need and how to get it.
Mind the Gap!
If you accept a pull request that looks okay locally, it is often a good idea to double-check that the contents of the pull request render well on the live lesson. One example is from issue #850 in swcarpentry/git-novice: images links that are incorrectly formatted as
[alt text](/fig/img.png)would show up correct locally, but would ultimately fail online.
Key Points
Lessons are checked by running
make lesson-check.The checker uses the same Markdown parser as Jekyll.
Lessons can be previewed by running
make serve.
Coffee Break
Overview
Teaching: min
Exercises: minQuestions
Objectives
Use the break layout for placeholder episodes representing coffee breaks and lunches.
These episodes do not have exercises, questions, objectives, or keypoints in their metadata,
but must have a “break” field to show how long the break is (in minutes).
Key Points