Instructor Notes
Table of Contents
- I. Information For and About Instructor Trainers
- II. Running an Instructor Training Event (General)
- III. Online vs In Person Training Events
- IV. Using Zoom for Online Trainings
- V. Curriculum Teaching Tips
I. Information For and About Instructor Trainers
Details about the Instructor Trainer role including the application process, duties, meetings, and administrative instructions are now housed in the Carpentries Handbook. To the extent that information in those instructions is directly pertinent to teaching an Instructor Training workshop, some items may be duplicated here. All other information previously housed on this page may now be found in the handbook. Instructions on running a Demo session are also provided in the Trainer Guide.
II. Running an Instructor Training Event (General)
Four Weeks before the Event
- Contact your co-Trainer(s) to plan how you will co-teach. Suggested
discussion questions include:
- Are all Trainers able to be present throughout the event? If someone needs to step away, you can request a backup co-Trainer during that time if you wish.
- What are some useful tips and tricks to organise yourself, pace yourself, share resources, etc. while teaching?
- How do you ensure that all trainees stay engaged and participate?
- How can Trainers help each other (at times when we are not the active Trainer)? How should we communicate with each other during the training?
- How can we address trainee challenges? These may include internet connectivity problems, distractions caused by working from home, etc.
- Create an event Etherpad using the Etherpad template). (Google Doc template may not be maintained)
- Send Etherpad/Google Doc links to instructor.training@carpentries.org.
- Consider forking the Instructor Training curriculum and doing all of your preparation work based on your fork so that any changes do not impact your preparation.
One Week before the Event
- Plan logistics with co-Trainer(s)
- Review your teaching schedule.
- Review (or set aside time closer to the event to review) the pre-assessment survey results for your workshop
- For online events:
- Test videoconferencing set up using login credentials provided.
- Make a copy of the Virtual Minute Cards template and personalise for your event.
- Plan how you will have trainees watch videos. If you plan to play them on zoom, familiarise yourself with audio settings and consider an ad management strategy.
- For in-person events:
- Confirm that breakout rooms are available or make an alternate plan
- Determine who will bring paper (if needed for concept mapping) and sticky notes (for minute cards & demonstration).
- Make sure you are prepared for the audiovisual setup in your room with the correct dongles/connectors etc.
- Check on availability/timing of breaks, lunch, etc.
- Familiarise yourself with the room, building, and accessibility resources as possible.
During the event
- Take attendance. When marking trainees absent due to missed time, be sure to add notes describing what time was missed.
- Monitor the Etherpad / Google Doc for questions and responses to exercises.
- For online events, ensure that you are logged into the Zoom room with the host key so that you can mute participants and create breakout rooms as needed.
- For self-organised training events, it may be necessary to remind trainees to fill out the application.
Immediately after the event
- Double check that your attendance sheet is complete. For self-organised events, email instructor.training@carpentries.org to be sure we have your attendance record.
- If you wish, you can an email to trainees thanking them for participating.
- Review survey results and prepare to discuss at upcoming Trainers discussion meeting.
- File any relevant issues or PRs to the instructor training repo.
Long-term after the event
- Join a Trainer
discussion meeting to share details about your event with other
Trainers. Consider:
- What instructional choices did you make for this event, and why?
- Did anything happen that would be interesting or useful for other Trainers to know or think about?
- What activities worked well? Where were the rough patches?
- Is there anything you would do differently next time?
Using Slides
Whether or not slides should be used during instructor training is a subject of frequent discussion.
The main advantage is that slides provide a visual aid when explaining complex concepts or when presenting learning objectives and challenges. The most notable disadvantage is that it can give the false impression that it is okay to use slides rather than live coding in SWC/DC/LC workshops For online instructor training events, there are two additional risks: the slides may fail to advance using Zoom’s screen share feature and you risk losing the audience’s attention because your face is less prominent.
If you chose to use slides in your workshop, this Google Drive folder contains slides with diagrams, cartoons, and text that trainers have used past workshops. Feel free to reuse the existing materials or add your own slides.
Using Etherpad
Each workshop will have an Etherpad. You can use the Instructor Training Etherpad template to quickly copy and paste challenges or useful information into your Etherpad.
Given the central role that Etherpad plays is running Carpentry workshops, you may want to take a minute to explain how to create a pad, what pads can be used for, and how long pads stick around. You may also want to point attendees to the “pad of pads”.
General Preparation
- Have water and cough drops nearby.
- Decide ahead of time if you will be using google docs or an Etherpad.
- Most people like or enjoy this training.
- There is no such thing as “too much coffee” or “too many donuts”
Using helpers/Co-Instructors
If you have a helper for the training, or want to involve your co-instructor more, here are some ways where it is easy to do so without much prep:
- give an example of a mental model in “Building Skill with Practice”
- tell a motivational/demotivational story in “Motivation and Demotivation”
- help collect 1-up, 1-down feedback by either writing or directing the participants
- find + talk about a good (or bad) learning objective in “Preparing to Teach”
- have this person monitor the chat (if online) and answer questions, catch “hands”
Episode order
Experience has shown that the current order of episodes works quite well. If you are a new Trainer, we recommend following the official order, however, the material is flexible enough to allow small shifts in episode order. If you are an experienced Trainer and you would like to re-arrange the schedule, make sure to communicate with your trainees and co-Trainers!
III. Online vs In Person Training Events
In-person trainings
- When watching videos, project them to the whole group.
- Assign (or let participants select) physical breakout groups.
- Use physical sticky notes to get minute card feedback at lunch breaks and end of each day.
Online trainings (a few small groups)
- When watching videos, have one Trainer do a screenshare with their audio on or have one person in each group play the video for the participants at their site.
- Assign (or let participants select) physical breakout groups.
- Use the virtual minute card form to get feedback at lunch breaks and end of each day.
- Have participants do all small-group exercises with participants at same site.
- See section IV below for more tips.
Online trainings (completely distributed)
- When watching videos, have all participants watch separately.
- Assign breakout groups randomly to breakout rooms in Zoom. Be sure to remove Trainers and helpers when assigning groups.
- Use the virtual minute card form to get feedback at lunch breaks and end of each day.
- Have participants screen share with their breakout room during the live coding exercises.
- For exercise to set up a workshop website, put participants in breakout rooms and have one person screen share while the others help guide them verbally.
- See section IV below for more tips.
IV. Using Zoom for Online Trainings
Online Carpentry Instructor Training events are held on Zoom. You can set up a personal Zoom account for yourself for free. This personal account will be able to attend the training event (or any other online Carpentry event), but will not be able to act as host.
Becoming the meeting host
About a week before your event, you will be given login credentials for a Carpentry account. Alternatively, if no one has yet claimed “host” in your session, you can click “claim host” next to your name in the Participants list; you will be asked for a 6-digit host key, which you can find in this message. See the explanation for step-by-step instructions on how to claim host in Zoom Rooms using the host key.
General tips for online training:
-
Support the lead
- Ways that you can support your co-teacher when they are leading are:
- Monitor the chat in zoom/notes
- Help post exercises + provide instructions
- Find links or references
- When you take turns instructing, remember to hand-off host privileges as needed, especially if anyone is stepping away.
- Ways that you can support your co-teacher when they are leading are:
-
Exercise management
- After the first exercise, keep a list of all the participants in a plain text file on your computer so can you can easily paste it into the shared note-taking doc for exercises. This way, everyone immediately has a place to start writing.(GW) Tip: randomise the order of names every once in a while so it is not always the same person that is first or last in the list, and thus may get more or less attention when you discuss the responses (LN).
- Screen-share a timer/countdown clock (like this timer from timeanddate.com) so participants know how long they have to work on exercises. (L.N) Cuckoo timers can also be helpful, especially during breakout room sessions: the countdown timer is shared between everyone visiting the webpage and all participants will hear an alarm sound when the timer runs out.
-
Shared notes tips
- No matter what kind of shared doc you are using, it is usually a
good idea to create two documents – one for each day of the training.
- Suggestion from AN: create a third doc for sharing concept maps, since they are images and can slow down the document.
- Etherpad pros + cons
- Pros: line numbers
- Cons: simple formatting
- Google Doc pros + cons
- Pros: richer formatting
- Cons: no line numbers
- Have a plaintext list of names that you can paste into the Etherpad/Google Doc. Reduces confusion when a bunch of people need to answer something at once, and subtly makes it clear that everyone needs to respond.
- No matter what kind of shared doc you are using, it is usually a
good idea to create two documents – one for each day of the training.
-
Zoom tips
- Announce at the beginning of the training that all participants should mute when they are not talking. You may need to repeat this a few times during the early part of the training, until people are doing it consistently.
- In general, it works best to have everyone use zoom individually on their computers (so you can see everyone’s faces); for trainings where some of the participants are co-located, have them use their own computer for video but pick one person to use for mic/sound.
- “Gallery view” in the upper right toggles the display to show more participants’ videos.
- “Share screen” is at the bottom middle of the screen. To end “share screen”, click the red button that will appear at the top middle of the screen when you are in screen sharing mode.
- When you screen share, you have the option to share individual apps or your entire desktop. The default is the full desktop.
- The Zoom chat is not stable (it is not saved across sessions or after going into breakout rooms, and people who have just joined a room cannot see previously posted chat items). We highly recommend using the Etherpad or Google Doc chat instead. For those who want to save the chat, they do that using the “More” option in the chat window, which offers “Save chat”. Choosing this will save the chat to a local text file on the person’s computer.
- During breaks, learners will often turn off their video and wait for your audio cue to re-activate. This makes it look like no one is back from break, but just saying ‘hello’ will generally get a bunch of people to come back on video quickly.
- When several attendees are in the same room (member trainings): it is helpful to have every participant log in separately so that you can see names and faces and they can interact by waving or using the chat. However, it is important that only one microphone and speaker should be active in the room at one time or feedback and noise will be a problem. When creating breakouts, you can either leave these people in the main room or shuffle people around to create a room just for them. Either way, ask them to leave a mic on so you can listen in.
- Attendees might like to have a separate room (without Trainers) to network in over lunch or other breaks. Be prepared to assign that room and then close it to restart the main session.
- You can never practice too much with Zoom!
V. Curriculum Teaching Tips
This is a place for Trainers to leave tips and observations for those newer to the curriculum. This can provide guidance on how to navigate difficult places in the curriculum until problems can be fixed, or may provide additional instructions that are conditional to an audience or are otherwise not appropriate to/ready for a change in the curriculum itself.
Breaks
Giving breaks is extremely important – for learners to decompress, take a walk, check email, etc. Make sure to give learners a full 60 minutes for lunch and 15-20 minutes for the morning/afternoon break. (EW)
Make good use of breaks - use them for a short exercise, or just give a break entirely for people to take a breather.
Welcome
- From JS: “What happens is that we send participants home at the end
of day one with a request to look up more about the Carpentries workshop
types and then we ask them what questions they have at the start of day
two. While the intent is that these questions will be put in the
Etherpad and then taken up later in one way or another this does not
happen or at least only happens in part. The result is either a lot of
saying,”We will cover that this afternoon” or pulling parts of the
relevant afternoon sessions into the morning. Participants thus either
end up a little frustrated (because they would really like an answer
now) or the schedule ends up being a little fractured.”
- Response from CK: I have never had the problem described by JS; people are usually willing to wait (especially once we dive into live coding), and I make sure to answer all questions (and take new ones!) in the afternoon.
- Response from KW: Another option is to have people put questions into the Etherpad in the morning, and then answer them (in the Etherpad) during the live coding practice. Trainees can read them at any time then, and you can refer back to them when necessary.
Motivation and Demotivation
As written, this can run long. Suggestions:
- CK: In general, I approach this section as “which 3 out of the N exercises do I want to make SURE I do?” and then if there is time (or interest! depends on the group) I will add or adapt.
The Carpentries: How We Operate
CK: Not an “official” exercise, but after explaining the workshops and how to run them, go around the room, asking each person if they have a question + then answer them.
-
Exercise: Creating a Workshop Website
- CK: This takes some time, so some people opt to skip this section. Inevitably, when working with a group of mixed experience with GitHub, some will be able to zip through this exercise, where others will struggle. We have gotten positive feedback about this exercise as well, where learners felt like it was a valuable experience. Can be especially valuable for groups that will probably be running workshops on their own (so open trainings, or trainings for folks who are ready to get started right away).
CK: The coffee break after this would be a great time for an “Ask and Offer” if the group is interested.
VI. Teaching Demonstration Tips
Here are suggestions from the Trainer Community for running a low stress teaching demo. For official/technical guidelines on how to run a demo, see the Handbook.
Points to make during introductions:
- This is not a high-stakes test! This is a friendly opportunity to give and receive feedback. On occasion, we do invite people to return for a second try. If we do this, your follow-up email will contain very clear instructions on exactly what we would like you to change on your next visit. This does not mean we do not want you as an instructor, it means we want you to be ready to put your best foot forward in the classroom and we are here to help you do that. (KW)
- I will not tell anyone that they have passed or ask anyone to repeat during this session. That information will come in the follow up email. (KW)
- The feedback you give sometimes says as much or more about your approach to instruction as the demo itself. (KW)
- Have trainees introduce themselves (name and institution or location) at the start. This makes sure everyone knows where the mute button is. (EB)
- I have already determined a random order for you each to do your demonstration. When it is your turn, you will have a minute or two to set up your screen. You will screen share (describe where the button is) and will have the option to share your whole Desktop or just a single application. I recommend sharing only the application you will be teaching from, that way you can keep your notes up on your screen without us seeing them. It is perfectly fine to teach using your notes - that is how I always teach. (EB)
- When your time is up, I will stop you and ask you to give feedback on yourself and then ask others to add their feedback. (EB)
Different ways of managing feedback:
- Create your own Etherpad and populate it with episode links, feedback templates, whatever. For example: etherpad-teaching-demo-template (LS)
- Use +/- content delivery rubric. (Or use “improvement” in place of “-” as suggested by MC). Keep in mind that some learners (like some Trainers) do not have the content expertise to be able to fully evaluate that category for all lessons.
- If there is time (4 people or less) you can do feedback entirely verbally, or have them issue verbal feedback after writing notes in the Etherpad. If you do this, suggest having presenter give their own feedback, then other learners, then Trainer can summarise/disagree/add/emphasise as needed.
- I take notes on physical paper during each demo with points I think need to be made, then mark things off as others mention them in their feedback. Usually, the trainees catch most of the things I wanted to mention, and I can choose just one or two things to comment on. (EB)
Points to make during wrap-up:
- Thank you for your excellent feedback! Instructors like you help to make this community what it is.
- I will follow up with each of you by email within ___ (time period). If you do not hear from me by __ feel free to check in.
Welcome
Instructor Note
In an online training, ensure that captions are turned on, that one trainer claims host, and that the host adds other trainers as co-hosts. The host key is in the email to trainers from the core team prior to the training.
Getting to know each other
There are multiple ways to build a sense of community early in an instructor training event and help ensure participants engage fully with one another. Some example activities are:
- Include an icebreaker question in the sign-in section or separately on the etherpad
- Invite participants to share their names (and optionally pronouns) verbally and/or share their icebreaker answers
- Model informal chat as participants come into the room on Day 1, particularly if a number of participants are early or late
Hearing participants say their own names is especially valuable in online workshops with diverse participants whose names may be difficult for some trainers and instructor trainees to pronounce.
When planning icebreakers and introductions, it’s important to be aware of time considerations, given the number of participants and expected timing. Balancing what is done in the etherpad and verbally can help, as can avoiding activities that are likely to encourage longer introductions or extended interaction at this point.
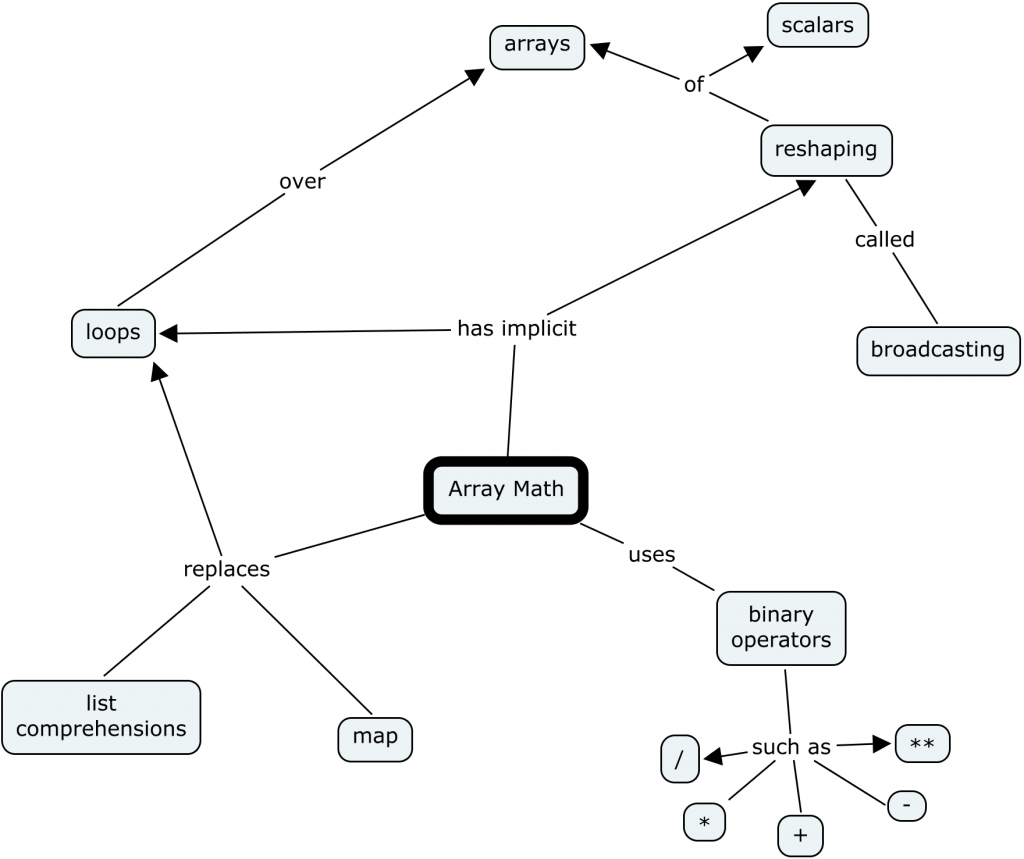
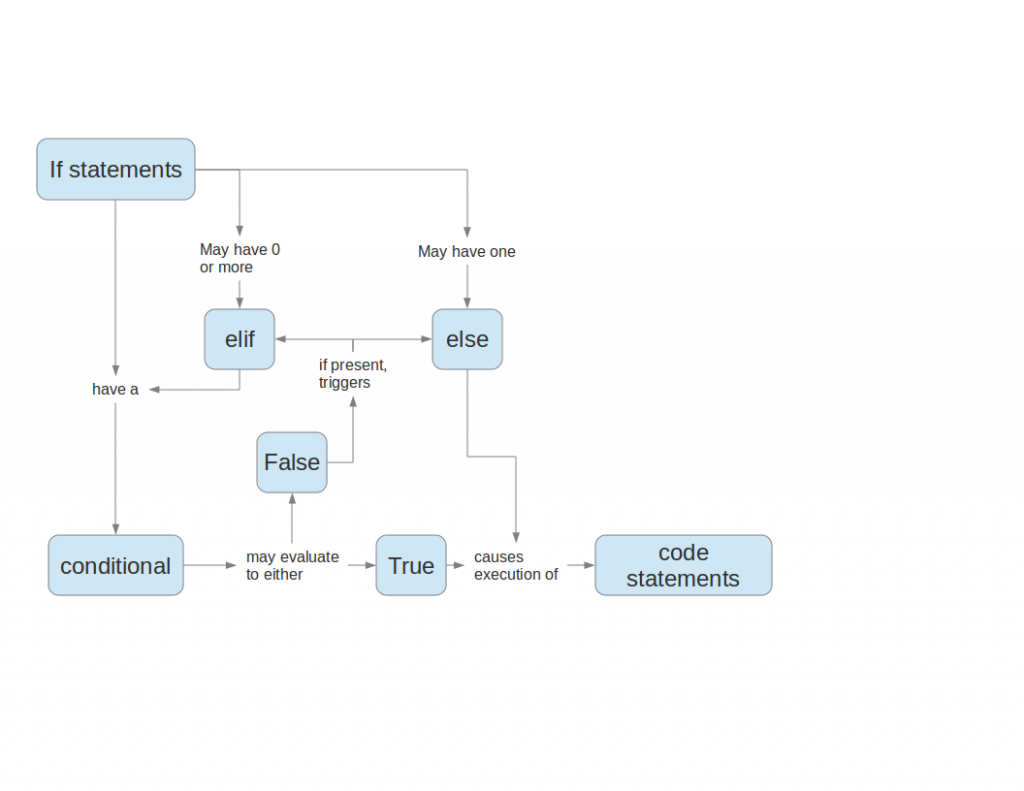
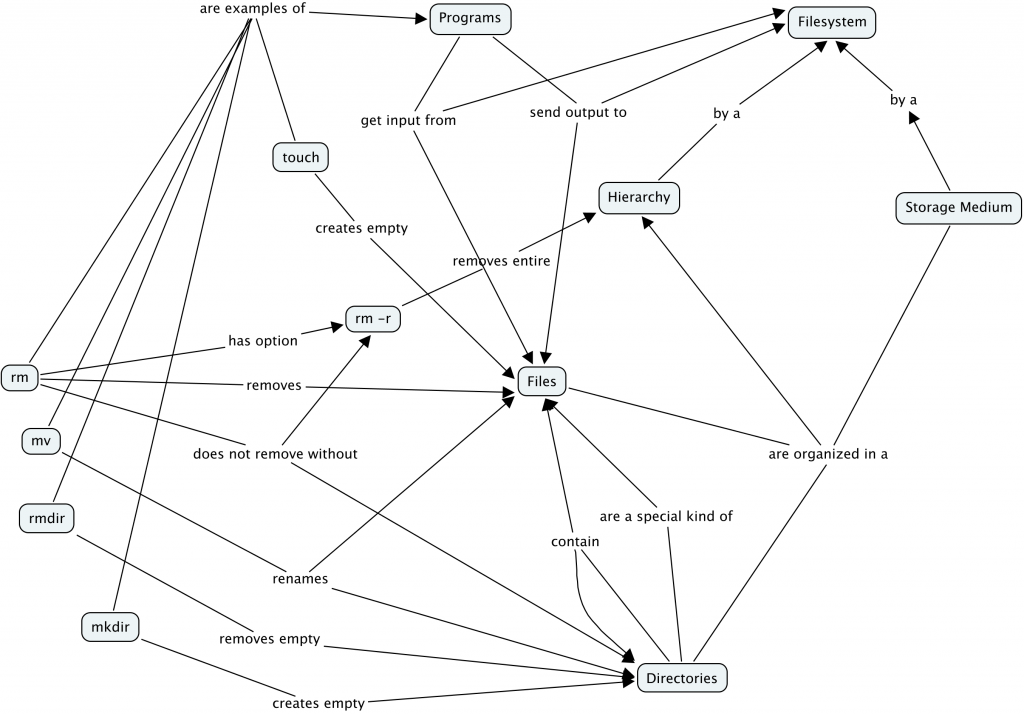
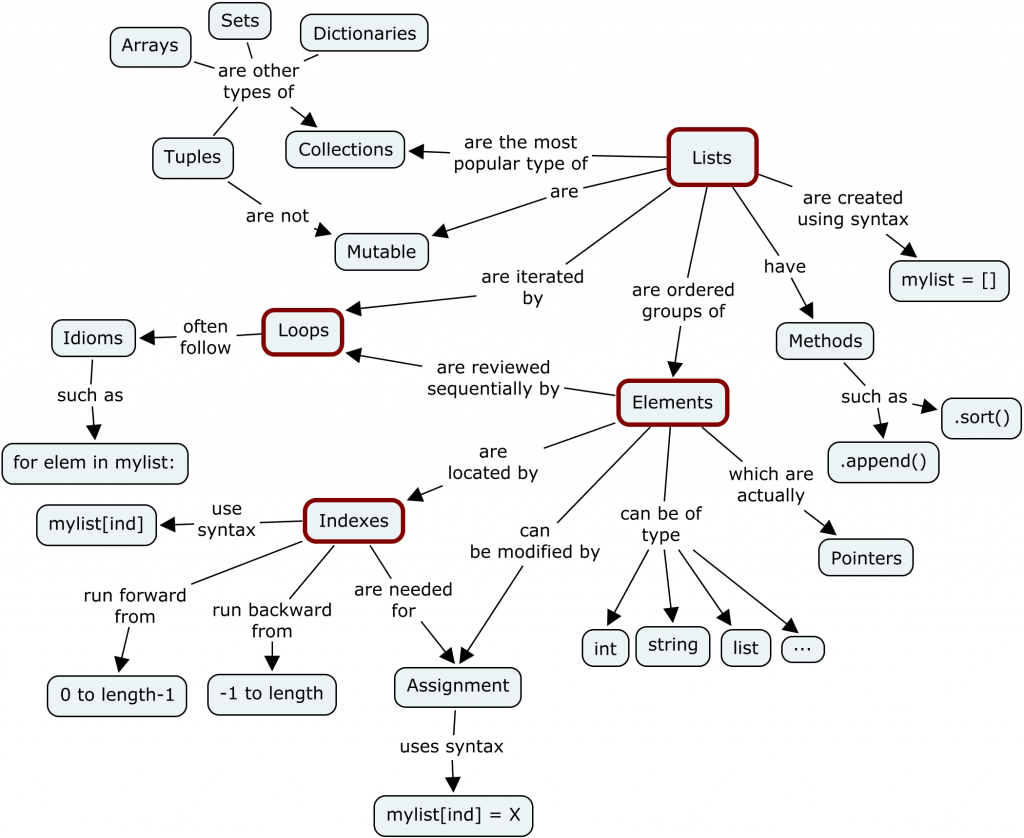
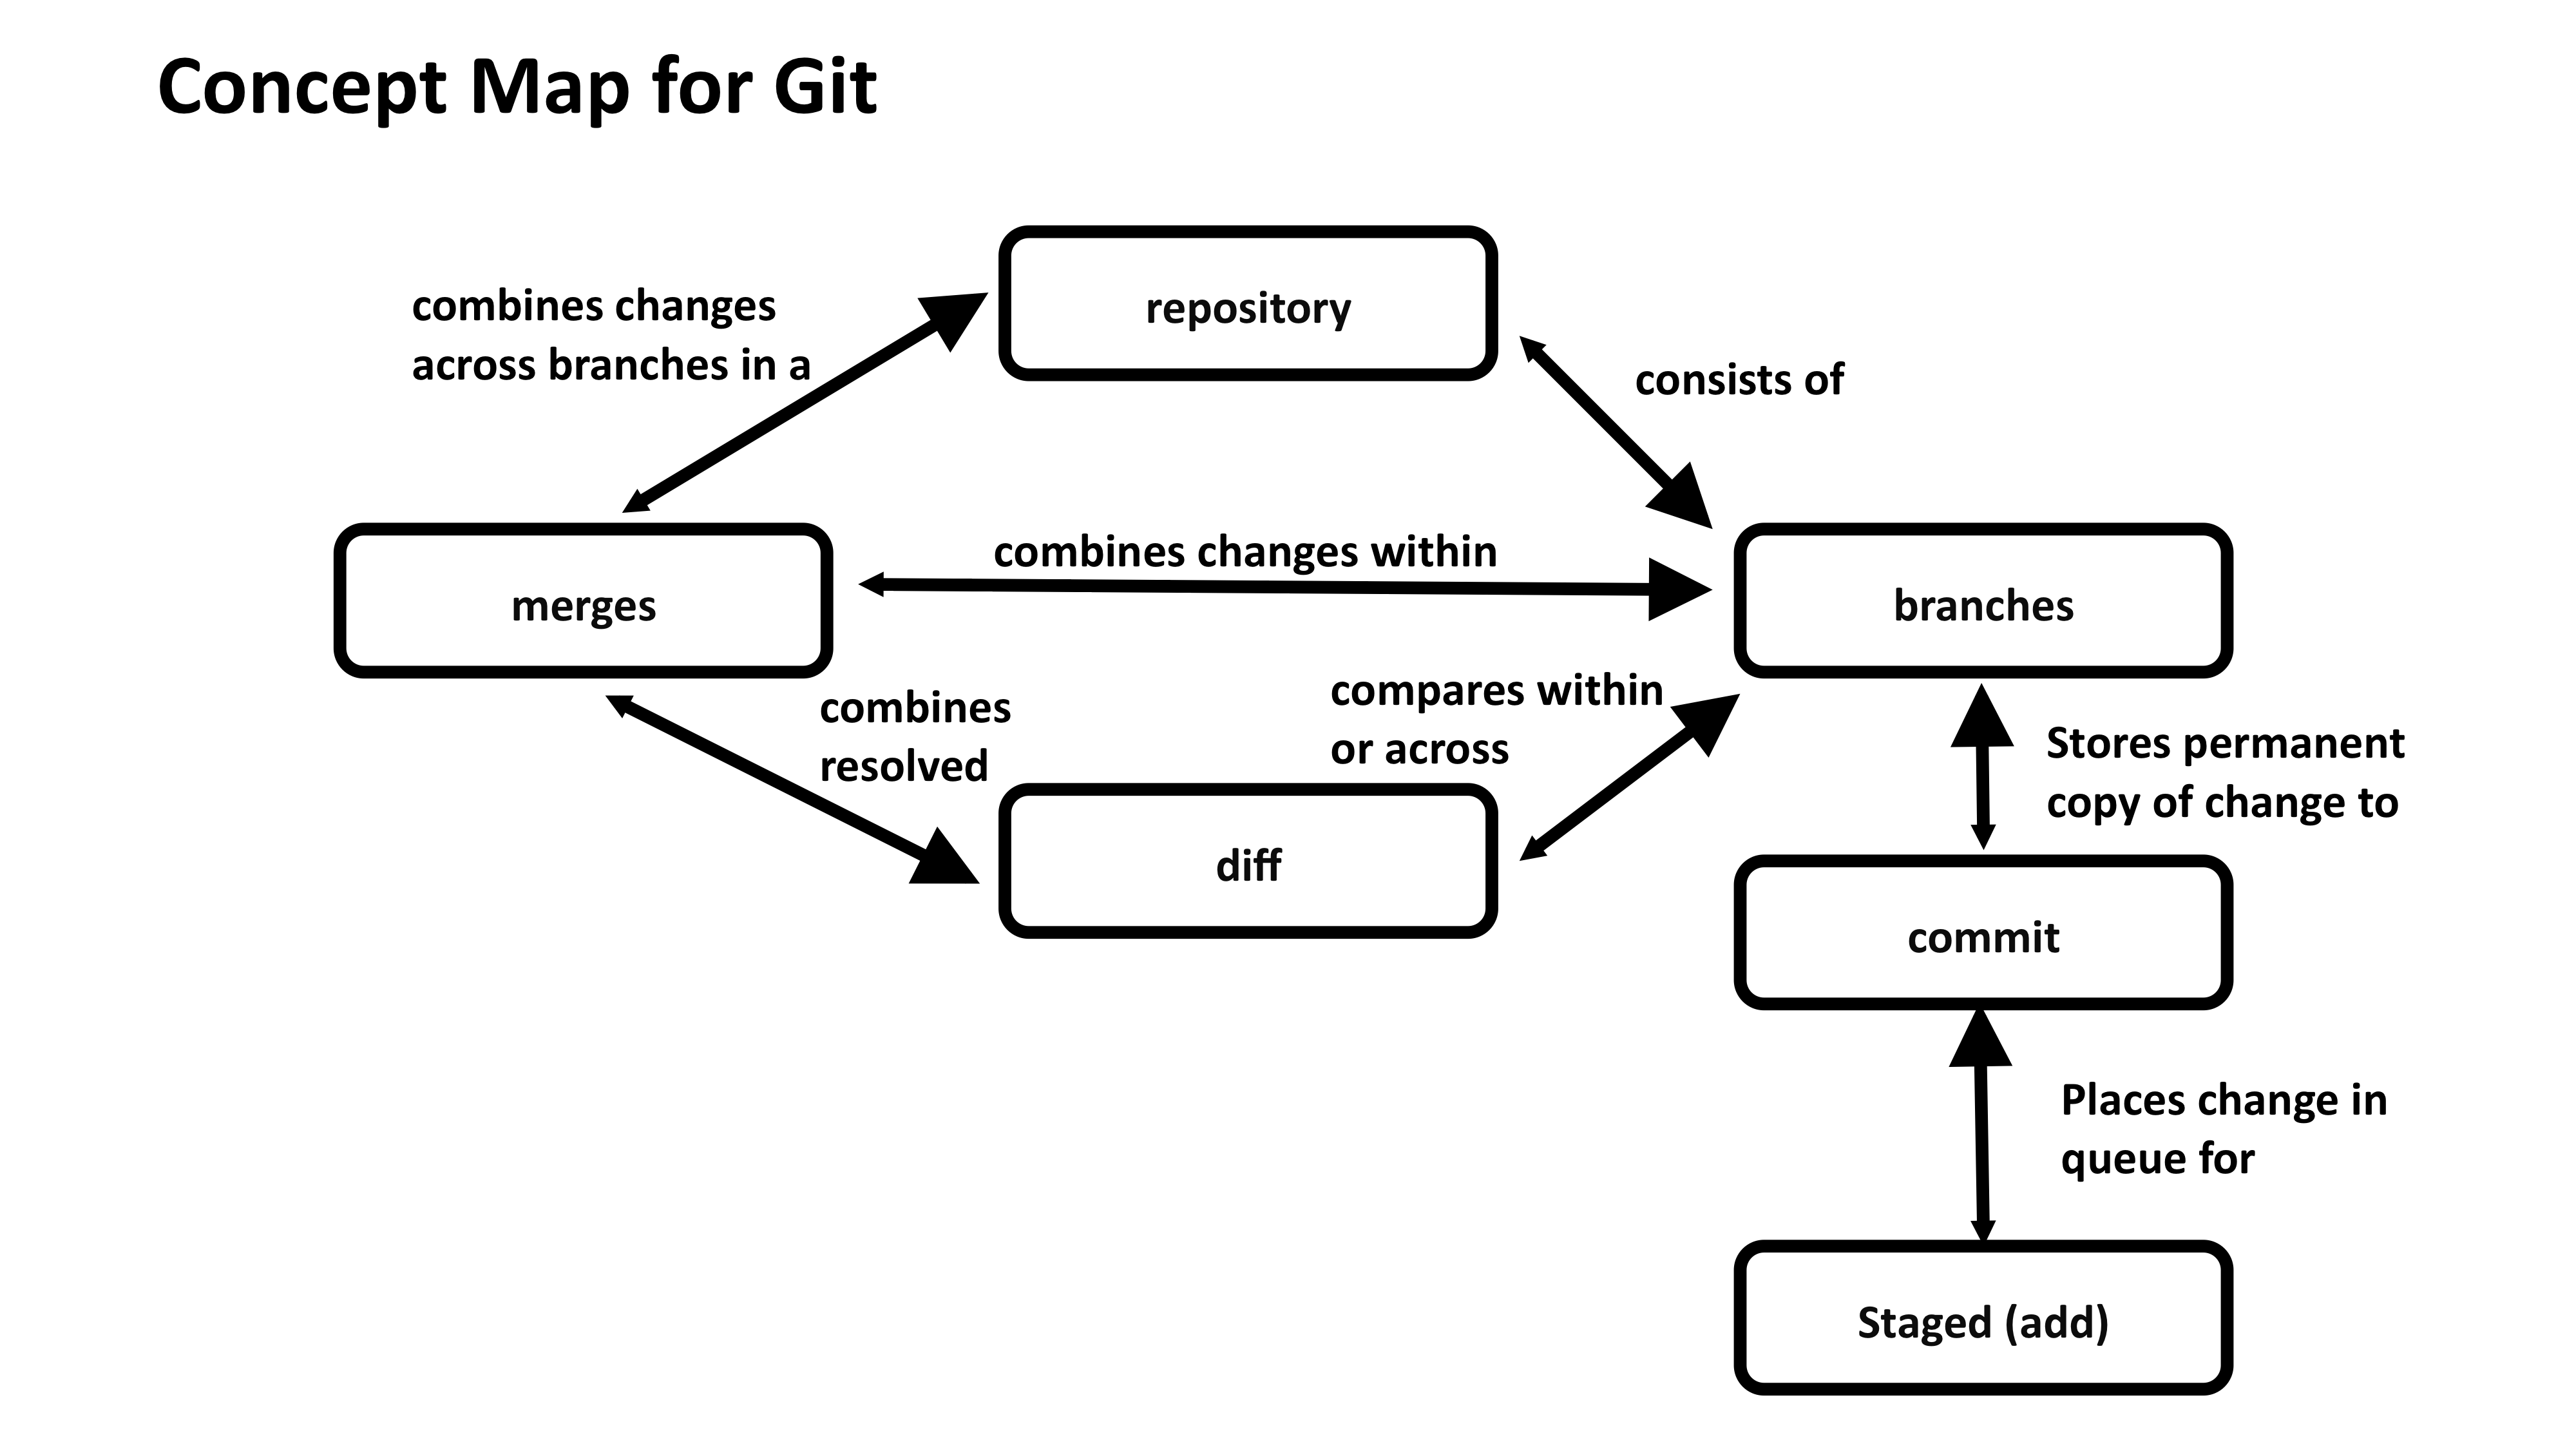
Building Skill With Practice
Instructor Note
People often request to see more examples of concept maps. These are some examples linked from a previous version of the curriculum:
- Array Math
- Conditionals
- Creating and Destroying Files
- Sets and Dictionaries in Python
- Input and Output
- Lists and Loops
- Git Version Control
Most of these are much larger than our recommended limit for the activity. It can be helpful to make a larger map and then narrow down to a smaller one.
Part 1 Break
Expertise and Instruction
Instructor Note
Some points to touch on in discussion: - the feeling of expertise as an instructor vs practitioner - the difference between expert knowledge in the topic and expertise in communicating about the topic
Memory and Cognitive Load
Instructor Note
For a semi-anonymous alternative to having learners write their score in the etherpad on the challenge below, you can create a list with numbers and have people add X’s. This also makes it easier to see the score distribution.
Example:
Building Skill With Feedback
End Part 1
Motivation and Demotivation
Instructor Note
In an online training, ensure that captions are turned on, that one trainer claims host, and that the host adds other trainers as co-hosts. The host key is in the email to trainers from the core team prior to the training.
Instructor Note
After trainees write in the etherpad, one way to discuss/review comments is to note which items in either list suggest practices that trainees can employ in their teaching and in particular to review how topics discussed already in the training (going slowly, expert awareness gaps, formative assessment, memory management, etc) can help mitigate the demotivating or are present in the motivating examples.
Equity, Inclusion, and Accessibility
Instructor Note
In your discussion of accessibility, it is helpful to point out that accessibility may not always affect only individual learners, such as persons with disabilities. Geographic and social differences can present barriers to accessibility for entire groups. People in rural regions or institutions with unreliable electricity and internet access, for example, face extra barriers to participating in online Carpentries workshops, instructor trainings, and community events.
Part 2 Break
Teaching is a Skill
Instructor Note
On Zoom, Remember to send broadcast messages to remind trainees to switch roles, sample language is below:
- at 5 min in (20 left):
Prep time is completed, the first person should start teaching now - at 11 min in (14 left):
The second person should start teaching now - at 17 min in (7 left):
The third person should start teaching now
End Part 2 and Preparation for the Next Part
Welcome Back
Getting Started on Instructor Certification
The Carpentries: How We Operate
Instructor Note
In an online training, ensure that captions are turned on, that one trainer claims host, and that the host adds other trainers as co-hosts. The host key is in the email to trainers from the core team prior to the training.
Instructor Note
CK: Not an “official” exercise, but after explaining the workshops and how to run them, go around the room, asking each person if they have a question + then answer them.
-
Exercise: Creating a Workshop Website
- CK: This takes some time, so some people opt to skip this section. Inevitably, when working with a group of mixed experience with GitHub, some will be able to zip through this exercise, where others will struggle. We have gotten positive feedback about this exercise as well, where learners felt like it was a valuable experience. Can be especially valuable for groups that will probably be running workshops on their own (so open trainings, or trainings for folks who are ready to get started right away).
CK: The coffee break after this would be a great time for an “Ask and Offer” if the group is interested.
Part 3 Break
Live Coding is a Skill
Instructor Note
On Zoom, Remember to send broadcast messages to remind trainees to switch roles, sample language is below:
- at 9 min in (16 left):
The second person should start teaching now - at 17 min in (8 left):
The third person should start teaching now
Preparing to Teach
A note on cutting
This episode is a common place for Trainers to cut parts of while preparing to teach. That’s not because this is not important – this page is a valuable resource – but we feel this is one of the sections that trainees can use effectively as a resource when actually preparing for a workshop, even without spending a lot of time doing activities on this material during their Instructor Training event.
End Part 3
More Practice Live Coding
Instructor Note
In an online training, ensure that captions are turned on, that one trainer claims host, and that the host adds other trainers as co-hosts. The host key is in the email to trainers from the core team prior to the training.
Instructor Note
On Zoom, Remember to send broadcast messages to remind trainees to switch roles, sample language is below:
- at 9 min in (16 left):
The second person should start teaching now - at 17 min in (8 left):
The third person should start teaching now
Working With Your Team
Instructor Note
If trainees seem to be struggling to identify challenges, consider priming them with some ideas from this list or your own experience:
- Varying prior knowledge
- More varied interests, expectations and goals for coming to the workshop
- Getting the pace right with both novice and more advanced learners - more difficult to keep all learners motivated
- More varied/customised setups at machines used by learners that instructors may be expected to understand/support
Instructor Note
An alternative for this activity is to direct trainees who need help
learning this to sign up for a skillup session on the Community
Sessions Etherpad. Search for workshop website.
Part 4 Break
Launches and Landings
Putting It Together
Wrapping Up
Instructor Note
You will need to get the post-training survey link yourself and
provide it in the activity below. It should follow the form
https://carpentries.typeform.com/to/cjJ9UP#slug=...../ and
can be found in an email Trainers receive from the Carpentries Core Team
before the training.
Instructor Note
It can be helpful to show trainees how can download the etherpad to save it and that while there are no plans to take it down, it is also not guaranteed to stay up forever.
The button to download is two arrows pointing opposite directions and is toward the top right, unless the etherpad window is narrow, when it moves to bottom left.
If you use another tool for shared notes, remind them of relevant practices related to that platform (e.g. if a Google Doc is managed by an institution, etc).