The Carpentries Git Workflow
Last updated on 2024-05-16 | Edit this page
Overview
Questions
- How can I use git to explore and edit changes suggested by contributors to a lesson?
- How can Maintainers make changes to their lessons?
Objectives
- manage potential changes to a lesson using forks and branches
Maintainers and Forked Repositories
If this is the first time you are maintaining a project where you and other people are going to be submitting changes there are two perspectives you need to keep in mind: one of the “maintainer” and one of the “contributor”.
- Maintainers: can directly
pushcode to the repository - Contributors: cannot directly
pushcode to the repository, and need to create a separate fork

Pushing and pulling directly to the remote repository owned by The Carpentries
The Software
Carpentry Git lesson and Library Carpentry Git
lesson show you how you can interact with a repository from an owner
and Maintainer point of view because you are allowed to
push directly to your project on GitHub (see label 1 in the
above diagram).
As a Maintainer to one of our lessons, you will be able to interact
with the lesson just like it was your own repository (see label 1 in the
above diagram). The only difference is the account the repository is
under. So instead of username/repo it will be something
like carpentries/repo. This means when you get the
git clone url, you will have to get it from the
carpentries/repo location, not your own.
In this setup, since you are cloneing down from the
original carpentries repo, the remote will be your
origin. This is the same workflow as if you are working on
your own personal repository, and you can
git push origin main.
An alternative workflow: Pushing and pulling to a remote (fork)
Some Maintainers choose to work using the forking model of collaboration. Even though they have access to the original “upstream” Carpentries repository, they will make a “fork” of The Carpentries repository so they have a copy (i.e., fork) in their own account (see label 2 in the above diagram). Using this workflow gives you (the Maintainer) the same workflow as any other contributor to your lesson (since contributors will also need to work on a fork).
Forking a Repository
To fork a repository on GitHub, you can visit a repository and add
/fork at the end of the URL or you can click the “fork”
button in the top right:

Once you fork the repository, there will be the original “upstream”
carpentries/repo and your own “fork”,
username/repo (see label 2). When you visit your fork on
the GitHub website, you will see a grey toolbar above the file list that
says “This branch is up to date with carpentries/repo:branch.”

You can clone your username/repo down to
your computer like any other repository you want to work on locally and
push and pull your changes to your remote (label 3). Because the
repository you cloned from is your own “fork”
(username/repo), the version in your account that you
cloned from is the “origin” repository (see the blue colored “origin”
label in the diagram). You can then issue a pull request (PR) to the
original carpentries/repo repository (see label 4).
For PRs from non-maintainers you will review
these changes and ask for changes if needed. As the Maintainer, you
can review and/or accept these PRs (including your own) because as a
Maintainer you will have the repository permissions (in
carpentries/repo) to accept the PR (see label 5).
Keeping your fork up-to-date
As more changes come in from other contributors and accepted by you
or other Maintainers, the forked repository (bottom right) and your own
local copy (bottom left) will be out of sync. This time, when you visit
your fork on GitHub, you will see that GitHub will show you that your
branch is N commits behind the upstream repository. You can
use the “Fetch upstream” button to bring those changes to your own
repository. 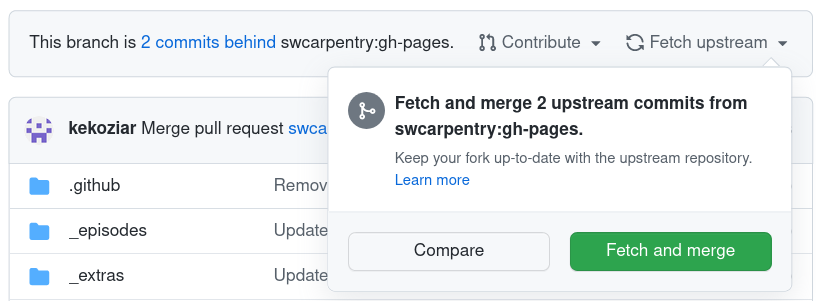
If you wanted to perform this update locally, you
would set the carpentries/repo as a new remote called
“upstream” and then pull
the changes from upstream.
Practice using the recommended workflow
We will now practice using the recommended workflow for pushing and pulling to a remote.
You will be assigned to a breakout group of 2-3 people. Once you are in breakout rooms, decide who will play the role of the Maintainer (“M”), and who will be the contributor (“C”).
Working on the default branch (10 minutes)
- M: Create a repository:
<date>-collab-exampleand initialise it with aREADME.mdfile so the repository is not completely empty. - M: Add C as a collaborator under the repository settings.
- C: Accept the collaboration invitation (check your e-mail)
- M + C:
clonethe repository to your local machine - M + C: Both add your name to the
README.mdfile - M + C:
addandcommityour changes - M + C:
pushyour changes to the remote - M + C: someone will have a merge conflict
Working on a new branch (15 minutes)
- Make sure that your local version is up-to-date:
git pull origin main - Create a new branch:
git switch -c BRANCH_NAMEorgit checkout -b BRANCH_NAME - Make changes,
add,commit, andpushthe changes - Create a PR
Working on the main branch
- C: fork the repository from M
- C:
clonefrom your respitory (c/<date>-collab-example) - M + C: Both add your name to the
README.mdfile - M + C:
addandcommityour changes - M + C:
pushyour changes to the remote (C: it will be yourorigin) - C: Issue the PR
- M: Review and merge the PR
- C: Setup the upstream remote
- C: Sync the upstream changes to your local machine and your fork
Repeat but using a branch
- Make sure that your local version is up-to-date:
git pull origin main - Create a new branch:
git checkout -b BRANCH_NAMEorgit switch -c BRANCH_NAME - Make changes,
add,commit, andpushthe changes - Create a PR
- M: Review and merge the PR
- C: Setup the upstream remote
- C: Sync the upstream changes to your local machine and your fork
Protected branches
Carpentries lesson repositories are configured with branch protection rules: safeguards to reduce the likelihood of accidentally making breaking changes to the lesson. Repositories have two protected branches:
- A rule preventing anyone from making changes to the
legacy/gh-pagesbranch, which includes the last version of the lesson that existed before it was transitioned to a new infrastructure in 2023. This branch exists to enable the automated closure of pull requests made from a fork that is still using a version of the lesson with the previous infrastructure. - A rule prevent anyone from changing the
mainbranch directly. This rule exists to prevent breaking or unfinished changes from being accidentally committed to directly to the lesson.
In addition to the danger of merge conflicts, the protection on the
main branch is another reason why you should follow a
branching/forking workflow when making changes to a lesson.
Questions and Answers (5 minutes)
Please add questions to the Etherpad.
- It can be helpful to clone a pull request branch to your computer and build a local version of the lesson to see how a contributor’s changes will look in the website
- As a Maintainer, you can choose to edit your lesson using branches on the repository or on your fork