Editing a {sandpaper} lesson
Last updated on 2026-05-26 | Edit this page
Estimated time: 5 minutes
Overview
Questions
- What is the folder structure of a lesson?
- How do you download an existing {sandpaper} lesson?
Objectives
- Understand how to clone an existing lesson from GitHub
- Use
sandpaper::build_lesson()to preview a lesson - Update the configuration for a lesson
- Rearrange the order of episodes
If you want to edit and preview a full lesson using {sandpaper}, this is the episode for you. If you want to create a new lesson, head back to the episode for Creating a New Lesson. I believe it’s beneficial to experience editing a fully functional lesson, so you will edit THIS lesson. The first step is to fork and clone it from GitHub:
Fork and Clone a Lesson
If you are familiar with the process of forking and cloning, then you may fork and clone as you normally do. If you would like a reminder, here are the steps:
Think about a place on your computer where you want to work on your fork of the lesson (e.g.
~/Documents/Lessons/) and make sure that folder exists.Go to https://github.com/carpentries/sandpaper-docs/fork/ to fork the repository to your account
(recommended) When creating your fork, you should uncheck “Copy the
mainbranch only” checkbox.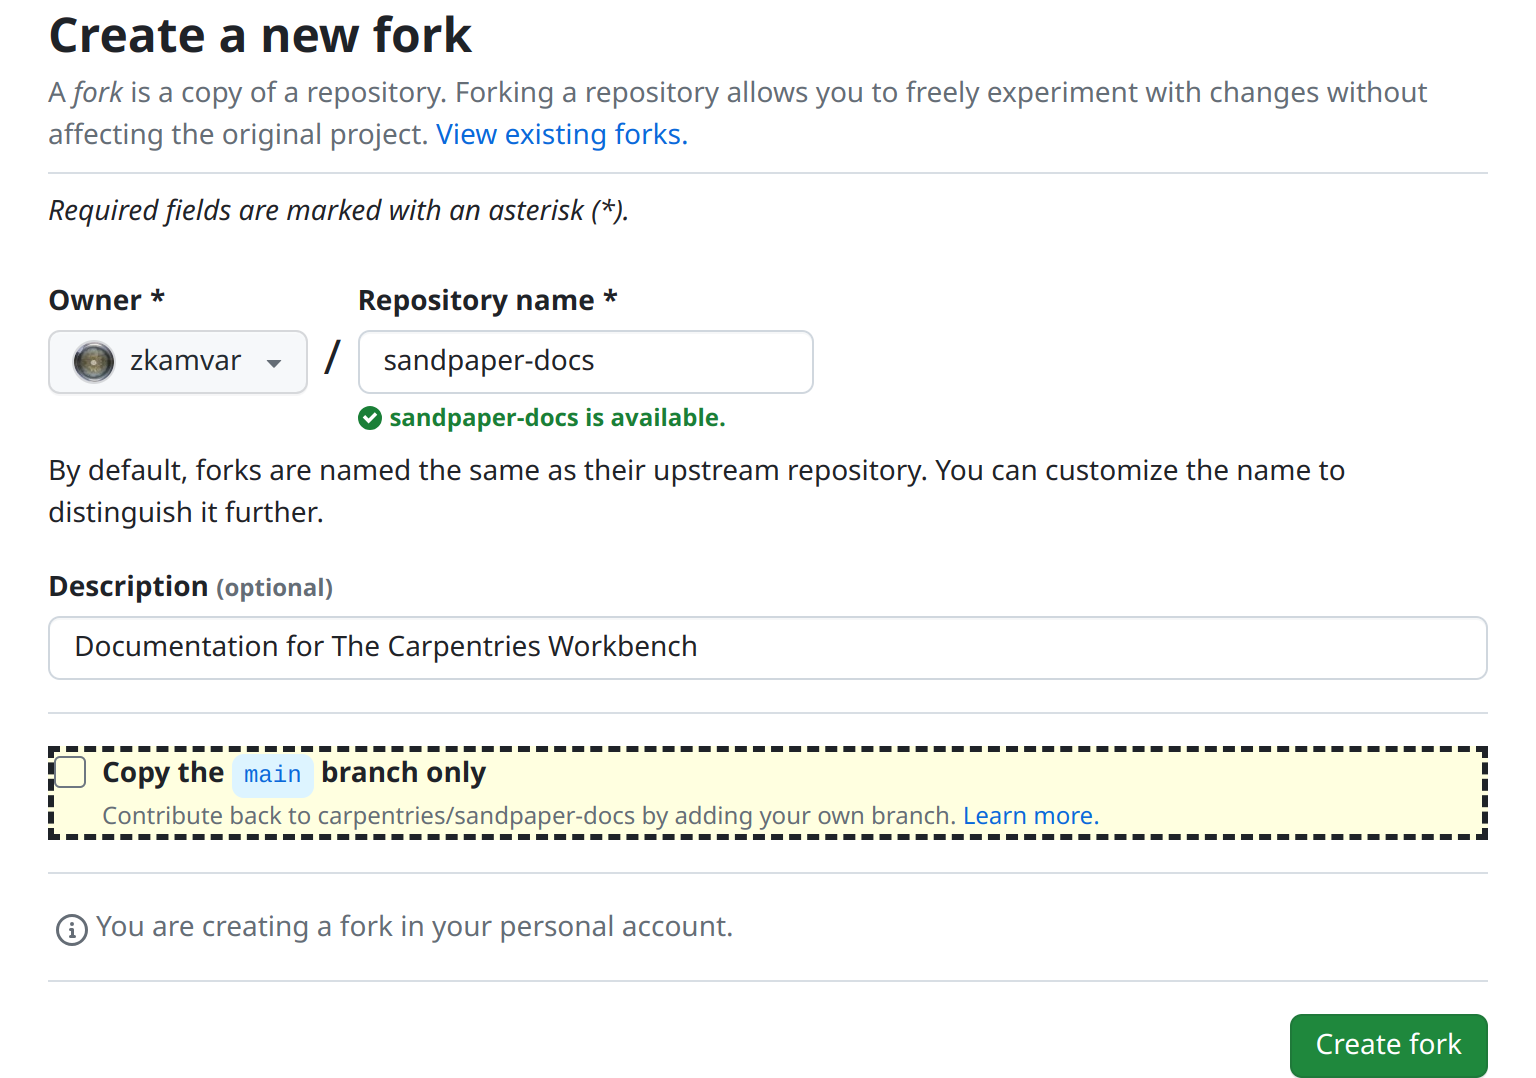
-
In the shell, use this command to clone this repository to your working directory, replacing
<USERNAME>with your username
One-step fork with R
If you use R and you also use an HTTPS protocol, you might be interested to know that the above three steps can be done in a single step with the {usethis} package via the GitHub API:
R
usethis::create_from_github("carpentries/sandpaper-docs", "~/Documents/Lessons/")
In the next section, we will explore the folder structure of a lesson.
Preview the Lesson
- Open the lesson in RStudio (or whatever you use for R)
- Use the keyboard shortcut ctrl + shift + b (cmd +
shift + b on macOS) to build and preview this lesson (or type
sandpaper::build_lesson()in the console if you are not using RStudio) - Open THIS file (
episodes/editing.md) and add step 4: preview the lesson again.
What do you notice?
What you should notice is that the only file updated when you
re-render the lesson is the file you changed
(episodes/editing.Rmd).
Folder Structure
🚧 This May Change 🚧
The exact folder structure still has the possibility to change based on user testing for the front-end of the lesson website.
The template folder structure will contain markdown files arranged so
that they match what we expect the menubar for the lesson should be. All
folders and files with an arrow <- are places in the
lesson template you will be modifying:
|-- .gitignore         #  | Ignore everything in the site/ folder
|-- .github/           #  | Configuration for deployment
|-- episodes/          # <- PUT YOUR EPISODE MARKDOWN FILES IN THIS FOLDER
|-- instructors/       # <- Information for Instructors (e.g. guide.md)
|-- learners/          # <- Information for Learners (e.g. reference.md and setup.md)
|-- profiles/          # <- Learner and/or Instructor Profiles
|-- site/              #  | This is a "scratch" folder ignored by git and is where the rendered markdown files and static site will live
|-- config.yaml        # <- Use this to configure lesson metadata
|-- index.md           # <- The landing page of your site
|-- CONTRIBUTING.md    #  | Carpentries Rules for Contributions (REQUIRED)
|-- CODE_OF_CONDUCT.md #  | Carpentries Code of Conduct (REQUIRED)
|-- LICENSE.md         #  | Carpentries Licenses (REQUIRED)
`-- README.md          # <- Introduces folks how to use this lesson and where they can find more information.
This folder structure is heavily opinionated towards achieving our goals of creating a lesson infrastructure that is fit for the purpose of delivering lesson content for not only Carpentries instructors, but also for learners and educators who are browsing the content after a workshop. It is not designed to be a blog or commerce website. Read the following sections to understand the files and folders you will interact with most.
All source files in {sandpaper} are written in pandoc-flavored markdown and all require
yaml header called title. Beyond that, you can put anything
in these markdown files.
config.yaml
This configuration file contains global information about the lesson. It is purposefully designed to only include information that is editable and relevant to the lesson itself and can be divided into two sections: information and organization
Information
These fields will be simple key-pair values of information used throughout the episode
- carpentry
- The code for the specific carpentry that the lesson belongs to (swc, dc, lc, cp, incubator, lab)
- carpentry_description
- (Optional) Full organisation name. Not needed when carpentry is swc, dc, lc, cp, incubator, or lab.
Adding a custom logo
The “carpentry” variable works with the {varnish} package to control the logo displayed on your lesson. You can display your own logo by
- Adding the logo file as SVG (e.g. ‘ice-cream-logo.svg’) to your fork
of {varnish} in the
inst/pkgdown/assets/assets/imagesfolder. - Setting “carpentry” to match the beginning of the name of your logo
file. E.g. to use the
ice-cream-logo.svgfile given above, “carpentry” should be set to ‘ice-cream’. - Adding ‘varnish: [YOUR-GITHUB-USERNAME]/varnish’ to the
Customization section of your lessons
config.yamlfile.
The rendered lesson will display your logo file with alternative text that matches the value of “carpentry”. For more informative alternative text, you can set “carpentry_description” to your organisation’s full name. E.g. “Ice Cream Carpentry” instead of “ice-cream”.
- title
- The main title of the lesson
- lang
-
Two letter code for the language used for headers, callouts and other
Workbench elements. Defaults to
enfor English. - languages
- If the lesson is available in more than one language you can use this setting to provide a drop-down menu to navigate between languages. This option can also be used to link between different flavors of the same material (e.g. Python vs R, GitHub vs GitLab)
Offering 4 languages: English, Spanish, German and Italian
An example to illustrate the usage of lang and
languages in a lesson config.yaml. The default
language is English and is indicated by the lang attribute.
The languages attribute specifies the names in the
drop-down menu and links to access the alternative content.
- Add
lang: ento indicate that the current lesson is in English - Indicate the
defaultlanguage to be English, shown as the default option in the drop-down. - Provide
otherlanguages, their description and a link to the corresponding location.
- life_cycle
- What life cycle is the lesson in? (pre-alpha, alpha, beta, stable)
- license
- The license the lesson is registered under (defaults to CC-BY 4.0)
Changing the default license
The default license for a lesson created with {sandpaper} is CC-BY 4.0. To use a different license
- Change the “license” variable to the name of your desired license.
- Replace the contents of ‘LICENSE.md’ with the text of your license or add a new variable called “license_url” and set to the url for your license.
- source
- The github source of the lesson
- branch
- The default branch
- contact
- Who should be contacted if there is a problem with the lesson
Organization
These fields match the folder names in the repository and the values
are a list of file names in the order they should be displayed. By
default, each of these fields is blank, indicating that the default
alphabetical order is used. To list items, add a new line with a hyphen
and a space preceding the item name (-). For example, if I
wanted to have the episodes called “one.md”, “two.Rmd”, “three.md”, and
“four.md” in numerical order, I would use:
Below are the four possible fields {sandpaper} will recognize:
- episodes
- The names of the episodes (main content)
- instructors
- Instructor-specific resources (e.g. outline, etc)
- learners
- Resources for learners (e.g. Glossary terms)
- profiles
- Learner profile pages
Remove Episode Numbering
By default, the lesson sidebar will display numbers next to each
episode title. To remove these numbers, add the following line to your
config.yaml file.
disable_sidebar_numbering: true
Configuring Episode Order
Open config.yaml and change the order of the episodes.
Preview the lesson after you save the file. How did the schedule
change?
The episodes appear in the same order as the configuration file and the timings have rearranged themselves to reflect that.
Configuring web analytics
The optional analytics field can be used to configure
web analytics, e.g. with Matomo or
Google Analytics. There are currently three options for
analytics:
-
NULL: disables tracking for that lesson. This is the default behviour, and is equivalent to omitting theanalyticsfield fromconfig.yamlaltogether. -
carpentries: adds the tracking script needed for the lesson to be tracked by The Carpentries self-hosted Matomo system. This option works only for The Carpentries lessons: community-owned lessons cannot be tracked in the same way. -
<user_string>: allows the user to define their own tracker script string. For legibility, use the|symbol to indicate that the value of the YAML field will be split across multiple indented lines (known as a ‘literal block’ in YAML). For example, to configure for Google Analytics:
YAML
analytics: |
  <!-- Global site tag (gtag.js) - Google Analytics -->
  <script async src='https://www.googletagmanager.com/gtag/js?id={YOUR TRACKING ID}#' ></script>
  <script>
    window.dataLayer = window.dataLayer || [];
    function gtag(){dataLayer.push(arguments);}
    gtag('js', new Date());

    gtag('config', '{YOUR TRACKING ID}');
  </script>
Tracking scripts configured with the analytics option
are added to the footer element of the lesson website HTML.
episodes/
This is the folder where all the action is. It contains all of the episodes, figures, and data files needed for the lesson. By default, it will contain an episode called introduction.Rmd. You can edit this file to use as your introduction. To create a new Markdown episode, use the folowing function:
R
sandpaper::create_episode_md("Episode Name")
This will create a Markdown episode called
episode-name.md in the episodes/ directory of
your lesson, pre-populated with objectives, questions, and keypoints.
The episode will be added to the end of the episodes: list
in config.yaml, which serves as the table of contents.
If you want to create an episode, but are not yet ready to render or
publish it, you can create a draft using the draft_episode
family of functions:
R
sandpaper::draft_episode_rmd("Visualising Data")
This will create an R Markdown episode called
visualising-data.Rmd in the episodes/
directory of your lesson, but it will NOT be added to
config.yaml, allowing you to work on it at your own pace
without the need to publish it.
When you are ready to publish an episode or want to move an existing
episode to a new place, you can use move_episode() to pull
up an interactive menu for moving the episode.
R
sandpaper::move_episode("visualising-data.Rmd")
OUTPUT
ℹ Select a number to insert your episode
(if an episode already occupies that position, it will be shifted down)

1. introduction.md
2. episode-name.md
3. [insert at end]

Choice: Should I use R Markdown or Markdown Episodes?
All {sandpaper} lessons can be built using Markdown, R Markdown, or a mix of both. If you want to dynamically render the output of your code via R (other languages will be supported in the future), then you should use R Markdown, but if you do not need to dynamically render output, you should stick with Markdown.
Sandpaper offers four functions that will help with episode creation depending on your usage:
| R Markdown | Markdown |
|---|---|
create_episode_rmd() |
create_episode_md() |
draft_episode_rmd() |
draft_episode_md() |
instructors/
This folder contains information used for instructors only. Downloads of code outlines, aggregated figures, and slides would live in this folder.
learners/
All the extras the learner would need, mostly a setup guide and glossary live here.
The glossary page is populated from the reference.md
file in this folder. The format of the glossary section of the
reference.md file is a heading title
## Glossary followed by a definition
list. Definition lists are formatted as two lines for each term, the
first includes the term to be defined and then the second line starts
with a “:” and a space then the definition. i.e.
- term
- definition
profiles/
Learner profiles would live in this folder and target learners, instructors, and maintainers alike to give a focus on the lesson.
index.md
This is the landing page for the lesson. The schedule is appended at the bottom of this page and this will be the first page that anyone sees.
README.md
This page gives information to maintainers about what to expect inside of the repository and how to contribute.
Making your lesson citable
You can add information about how people should cite your lesson by
adding a citation file to your lesson repository. If the root folder of
your lesson repository contains a CITATION.cff in Citation
File Format (more details below), the lesson website will include a
Lesson Citation page linked from Cite in the page footer. If
the root folder includes a file called CITATION, the
‘Cite’ page footer of your lesson site will link to this
file.
We recommend that you add and maintain a CITATION.cff
file for your lesson, in Citation File Format
(CFF). CFF is a structured text file format that provides
machine-readable citation information for projects. It is supported by a
growing number of tools, including GitHub: if a project includes a CFF
file in its default branch, GitHub
will present citation information for the project under a ‘Cite
this repository’ button in the About sidebar.
Creating a CFF for a lesson
You can use the cffinit
webtool to create a new CFF for your lesson or update an existing
file. When creating a CFF for a lesson, you should specify
dataset as the type of work being described (This
discussion includes explanation for why dataset is the
appropriate type for a lesson.)
cff-version: 1.2.0
title: Introduction to The Carpentries Workbench
message: >-
  Please cite this lesson using the information in this file
  when you refer to it in publications, and/or if you
  re-use, adapt, or expand on the content in your own
  training material. To cite the Workbench software itself,
  please refer to the websites for the individual
  components:
  https://carpentries.github.io/sandpaper/authors.html#citation,
  https://carpentries.github.io/pegboard/authors.html#citation,
  https://carpentries.github.io/varnish/authors.html#citation
type: dataset
authors:
  - given-names: Zhian
    family-names: Kamvar
    name-particle: N.
    orcid: 'https://orcid.org/0000-0003-1458-7108'
  - given-names: Toby
    family-names: Hodges
    email: tobyhodges@carpentries.org
    affiliation: The Carpentries
    orcid: 'https://orcid.org/0000-0003-1766-456X'
  - given-names: Erin
    family-names: Becker
    orcid: 'https://orcid.org/0000-0002-6832-0233'
  - orcid: 'https://orcid.org/0000-0002-7040-548X'
    given-names: Sarah
    family-names: Stevens
  - given-names: Michael
    family-names: Culshaw-Maurer
    orcid: 'https://orcid.org/0000-0003-2205-8679'
  - given-names: Maneesha
    family-names: Sane
  - given-names: Robert
    family-names: Davey
    orcid: 'https://orcid.org/0000-0002-5589-7754'
  - given-names: Amelia
    family-names: Bertozzi-Villa
  - given-names: Kaitlin
    family-names: Newson
    orcid: 'https://orcid.org/0000-0001-8739-5823'
  - given-names: Jennifer
    family-names: Stubbs
    orcid: 'https://orcid.org/0000-0002-6080-5703'
  - given-names: Belinda
    family-names: Weaver
  - given-names: François
    family-names: Michonneau
    orcid: 'https://orcid.org/0000-0002-9092-966X'
repository-code: 'https://github.com/carpentries/sandpaper-docs'
url: 'https://carpentries.github.io/sandpaper-docs/'
abstract: >-
  Documentation for The Carpentries Workbench, a set of
  tools that can be used to create accessible lesson
  websites.
keywords:
  - Carpentries
  - sandpaper
  - pegboard
  - varnish
  - R
  - pkgdown
license: CC-BY-4.0
Plain text CITATION file
As an alternative to Citation File Format, you can also use a plain
text file, named CITATION (i.e. without the
.cff extension), in which you add guidance for people
wanting to cite your lesson in their publications/projects.
Please cite this lesson as:

Zhian N. Kamvar et al,
Introduction to The Carpentries Workbench.
https://github.com/carpentries/sandpaper-docs-
sandpaper::build_lesson()renders the site and rebuilds any sources that have changed. - RStudio shortcuts are cmd + shift + B and cmd + shift + K
- To edit a lesson, you only need to know Markdown and/or R Markdown
- The folder structure is designed with maintainers in mind
- New episodes can be added with
sandpaper::create_episode()