Introduction to The Carpentries Workbench
Last updated on 2026-05-26 | Edit this page
Overview
Questions
- How do I get started?
Objectives
- Create new lesson from scratch
- Identify the main command to preview the site
- Understand the basic structure of a new workbench
Let’s say you have a set of Markdown or R Markdown files that you used for a class website that you want to convert into a Carpentries Lesson. To go from zero to a new lesson website that can auto-render R Markdown documents to a functional website is three steps with sandpaper:
- Create a site
- Push to GitHub
- Add your files
That’s it. After that, if you know how to write in Markdown, you are good to go.
Takeaway message
Contributors should only be expected to know basic markdown and very minimal yaml syntax in order to work on lessons.
Super Quickstart: Copy A Template from GitHub
The absolute quickest way to get started with The Carpentries Workbench is to create a GitHub repository with one of the two available templates, depending on your preference:
Step 1: Choose a template
- Markdown Lessons (no generated content) (if your lesson will not include R code examples, use this template)
- R Markdown Lessons (generated content via R) (our tutorial uses this template)
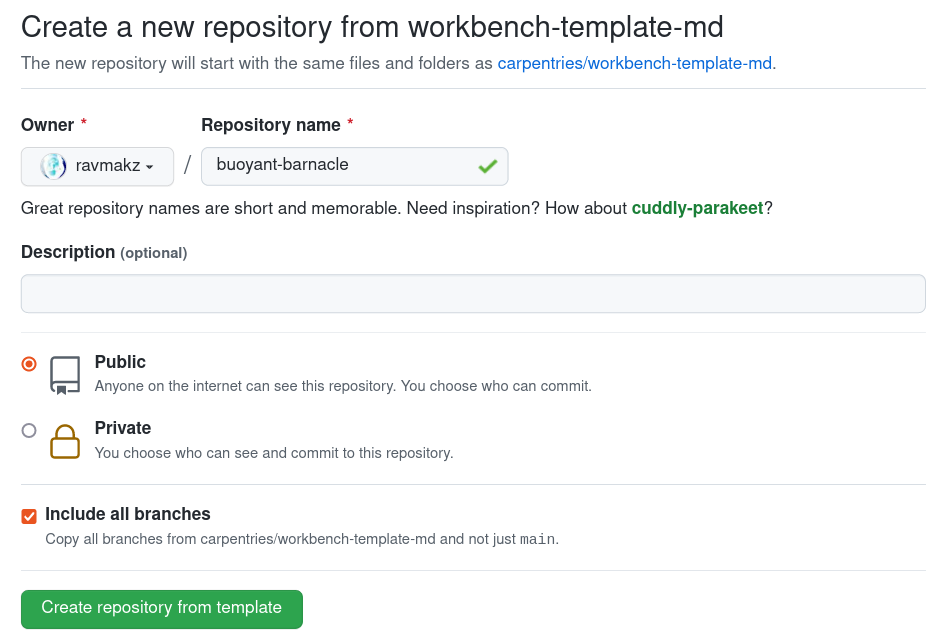
Step 2: Choose a name for your lesson repository.
Name it “buoyant-barnacle”. select “Include All Branches”. Click on the button that says “Create repository from template”
Creating a new lesson repository
Step 3: Customise your site
On GitHub, open the config.yaml file, and click on the
pencil icon on the top and edit the values, especially “carpentry”,
“source”, and “title” to reflect your own repository. Commit the file
using the form at the bottom of the page.
That’s it. The website should update in about 2-3 minutes with your information. If you want to continue working directly on GitHub, you can do so. If you want to work locally, be sure to follow the setup instructions, clone your lesson to your computer, open RStudio (or your preferrred interface to R) inside the lesson folder, and preview your new lesson
Quickstart: Create a New Lesson
Create a Lesson Locally
Follow these steps to create a brand new lesson on your Desktop called “buoyant-barnacle”.
- Follow the setup instructions
- Open RStudio (or your preferred interface to R)
- Use the following code:
R
library("fs") # file system package for cross-platform paths
library("sandpaper")

# Create a brand new lesson on your desktop called "buoyant-barnacle"
bb <- path_home("Desktop/buoyant-barnacle")
print(bb) # print the new path to your screen
create_lesson(bb) # create a new lesson in that path
If everything went correctly, you will now have a new RStudio window
open to your new project called “buoyant-barnacle” on your Desktop (if
you did not use RStudio, your working directory should have changed, you
can check it via the getwd() command).
Your lesson will be initialized with a brand new git repository with
the initial commit message being
Initial commit [via {sandpaper}].
🪲 Known Quirk
If you are using RStudio, then an RStudio project file
(*.Rproj) is automatically created to help anchor your
project. You might notice changes to this file at first as RStudio
applies your global user settings to the file. This is perfectly normal
and we will fix this in a future iteration of {sandpaper}.
Previewing Your New Lesson
After you created your lesson, you will want to preview it locally. First, make sure that you are in your newly-created repository and then use the following command:
R
sandpaper::serve()
What’s with the :: syntax?
This is a syntax that clearly states what package a particular
function comes from. In this case, sandpaper::serve() tells
R to use the serve() function from the
sandpaper package. These commands can be run without first
calling library(<packagename>), so they are more
portable. I will be using this syntax for the rest of the lesson.
If you are working in RStudio, you will see a preview of your lesson in the viewer pane and if you are working in a different program, a browser window will open, showing a live preview of the lesson. When you edit files, they will automatically be rebuilt to your website.
DID YOU KNOW? Keyboard Shortcuts are Available
If you are using RStudio, did you know you can use keyboard shortcuts to render the lesson as you are working on the episodes?
- Render and preview the whole lesson
- ctrl + shift + B
- Render and preview an episode
- ctrl + shift + K
The first time you run this function, you might see A LOT of output on your screen and then your browser will open the preview. If you run the command again, you will see much less output. If you like to would like to know how everything works under the hood, you can check out the {sandpaper} package documentation.
How do I determine the order of files displayed on the website?
The config.yaml file contains four fields that
correspond to the folders in your repository: episodes,
instructors, learners, profiles.
If the list is empty, then the files in the folders are displayed in
alphabetical order, but if you want to customize exactly what content is
published on the website, you can add a yaml list of the filenames to
determine order.
For example, if you had three episodes called “introduction.md”,
“part_two.Rmd”, and “in_progress.md” and you wanted to only show
introduction and part_two, you would edit config.yaml to
list those two files under episodes::
Push to GitHub
The lesson you just created lives local on your computer, but still needs to go to GitHub. At this point, we assume that you have successfully linked your computer to GitHub.
- visit https://github.com/new/
- enter
buoyant-barnacleas the repository name - Press the green “Create Repository” button at the bottom of the page
- Follow the instructions on the page to push an existing repository from the command line.
A few minutes after you pushed your repository, the GitHub workflows
would have validated your lesson and created deployment branches. You
can track the progress at
https://github.com/<USERNAME>/buoyant-barnacle/actions/.
Once you have a green check mark, you can set
up GitHub Pages by going to
https://github.com/<USERNAME>/buoyant-barnacle/settings/pages
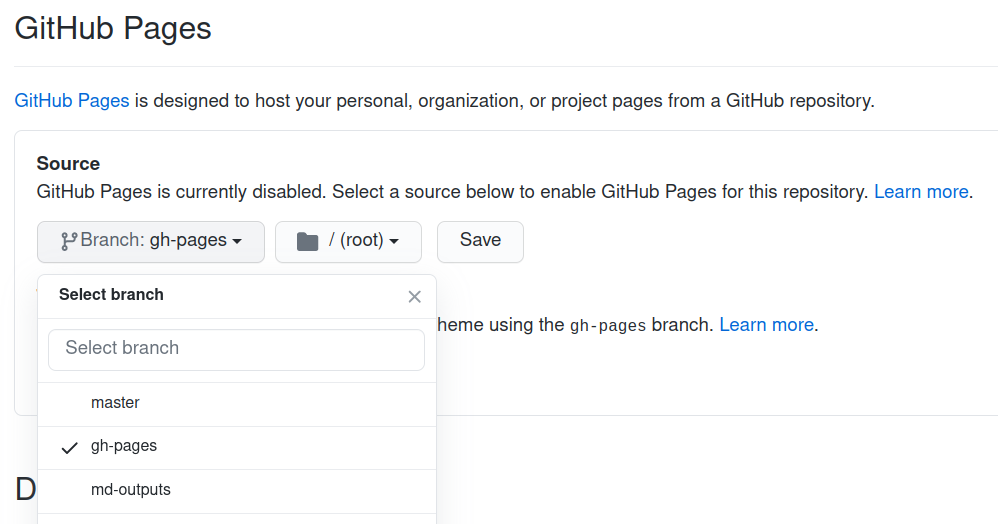
and choosing gh-pages from the dropdown menu as shown in
the image below:
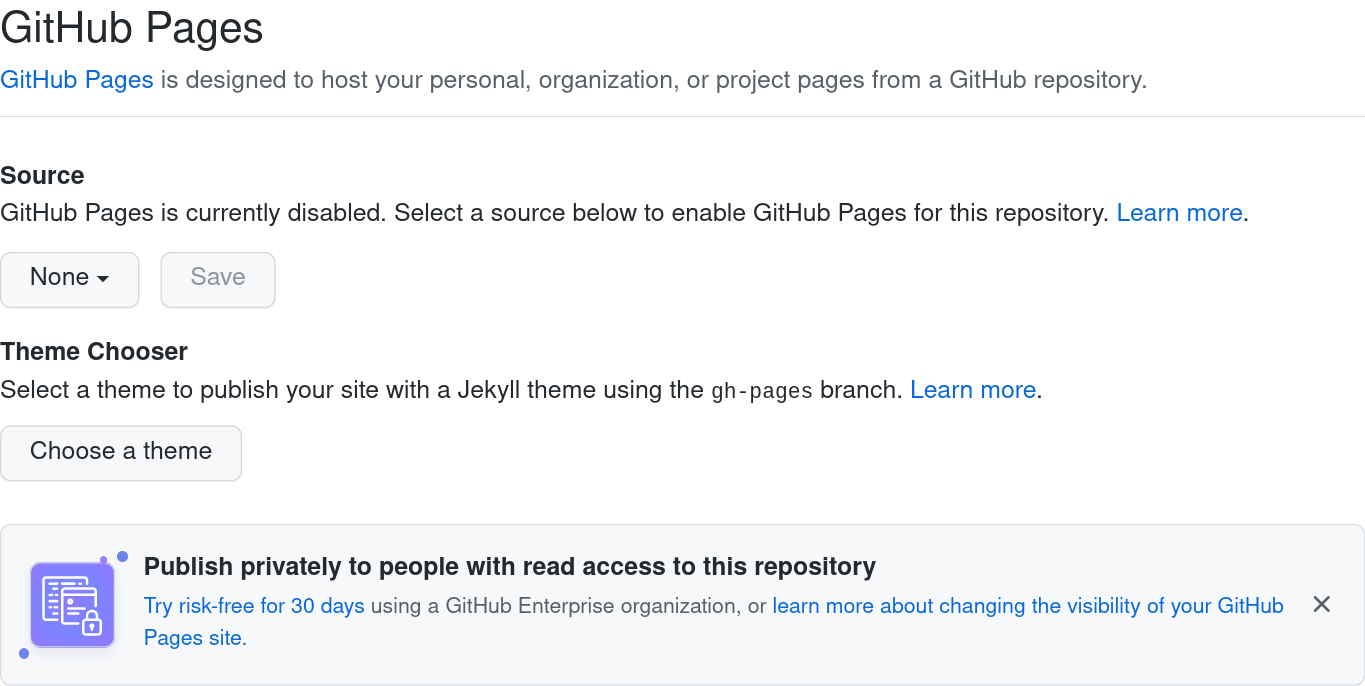
Click on the “select branch” button and select “gh-pages”, then click “Save”:
After completing this configuration, the URL for your lesson website
will be displayed at the top of the page. Site URLs can be customised,
but the default URL structure is
https://<USERNAME>.github.io/<REPONAME>/: the
URL of the buoyant-barnacle example used so far would be
https://<USERNAME>.github.io/buoyant-barnacle/.
⌛ Be Patient
GitHub needs to start up a new virtual machine the first time you use this, so it may take anywhere from 4 minutes up to 30 minutes for things to get started: 15 minutes for the workflow to spin up and then another 15 minutes for the machine to bootstrap and cache.
Alternative: Two-step solution in R
If you use R and use an HTTPS protocol, this can be done in a single step from inside RStudio with the {usethis} package:
R
usethis::use_github()
usethis::use_github_pages()
The use_github() function will set up a new repository
under your personal account called buoyant-barnacle, add
that remote to your git remotes, and automatically push
your repository to GitHub.
The use_github_pages() function will signal to GitHub
that it should allow the gh-pages branch to serve the
website at https://user.github.io/buoyant-barnacle
The output of these commands should look something like this:
OUTPUT
> use_github()
✔ Creating GitHub repository 'zkamvar/buoyant-barnacle'
✔ Setting remote 'origin' to 'https://github.com/zkamvar/buoyant-barnacle.git'
✔ Pushing 'main' branch to GitHub and setting 'origin/main' as upstream branch
✔ Opening URL 'https://github.com/zkamvar/buoyant-barnacle'

> use_github_pages()
✔ Initializing empty, orphan 'gh-pages' branch in GitHub repo 'zkamvar/buoyant-barnacle'
✔ GitHub Pages is publishing from:
• URL: 'https://zkamvar.github.io/buoyant-barnacle/'
• Branch: 'gh-pages'
• Path: '/'
If you don’t use the HTTPS protocol, and want to find out how to set it in R, we have a walkthrough to set your credentials in the learners section.
Tools
As described in the setup document, The Carpentries Workbench only requires R and pandoc to be installed. The tooling from the styles lesson template has been split up into three R packages:
- {varnish} contains the HTML, CSS, and JavaScript elements
- {pegboard} is a validator for the markdown documents
- {sandpaper} is the engine that puts everything together.
- Lessons can be created with
create_lesson() - Preview lessons with
serve() - The toolchain is designed to be modular.