Summary and Setup
Welcome to the documentation for The Carpentries Workbench. This is a complete redesign of our lesson infrastructure (formerly known as the lesson template) that follows the philosophy of keeping content and tools separate. The new infrastructure will have the following features:
Features of the The Carpentries Workbench
🚧 Under Construction 🚧
This documentation site is still being constructed—please be patient.
If you are looking to get started using the workbench, head over to the setup page to get started!
Overview
The lesson infrastructure is built on Git, the R language, and pandoc. It consists of four components:
- The source content (plain markdown or RMarkdown files organized into folders with a configuration yaml file)
- The engine (R package {sandpaper})to orchestrate building the content from markdown to HTML
- The validator (R package {pegboard}) to parse the source files and highlight common errors
- The style (R package {varnish}) HTML, CSS, and JavaScript styling elements for the final website
Details of how these tools work together are explained in the Lesson Deployment chapter. In short, you can expect to interact with the source content and {sandpaper} to author and preview your lesson.
Required Software
This setup document will walk you through the process of installing or upgrading the required software in the following order.
Git (≥ 2.28 recommended)
R (≥ 4.x)
pandoc (≥ 3.x)
-
The lesson infrastructure R packages
- {sandpaper} (development version)
- {varnish} (development version)
- {pegboard} (development version)
- {tinkr} (markdown parser required by {pegboard})
Once you have Git, R, and Pandoc installed, these packages can be installed and updated via:
R
install.packages(c("sandpaper", "varnish", "pegboard"),
  repos = c("https://carpentries.r-universe.dev/", getOption("repos")))
Recommended Software
If you are using R or pandoc for the first time, we recommend using the RStudio IDE for the following reasons:
- It comes with pandoc pre-installed.
- It works consistently across all major platforms.
- It provides a dedicated BASH console so you can easily switch between R and Git operations.
- There are convenient keyboard shortcuts to preview lessons.
- On Windows, it will automatically detect your R installation without
you needing to edit your
PATH.
If you do not want to use RStudio, that’s perfectly okay and expected! We want to be able to meet you where you are to work with the new template. If you feel comfortable using a different tool (e.g. the command line or VSCode), then you should install R and pandoc separately and make sure that they are in your path.
Installation
This will guide you through installing the foundational software and infrastructure packages on your computer. If you already have software installed and are curious if you should update it to a newer version, the answer is almost always, yes, update to a newer version, because often the newer versions will contain important bug fixes that are important to the secruity of your computer.
Jump to the installation instructions for your system: Windows, MacOS, or Linux
Installing on Windows
Git
We recommend installing git via the Git for Windows installer. The installer is going to ask a lot of questions, so we recommend using The Carpentries instructions for workshop participants.
Test your installation
To test that you have git installed, open your command line by
pressing Windows+R and type cmd to
bring up the command prompt. From there, you can type
git --version to see the version of your git installation.
You might see something like this:
OUTPUT
git version 2.31.1.windows.1If, however, you see this error, then you should try to install git again.
ERROR
'git' is not recognised as an internal or external command,
operable program or batch file.
R
Install the latest version of R for Windows. There is also a video tutorial up on The Carpentries instructions for workshop participants that can be quite helpful for parsing the steps of installing R on Windows.
Optional: Want to add R to your PATH?
As we mention above, we recommend using RStudio
for your lesson, but if you want to be able to integrate the lesson
infrastructure into your own preferred workflow, you need to have R on
your path. The catch is that R for Windows does not automatically set
your PATH variable.
Here are
some instructions on setting up your PATH on Windows using both the GUI
and CLI. Note that R will normally install at something like
c:\Program Files\R\R-4.1.0\bin\x64, but if you are not
admin, it will install in your Documents folder.
To verify that R is installed in your PATH, open your
command line by pressing Windows+R and type
cmd to bring up the command prompt. From there, you can
type R --version at the prompt. Your output should be
similar to below, with a version ≥ 4.x.
OUTPUT
R version 4.1.0 (2021-05-18) -- "Camp Pontanezen"
Copyright (C) 2021 The R Foundation for Statistical Computing
Platform: x86_64-mingw32/x64 (64-bit)

R is free software and comes with ABSOLUTELY NO WARRANTY.
You are welcome to redistribute it under the terms of the
GNU General Public License versions 2 or 3.
For more information about these matters see
https://www.gnu.org/licenses/.
pandoc
There are two ways to install pandoc:
Via RStudio (recommended)
Since pandoc comes bundled with RStudio, you can install it by installing the latest version of RStudio. You can download the installer from the RStudio website.
Via the pandoc website
If you are comfortable adding R to your windows PATH (see previous section), then you can install pandoc by using the binary provided on its website at https://pandoc.org/installing.html
Infrastructure R packages
To install the R packages, you will need to open RStudio (or start R from the command line if you did not install RStudio) and enter the following lines into the console.
R
# register the repositories for The Carpentries and CRAN
options(repos = c(
  carpentries = "https://carpentries.r-universe.dev/",
  CRAN = "https://cran.rstudio.com/"
))

# Install the template packages to your R library
install.packages(c("sandpaper", "varnish", "pegboard"))
Installing on MacOS
Git
You should have git pre-installed on your macOS, but it is likely that this is an old version. We recommend installing The latest version of Git for MacOS. For a video guide, you can look at the instructions for workshop participants.
Test your installation
To test your installation of Git and confirm it works, open Terminal.app and type the following:
OUTPUT
git version 2.31.0If you have the default version of git, you might see this output, and that’s okay for the purposes of this template.
OUTPUT
git version 2.24.3 (Apple Git-128)R
Homebrew Not Recommended
Installing R via Homebrew can allow you to customise your
installation, but you lose the advantage of having readily available
package binaries. Moreover, if you do not have the required C libraries
(e.g. libxslt) installed, then the installation of some
packages will fail. So, unless you are prepared for this, please do not
use Homebrew to install R.
You can install the latest R release for MacOS from https://cran.r-project.org/bin/macosx. There is also a video tutorial up on The Carpentries instructions for workshop participants that can be quite helpful for parsing the steps of installing R on MacOS.
Test your installation
You can test your installation of R by opening
Terminal.app and typing R --version into
the prompt. Your output should be similar to below, with a version ≥
4.x.
OUTPUT
R version 4.1.0 (2021-05-18) -- "Camp Pontanezen"
Copyright (C) 2021 The R Foundation for Statistical Computing
Platform: x86_64-apple-darwin17.0 (64-bit)

R is free software and comes with ABSOLUTELY NO WARRANTY.
You are welcome to redistribute it under the terms of the
GNU General Public License versions 2 or 3.
For more information about these matters see
https://www.gnu.org/licenses/.
pandoc
There are two ways to install pandoc:
Via RStudio (recommended)
Since pandoc comes bundled with RStudio, you can install it by
installing the latest version of RStudio. You can download
the installer from the RStudio website. RStudio will be a
*.dmg (disk image) that you will double click to open a
window that will look something like this:
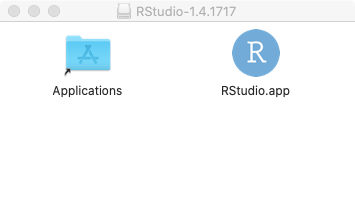
You should drag the RStudio icon to the left, into the Applications folder to install RStudio on your computer.
Via the pandoc website
If are more comfortable using R from the command line, then you can
install pandoc by
clicking the “Download the latest installer for macOS” button. This will
save a file called pandoc-X.XX-macOS.pkg installer to your
computer. Open the installer and follow the instructions to install
pandoc on your computer.
Infrastructure R packages
To install the R packages, you will need to open RStudio (or start R from the command line if you did not install RStudio) and enter the following lines into the console.
R
# register the repositories for The Carpentries and CRAN
options(repos = c(
  carpentries = "https://carpentries.r-universe.dev/",
  CRAN = "https://cran.rstudio.com/"
))

# Install the template packages to your R library
install.packages(c("sandpaper", "varnish", "pegboard"))
Installing on Linux
Instructions for installing on Linux are nuanced due to the variety
and availability of libraries and dependencies for each distribution,
e.g. Ubuntu is Debian based whereas Fedora is Red Hat based. These
instructions will use Ubuntu as the preferred distribution. The default
apt repository is often out of date, so you will need to
use a Personal Package Archive
aka PPA to install the latest version of a particular software,
which will be included in these instructions.
Git
Many distributions include git by default, but it is often outdated. It is useful to try to update in case a newer version is available:
R
To install R, you can visit CRAN’s Linux page to check if your platform is supported. Detailed instructions exist for Ubuntu. Here are the commands to register the PPA on your machine and then install R:
BASH
# update indices
sudo apt update -qq
# install two helper packages we need
sudo apt install --no-install-recommends software-properties-common dirmngr
# import the signing key (by Michael Rutter) for these repo
sudo apt-key adv --keyserver keyserver.ubuntu.com --recv-keys E298A3A825C0D65DFD57CBB651716619E084DAB9
# add the R 4.0 repo from CRAN -- adjust 'focal' to 'groovy' or 'bionic' as needed
sudo add-apt-repository "deb https://cloud.r-project.org/bin/linux/ubuntu $(lsb_release -cs)-cran40/"

# Install R
sudo apt install --no-install-recommends r-base
Test your installation
Test your R installation by opening your terminal and runningR --version into the prompt. Your output should be similar
to below, with a version ≥ 4.x.
OUTPUT
R version 4.1.0 (2021-05-18) -- "Camp Pontanezen"
Copyright (C) 2021 The R Foundation for Statistical Computing
Platform: x86_64-pc-linux-gnu (64-bit)

R is free software and comes with ABSOLUTELY NO WARRANTY.
You are welcome to redistribute it under the terms of the
GNU General Public License versions 2 or 3.
For more information about these matters see
https://www.gnu.org/licenses/.
pandoc
There are two ways to install pandoc:
Via RStudio (recommended)
Pandoc comes bundled with RStudio. You can download the installer from the RStudio website. When installing RStudio for Linux, your distribution may not be shown on the landing page. If your Ubuntu version is not listed, check the RStudio Previous Versions page to see if there are builds available.
Optional: verify the install
You can optionally verify the download before installing by following the instructions at https://posit.co/code-signing/.
Via the pandoc website
If you are more comfortable using R from the command line, then you
can install pandoc from the releases page. From the
list on the GitHub page, for Ubuntu, choose the appropriate
.deb file for your chip architecture (i.e. AMD64 or
ARM64).
Infrastructure R packages
Linux packages normally need to be compiled into binaries by your system, which can take a long time the first time it happens. RStudio provides a package manager that pre-compiles Linux binaries. Note that you do not have to be using RStudio to take advantage of these binaries. The one we are using is set up for Ubuntu 22.04 (jammy).
Dependencies of Dependencies
If you are not used to installing software on Linux, it can be frustrating sometimes because things can go wrong and it’s not always immediately clear why. The same is true for some R packages with compiled code.
Some packages require underlying C libraries (e.g. the xml2 library),
which are catalogued for Ubuntu in The Carpentries R
Universe and available via the
API. To produce a list (you may need to
sudo apt install jq if it is not already on your
system):
BASH
curl -L https://carpentries.r-universe.dev/stats/sysdeps 2> /dev/null | jq -r '.headers[0] | select(. != null)'This list can be sent to apt install to install
everything:
BASH
sudo apt-get install -y \
  $(curl -L https://carpentries.r-universe.dev/stats/sysdeps 2> /dev/null | jq -r '.headers[0] | select(. != null)') 2> /dev/null \
  || echo "Not on Ubuntu"
After you have these installed, you will be able to install the required R packages without error.
What if I have a different version of Linux?
For the dependencies above, you can browse the rstudio/r-system-requirements repository to find the correct formulation for your computer.
In addition, you should check the supported operating systems for the Posit Package Manager to see if you will benefit from pre-built binaries.
To install the R packages, you will need to open RStudio (or start R from the command line if you did not install RStudio) and enter the following lines into the console.
R
# Set the default HTTP user agent to get pre-built binary packages
RV <- getRversion()
OS <- paste(RV, R.version["platform"], R.version["arch"], R.version["os"])
codename <- sub("Codename.\t", "", system2("lsb_release", "-c", stdout = TRUE))
options(HTTPUserAgent = sprintf("R/%s R (%s)", RV, OS))

# register the repositories for The Carpentries and CRAN
options(repos = c(
  carpentries = "https://carpentries.r-universe.dev/",
  CRAN = paste0("https://packagemanager.posit.co/all/__linux__/", codename, "/latest")
))

# Install the template packages to your R library
install.packages(c("sandpaper", "varnish", "pegboard"))
Saving these settings for later
To not have to run this block of code every time you want to update,
add the following code into your ~/.Rprofile to run it
every time you open your terminal:
R
local({
  # Set the default HTTP user agent to get pre-built binary packages
  RV <- getRversion()
  OS <- paste(RV, R.version["platform"], R.version["arch"], R.version["os"])
  codename <- sub("Codename.\t", "", system2("lsb_release", "-c", stdout = TRUE))
  options(HTTPUserAgent = sprintf("R/%s R (%s)", RV, OS))

  # register the repositories for The Carpentries and CRAN
  options(repos = c(
    carpentries = "https://carpentries.r-universe.dev/",
    CRAN = paste0("https://packagemanager.posit.co/all/__linux__/", codename, "/latest")
  ))
})
What if I get errors installing packages?
If you run into errors (non-zero exit status), it probably means that you were missing a C library dependency that needs to be installed via your package manager (i.e. apt). To resolve these issues, scroll back in the log and you might find messages that looks similar to this:
OUTPUT
* installing *source* package ‘xslt’ ...
** using staged installation
Package libexslt was not found in the pkg-config search path.
Perhaps you should add the directory containing `libexslt.pc'
to the PKG_CONFIG_PATH environment variable
No package 'libexslt' found
Using PKG_CFLAGS=-I/usr/include/libxml2
Using PKG_LIBS=-lexslt -lxslt -lxml2
-----------------------------[ ANTICONF ]-------------------------------
Configuration failed to find libexslt library. Try installing:
 * deb: libxslt1-dev (Debian, Ubuntu, etc)
 * rpm: libxslt-devel (Fedora, CentOS, RHEL)
 * csw: libxslt_dev (Solaris)
If libexslt is already installed, check that 'pkg-config' is in your
PATH and PKG_CONFIG_PATH contains a libexslt.pc file. If pkg-config
is unavailable you can set INCLUDE_DIR and LIB_DIR manually via:
R CMD INSTALL --configure-vars='INCLUDE_DIR=... LIB_DIR=...'
---------------------------[ ERROR MESSAGE ]----------------------------
<stdin>:1:10: fatal error: libxslt/xslt.h: No such file or directory
compilation terminated.
------------------------------------------------------------------------
Use the instructions in these logs to install the correct package
from your terminal and then open R or RStudio and retry installing the
packages. For example, for the error above, use
sudo apt install libxslt1-dev.
Test your installation
Now that you have installed the lesson components, it is a good idea to run a small test to verify that these components work together. To test your installation open RStudio (or launch R if you have not installed RStudio) and enter the following commands to confirm everything works
R
rmarkdown::pandoc_version()
tmp <- tempfile()
sandpaper::no_package_cache()
sandpaper::create_lesson(tmp, open = FALSE)
sandpaper::build_lesson(tmp, preview = FALSE, quiet = TRUE)
fs::dir_tree(tmp, recurse = 1)
OUTPUT
[1] '2.19.2'
ℹ Consent for package cache revoked. Use `use_package_cache()` to undo.
→ Creating Lesson in '/tmp/RtmpnRjHyr/file12f34734be05f'...
✔ First episode created in '/tmp/RtmpnRjHyr/file12f34734be05f/episodes/01-introduction.Rmd'
ℹ Workflows up-to-date!
✔ Lesson successfully created in '/tmp/RtmpnRjHyr/file12f34734be05f'
/tmp/RtmpnRjHyr/file12f34734be05f
├── CODE_OF_CONDUCT.md
├── CONTRIBUTING.md
├── LICENSE.md
├── README.md
├── config.yaml
├── episodes
│   ├── 01-introduction.Rmd
│   ├── data
│   ├── fig
│   └── files
├── index.md
├── instructors
│   └── instructor-notes.md
├── learners
│   └── setup.md
├── profiles
│   └── learner-profiles.md
└── site
    ├── DESCRIPTION
    ├── README.md
    ├── _pkgdown.yaml
    ├── built
    └── docs
If the installation did not work, please raise an issue on GitHub.
Installation FAQ
Why does it take 5 lines of code to install the infrastructure?
As the Workbench packages are in The Carpentries R-Universe and not CRAN, we need to tell R to get the packages from R-Universe.
What is an R Library?
An R library is a folder on your computer that stores R packages. When you install R packages, the first message you will see will probably be something like (on Windows):
Installing packages into ‘c:/Users/USER/Documents/R/win-library/4.0’
(as ‘lib’ is unspecified)
On Ubuntu, this may look like:
Installing packages into ‘/home/<user>/R/x86_64-pc-linux-gnu-library/4.4’This folder is where all of the R packages you install via
install.packages() will live. If you ever need to look this
up, you can use the .libPaths() function.
Opening your R environment
If you are using RStudio, you can open it by double-clicking on the RStudio icon in your application launcher; you do not have to open R separately to use RStudio.
If you are using R, you can open it in your terminal application by
typing R. Your prompt will be replaced by a
>, which indicates that you are in R’s interactive REPL.
You can exit R or RStudio by typing q() in the R
console.
Setting up your R workspace
When you set up R, it’s important to make sure you set it up to always start R with a clean slate1: never save your workspace on exit and never load a previously saved workspace on startup.
Via RStudio
If you are using RStudio, you can follow the instructions in this forum post:
- From the menu, select
Tools > Global Options - Under Workspace Options, de-select “Restore .RData into workspace at startup” and set “Save workspace to .RData on exit” to “Never”
Connect to GitHub
You will need to make sure your git session is connected to GitHub. To do so, you will need to use an SSH or HTTPS protocol. If you already know how to push and pull from GitHub using the command line, you do not need to worry about setting this up.
If you do not have this set up, you should choose a protocol and then set them up according to the instructions from GitHub.
It’s recommended to use the SSH protocol, unless you explicitly cannot, e.g. behind an institutional firewall or proxy.
Is GitHub’s Documentation Confusing?
If you are like me, you may find GitHub’s documentation slightly confusing and/or lacking. I’ve found the following resources to be extremely helpful for setting up authentication credentials for your account:
- Remotes in GitHub (Software Carpentry)
- A walkthrough of creating a repository on GitHub and pushing to it via the command line.
- Connect to GitHub (Happy Git With R)
- A walkthrough of creating a throwaway repository that gives you a good idea for the mechanics of working with GitHub.
- Cache credentials for HTTPS (Happy Git With R)
- Clear explanation on how to set up a Personal Access Token and the benefits of using HTTPS. This explains how to do this in both the shell and R.
- Set up keys for SSH (Happy Git With R)
- Clear explanation on what SSH key pairs are and how to set up and connect them with GitHub. This has recommendations using both the shell and RStudio.
By default, R will ask if you want to save your workspace to a hidden file called
.RData. This is loaded when you start R, restoring your environment with all of the packages and objects you had previously loaded. This default behavior is not good for reproducibility and makes updating packages very very difficult. In 2017 Jenny Bryan wrote a very good article about the benefits of having a project-based workflow, starting from a clean slate: https://www.tidyverse.org/blog/2017/12/workflow-vs-script/↩︎