All in One View
Content from Introduction
Last updated on 2025-12-12 | Edit this page
Overview
Questions
- What is covered in this training?
- Who are the trainers?
- Who is participating?
Objectives
After completing this episode, participants should be able to…
- Explain how trainers and participants will interact throughout the workshop.
- Summarise the main skills that will be taught in this workshop.
Note: some of the content in this course is reproduced or adapted from The Carpentries Instructor Training curriculum.
Pronouns and Names
Using correct names and pronouns (e.g. “she/her”) is important to setting a tone of respect. Learning these is hard to do quickly, so we recommend displaying it prominently during the workshop.
In an online workshop, give everyone a moment to update their display name to reflect how they would like to be addressed.
At an in-person event, we recommend supplying name tags and markers, or using plain paper to create table-displayed name placards.
Note that pronouns are personal and some participants might prefer not to share them. Do not force people to share their pronouns.
Before The Training Begins
Getting to Know Each Other
If the Trainer has chosen an icebreaker question, participate by writing your answers in the shared document for the workshop.
Code of Conduct
To make clear what is expected, everyone participating in The Carpentries activities is required to abide by our Code of Conduct. Any form of behaviour to exclude, intimidate, or cause discomfort is a violation of the Code of Conduct. In order to foster a positive and professional learning environment we encourage you to:
- Use welcoming and inclusive language
- Be respectful of different viewpoints and experiences
- Gracefully accept constructive criticism
- Focus on what is best for the community
- Show courtesy and respect towards other community members
If you believe someone is violating the Code of Conduct, we ask that you report it to The Carpentries Code of Conduct Committee by completing this form.
Today’s Trainers
To begin class, each Trainer should give a brief introduction of themselves.
(For some guidelines on introducing yourself, see the Workshop Introductions section of the Instructor Training curriculum).
Now, we would like to get to know all of you.
Our First Exercise (10 minutes)
Think of an example of a great a lesson that you have followed (were taught in a class, read through online, read in a book).
- What did you find was so good about it?
- Why did it make such an impression on you?
Try to differentiate between what was good about the performance of the teacher/trainer and what was good about the content of the lesson itself. Take a few minutes to write down some notes about your answer, then introduce yourself to the other participants and tell them about it.
Collaborative Lesson Development Training Overview
The main objective of this training is to teach you the skills you need to design and develop an effective lesson, in collaboration with other members of the community.
During the training, we will introduce the steps you can take to design and develop a lesson to meet the needs of your target audience, and give you time to begin implementing those steps during the workshop itself. By the end of the training, you can expect to have defined an outline for your whole lesson, and begun filling in a detailed plan for some of its individual sections. The content you create in the training will exist as an open source lesson website similar to the one this training is based on. You should also know how you can continue building on the lesson and have some plans for how you will collaborate on the project after the training ends.
We will focus on three main areas:
Designing a Lesson
Much of the training will discuss a process to incorporate good practices in lesson design. We will explore how defining the specific skills you wish to teach early on in the development process provides a foundation from which you can build a stronger, more impactful lesson.
Building a Lesson Website
Throughout the training, while you design and begin developing the content of your lessons, we will teach you how to incorporate this into an organised and accessible website using our lesson infrastructure.
Collaborating Effectively
We believe that lessons are much more likely to succeed, and to remain useful in the long term, if they are developed collaboratively. We will spend a little time talking about how you can work together effectively during this training. To further develop your collaboration skills after the training, we recommend that you join one of the regular GitHub Skill-up sessions hosted by The Carpentries. Participation in those skill-ups is optional but included in your registration for this training.
Learning How to Teach a Lesson
This training will focus on the content – how to prepare a good lesson. More about the performance – how to deliver a lesson most effectively – is covered in The Carpentries Instructor Training.
- This training aims to teach you a process for designing a lesson and the skills to develop it as an open source website, in collaboration with others.
Content from Lesson Design
Last updated on 2025-12-12 | Edit this page
Overview
Questions
- What are the recommended steps to take when developing a new lesson?
- What lesson do you want to develop during and after this workshop?
Objectives
After completing this episode, participants should be able to…
- Explain the lesson design process we will be adopting for this course.
- Summarise the lessons that participants will be working on.
A Lesson Design Process
In order to design an effective lesson, we need a structured approach with the learner in mind and clearly identified goals. Throughout this training we will use a modified version of a process for curriculum design commonly referred to as backward design, described by Gill Nicholls1. Following Nicholls’ paradigm, we begin by defining exactly what you want your learners to be able to do after they have completed the lesson/training/course, with the subsequent stages involving the design and evaluation of content that will directly help learners meet those stated outcomes. By defining at the beginning of the process what you want the outcomes to be at the end, you ensure that your efforts remain focused on those goals as you work.
This training promotes an iterative backward design process where, after identifying the target audience of our lesson, we
- Define desired learning outcomes.
- Design assessments to determine progress towards desired outcomes.
- Write content to lead learners from one of these assessments to the next.
- Assess learner progress towards outcomes during teaching.
- (After the break) evaluate how closely the outcomes meet the objectives.

The process throughout this training
Note the cyclical nature of the process described above. By the time you have completed your certification as a Carpentries Lesson Developer, you will have completed one iteration through this cycle:
- Define desired learning outcomes.
- You will define learning objectives for your lesson as a whole and for individual sections.
- Design assessments to determine progress towards desired outcomes.
- You will learn about different types of assessment and how they can give you information about your learners’ progress towards the defined objectives.
- You will design and implement exercises that are appropriate to your target audience and the skills you want to teach them.
- Write content to lead learners from one of these assessments to the
next.
- You will choose examples and a narrative that can help learners gain insight into the topic of your lesson.
- You will begin to write content that is accessible, relevant, and appropriate for your target audience.
- Assess learner progress towards outcomes during teaching.*
- You will deliver part of your new lesson and gather information about how effectively it teaches learners what they need to know.
- Evaluate how closely the outcomes meet the objectives.*
- You will revisit your lesson design and content and make plans to update it, based on your own reflections and the feedback you gathered from learners.
Teaching the new lesson content is an essential intermediate step in the process and the steps marked with an asterisk (*) will be completed after the training, as part of the checkout process for certification (more on which later). The importance of gathering feedback and reflecting on teaching experience will be a common refrain throughout this training.
Your Lessons
This training will provide many opportunities for discussion of your lessons. Providing some context now for the lessons that you will be creating will help the Trainers and other participants get involved in those discussions and give you feedback as you follow the process.
Discussion (10 minutes)
Share your answers to the following questions in the shared notes, then discuss them with the Trainers, your collaborators, and the other participants.
- What is the topic of the lesson that you plan to develop based on this training?
- Have you created training material on this topic before?
- What is motivating you to create this lesson?
Iterative Development
The Carpentries community develops open source lessons, which can always be updated and may never be finished. A lesson can undergo many iterations before it reaches a relatively stable state. To reflect this, we encourage lesson developers to indicate the status of their lesson by labelling its progress through a lesson life cycle:

Each life cycle stage indicates the level of maturity of a lesson:
- pre-alpha: a first draft of the lesson is still being constructed.
- alpha: the lesson has been/is being taught by the original authors, but has not been fully tested.
- beta: the lesson is ready to be taught by instructors who have not been significantly involved in its development to this point.
- stable: the lesson has been extensively tested by the authors and others. It can be considered broadly complete and unlikely to undergo any drastic changes without warning.
Although your lessons will probably remain in pre-alpha throughout this training, some of the content will be equally valuable at later stages and we will also point you towards resources to help with testing the lesson and gathering feedback.
The Carpentries Community Handbook provides more information about the lesson life cycle.
Lesson Design Notes Template
At this point, the Trainers will share a template document for Lesson Design Notes with trainees. Trainees should make a copy of this document and fill in their lesson title. They will populate other parts of the document with the notes and information they produce throughout the training.
- We will learn to develop lessons based on the (slightly adapted) Nicholls’ backward lesson design process.
- There can be many reasons to create a new lesson.
- This training will give you a process to follow to ensure your lesson is effective.
Content from Identifying Your Target Audience
Last updated on 2025-10-17 | Edit this page
Overview
Questions
- Why is it so important to think about the target audience early in the process?
- How can you ensure that your lesson reaches the right audience?
Objectives
After completing this episode, participants should be able to…
- Describe the importance of aligning lesson design with the intended audience.
- Compose a list of prior knowledge required to follow a lesson.
Target Audience
Given the limited time in a short-format training, it is vital to define the scope of the lesson, i.e. what people need to know before and what they will know after the lesson. Thinking carefully about the target audience will help you with this and with defining desired learning outcomes (the first step of the lesson design). Prominently displaying a description of the target audience will also help attract people with the right motivation and relevant prior knowledge to attend your workshops.
Expertise
One of the most important things we can identify about our target audience is the level of expertise they will already have in relation to the skills taught in your lesson. In The Carpentries Instructor Training curriculum, we describe three different stages of skill acquisition: novice, competent practitioner, and expert and how these stages directly correlate to the complexity of mental models these different groups have about a domain/topic.
Briefly, the novice is someone who does not know what they do not know, i.e., they do not yet know what the key ideas in the domain are or how they relate, the competent practitioner has enough understanding of the domain/topic for everyday purposes, and the expert is someone who can easily handle situations that are out of the ordinary and can immediately use their prior knowledge or skills when presented with a new problem in the domain.
When designing a new lesson, it is important to think about the level of expertise that you expect learners to arrive with for two reasons:
- It helps to predict what prior knowledge and mental
model learners will have of the lesson domain when they arrive. This
can enable you to make progress quickly by
- working to help learners recall (activate) that prior knowledge1,
- building on the conceptual understanding they already have2 and,
- perhaps most importantly, giving you some idea of what misconceptions they might arrive with. It is vital that misconceptions are identified and corrected early on, before learners try to incorporate new knowledge into a broken mental model. (More on this in Designing Exercises.)
- People at different stages of this process need to be taught differently. For example, novices will learn more from lessons that include worked examples and are more tutorial-like i.e. focused on a specific task, with step-by-step explanations of the process, but without a lot of extra information that is not directly relevant. However, the same approach may actually hinder learning for competent practitioners who may be distracted by a step-by-step explanation of something they already have the prior knowledge of3. For learners at this level of expertise, lessons which include activities offering learners the freedom to explore options and develop their own solutions, are likely to be more effective.
Motivation
Furthermore, your lesson will be more effective if it aligns with the motivations of the target audience. Understanding the wants and needs of your target audience, what they know already and what kinds of problems they want to solve, will help you design a lesson that learners can see the value in. It will give them the impression that taking the lesson will be worthwhile (called positive expectancies in the literature).
We will look more at strategies to establish value and build positive expectancies in the next episode.
Be Specific
It can be tempting to identify a target audience only in vague terms, for example by writing that a lesson is aimed at “PhD students” or “early career researchers”. However, taking the time to focus on real people, or imagined personae, who represent your target audience will help you take time to consider the various aspects that can influence how much someone will learn from your lesson. It will also help you notice when the assumptions you are making about your target audience are unreasonable.
Most of all, it will help you stay connected to the fact that you are not your learners: they will arrive at the lesson with different priorities, interests, and challenges than your own.
Exercise: thinking about target audience (15 minutes total for both parts)
Part 1 (all, 5 minutes): think about a member of the target audience for your lesson, and answer the following questions in the context of your lesson topic:
- What is their background?
- What do they already know how to do?
- What do they want to do with the skills they will learn from your lesson?
- What problem will your lesson help them solve?
Share your answers with your collaborators. How do they compare? If you have identified different audiences, are they compatible? Or would your time be better spent focussing on one particular audience for this lesson?
Take notes on your discussion in your Lesson Design Notes document. It can be particularly helpful to note down any decisions made e.g. potential target audiences that were explicitly discounted, and your reasons for doing so.
Take notes about your choice of target audience in your Lesson Design Notes document. It can be particularly helpful to note down any decisions made e.g. potential target audiences that were explicitly discounted, and your reasons for doing so.
Then write 1-2 diagnostic questions, for use before the lesson is taught, to help you assess whether a respondent falls within the intended audience for your lesson.
There is more to consider about your target audience than we could capture with only the questions listed above. In your own time, you should think more about the other considerations you might need to make when writing a lesson for your audience.
For example, what vocabulary do they use? The terms you are teaching in your lesson might have a different meaning in your learners’ domain of expertise, and it can be helpful to prepare for and try to avoid confusion arising from this clash. Furthermore, might their primary language differ from yours? If so, how might this change the way you write the lesson?
Defining Prerequisite Knowledge
A very common challenge encountered in workshops is heterogeneity of expertise among the audience. When learners arrive at a workshop with a wide range of previous experience with the topic, it is difficult for the instructors to keep everyone engaged. Those who arrive with too little relevant knowledge and experience can struggle to follow the lesson content at the pace you expect, while those who arrive with too much are likely to become bored and despondent as their expectation of learning new skills is not met.
One way to try to guard against this is to publish the description of your target audience when you advertise a workshop teaching your lesson, alongside a list summarising the skills and conceptual knowledge you expect learners to arrive with. Another is to use the information you have about your target audience to ask questions of potential learners when they apply/register to join the workshop (like the diagnostic questionnaire you may have prepared in the exercise above), and use the answers they give to filter out those who fall outside your intended audience.
While valuable, this kind of pre-assessment should be approached with caution: people are often bad at self-assessment i.e. estimating our own ability to perform a task4. We can try to mitigate for this when designing the questions for a pre-workshop survey, leaving little room for inaccurate self-assessment to confound the results. But experience suggests it is very difficult to ensure that every learner in a workshop falls within the intended audience of a lesson.
Exercise: defining prerequisite knowledge (5 minutes)
Write a list of the skills/knowledge your learners will be required to have before they can follow your lesson.
If you are struggling with this exercise because your lesson audience is novices, think about skills like touch typing, using a web browser, or interacting with a command line or graphical interface. These are skills commonly overlooked by experts and competent practitioners.
- We recommend an iterative lesson design process that begins with identifying the target audience, before defining learning outcomes, then creating assessments, writing explanatory content, and evaluating the lesson in a workshop.
- Thinking about the target audience early in the design process helps to ensure that your lesson is built around the needs and motivations of real people.
- Use the description of your target audience to help attract people with the appropriate interests and prior knowledge to your lesson.
See chapter 1, How Does Students’ Prior Knowledge Affect Their Learning?, of Ambrose et al. 2010.↩︎
See chapter 2, How Does the Way Students Organize Knowledge Affect Their Learning?, of Ambrose et al. 2010.↩︎
Content from Defining Lesson Objectives
Last updated on 2026-05-20 | Edit this page
Overview
Questions
- How can describing the things you intend to teach aid the process of writing a lesson?
- How can you be specific and realistic about what you will teach in your lesson?
- What are some of the risks associated with unrealistic or undefined expectations of a lesson?
Objectives
After completing this episode, participants should be able to…
- Explain the importance of defining specific, measurable, attainable, relevant and time-bound (SMART) objectives for a lesson.
- Evaluate a written lesson objective according to these criteria.

At this stage of the training, you should have a clear idea of who the target audience is for your lesson, and what knowledge, skills, and abilities you expect them to arrive with. Now it is time to consider the additional knowledge, skills, and abilities they will have by the time they leave: these are the learning outcomes of your lesson. It can feel strange to jump from one end of the process to the other like this, but clearly defining your goals early in the lesson development process is vital. As we will see in this episode, it helps you to determine the activities, examples, etc. that are appropriate for the lesson content, and provides a scope for what should and should not be included.
Why Focus on Skills?
To ensure your audience stays motivated, and your lesson feels relevant to them, we recommend that lessons focus on teaching skills rather than tools. Lessons should be centred around what you are empowering learners to do, what will be most beneficial to them, rather than a list of functions or commands you are teaching them to use. Placing the emphasis on skills over tools will help you prioritise key concepts and consider how your lesson can have the biggest impact on the way learners do their work.
Learning Objectives
The desired outcomes (the learning objectives) of a lesson should be new skills, i.e. things that the learner can do. For the vast majority of lessons, these will be cognitive skills: things learners can do with their minds. (Lessons intended to teach other kinds of skill, such as woodwork, playing a musical instrument, or making sushi, are probably better suited to a different platform than a static website.)
Cognitive skills cannot be equally easily acquired: before we can apply concepts and create something new, we must attain the ability to remember and distinguish between new concepts. Remembering and distinguishing are also abilities that are often faster to gain than applying or creating.
This is what Bloom’s Taxonomy (depicted in diagram below) tells us as well - it arranges cognitive skills (and educational objectives) into a hierarchy where cognitive skills on higher levels cannot be obtained before gaining those on lower levels. Even though Bloom’s Taxonomy has been disputed by some educational psychologists and has been revised since the original proposal - it still provides a useful framework to help us define learning objectives (as we will see shortly).

We must try to be realistic about how far along this scale we can move learners during a single workshop/lesson. This is one reason why the target audience is so important: if we can predict what learners will know when they arrive at the lesson, we can better define the outcomes we can expect when they leave.
Defining objectives for a lesson is essential because it allows us to focus the rest of our time on developing content that is necessary for learners to reach these goals. It will help us ensure we do not miss anything important or, conversely, include anything superfluous that could use up valuable time or distract instructors and learners.
What Does a Learning Objective Look Like?
The following highlights the most important elements of a learning objective:

Learning objectives should be read as if they were endings to the following sentence:
“At the end of this session, learners should be able to …”
Each objective should start with a verb and describe one (and only one) skill the learner will obtain.
For objectives to be as helpful as possible, they need to be written in a way that will allow us to directly observe whether or not a learner has attained the skills we want them to. This means that the skills described by our objectives should be measurable: as a general rule, action verbs such as “explain,” “choose,” or “predict,” are more helpful than passive verbs such as “know,” “understand,” or “appreciate”, which are hard to directly assess and are often open to interpretation.
Refer back to Bloom’s Taxonomy - this time focusing on the right-hand side of the diagram showing the measurable actions used to help us describe knowledge, skills and abilities. It serves as a very useful bank of action verbs for use in learning objectives. The Committee for Computing Education in Community Colleges has also created a version of Bloom’s Taxonomy customized for computing-related training with an extended list of action verbs.
We will see how helpful it can be to use action verbs in learning objectives when we begin talking about exercise design in the coming episodes.
Lesson-Level vs. Episode-Level Objectives
Objectives can be defined for a lesson as a whole - answering the question “what should learners be able to do at the end of a workshop teaching this lesson?”.
Objectives can also be defined for individual sections within it - answering the question “what should learners be able to do after following this particular part of the lesson?”.
This is probably a episode-level objective because it is very specific. A corresponding lesson-level objective might be “read data and libraries into the Python environment”. It is still fairly specific but a bit broader in scope and contains several episode-level objectives.
The lesson-level objective for the current section of this training is:
define SMART learning objectives.
This objective also covers a later episode as well.
The episode-level objectives for the current section of this training are:
- Explain the importance of defining specific, measurable, attainable, relevant and time-bound objectives (SMART) for a lesson.
- Evaluate a written lesson objective according to these criteria.
SMART Objectives
To assist you in defining and writing learning objectives for your lesson, it can be helpful to turn to another popular framework for defining goals and objectives: SMART. Originally proposed to aid managers in the definition of business goals, and updated and adapted since to several other domains including education (see How to Write Well-Defined Learning Objectives for example1), the SMART acronym requires goals to be specific, measurable, attainable, relevant, and time-bound.
In the context of a lesson, SMART objectives should be:
- Specific: they should clearly describe a particular skill or ability the learner should gain.
- Measurable: it should be possible to observe and ascertain when the learner has developed the skill described in the objective.
- Attainable: the learner should realistically be able to acquire the skill in the time available in a workshop or by following the text of the lesson.
- Relevant: they should be relevant to the overall topic or domain of the lesson as a whole.
- Time-bound: they should include some timeframe within which the goal will be reached. For learning objectives, this is built into the approach described above.
Note that, for any lesson that will be taught in a fixed amount of time, attainable and time-bound are overlapping: learning objectives for your lesson will answer the question “What will learners be able to do by the end of this lesson?” and the time available to teach the lesson, combined with the expected prior knowledge of your target audience, will determine how attainable they are.
Exercise: evaluating learning objectives (15 minutes)
Look at the example learning objectives below. Fill in the table for each objective, checking off the cells if you think an objective meets the criteria or leaving it unchecked if not. You should assume each objective is for a lesson to be taught in a two-day workshop. Note down any observations you make as you move through the list. If you have time, try to imagine the titles of lessons that would have these objectives. This part of the exercise should take 10 minutes.
At the end of this lesson, learners will be able to:
- create formatted page content with Markdown.
- program with Rust.
- fully understand GitHub Actions.
| Objective | Action verb? | Specific | Measurable | Attainable |
|---|---|---|---|---|
| 1 | ||||
| 2 | ||||
| 3 |
In the last five minutes of the exercise, we will discuss as a group how each objective might be improved.
| Objective | Action verb? | Specific | Measurable | Attainable |
|---|---|---|---|---|
| 1 | ✅ | ❓ | ❓ | ✅ |
| 2 | ❓ | ❌ | ❌ | ❓ |
| 3 | ❌ | ❌ | ❌ | ❓ |
Objective 1 is the closest to what we ideally want in a lesson objective, but it illustrates how difficult it can be to make an objective truly specific. For example, a more specific and measurable version of this objective could be:
write links, headings and bold and italicised text with Markdown.
Lesson Scope
One of the major challenges of lesson design is choosing what to include in a lesson: what the main points will be, in what order they will be introduced, how much detail can be provided, and how much time can be spent on each point. Especially when writing lessons for short format training like a Carpentries workshop, difficult decisions often need to be made about what can and cannot be included. Trying to fit too much content into a lesson is counter-productive2, so it is good to avoid the temptation to cram in more content than you have time to cover properly.
Writing learning objectives is a good opportunity to begin thinking about lesson scope, and can provide assistance when you are faced with a difficult decision about what content to cut out.
For instance, consider the order in which new skills must be acquired. Before learners can begin to acquire “higher-level” cognitive skills to perform creative and analytical tasks, they must first acquire the foundational knowledge and conceptual understanding of the domain. Furthermore, these higher-level skills take longer to acquire so, unless you can expect your target audience to arrive at the lesson with the relevant foundational knowledge and understanding, it is probably unrealistic to aim to have learners completing creative tasks before its end.
As should become clear through activities in the upcoming episodes, lessons can be broadly considered as blocks of content associated with a particular learning objective. This can be helpful when making choices about content to remove, because the task can be considered in the context of taking out whole learning objectives.
Defining Your Learning Objectives
We have discussed the importance of defining objectives early in the lesson design process, and looked at some examples of objectives written for other lessons. Now it is time to begin defining objectives for your own lesson.
Here are some recommendations to help you get started:
- Aim for 3-4 lesson objectives for every 6 hours your lesson will take to teach. (For example, this curriculum is designed to be taught in ~18 hours and has ten learning objectives.)
- These objectives are for your lesson as a whole: try to define the “end point” knowledge and skills you want learners to acquire. You can think of these as the things you would test in a fictional “final exam” your learners would be able to tackle.
- Later you will write “episode-level” objectives that should define intermediate steps towards the high-level objectives you identify for your lesson here.
Exercise: defining objectives for your lesson (20 minutes)
Write learning objectives for your lesson into the relevant section of your Lesson Design Notes document - what do you want learners to be able to do at the end of the workshop? When writing these lesson-level objectives, try to follow the SMART framework: make them specific, measurable, attainable, relevant, and time-bound.
Take notes about the your discussion in your Lesson Design Notes document. A record of the decisions you made and your reasons for choosing these objectives can be very helpful for you and others to understand the design and scope of the lesson later.
If you find yourself writing very specific episode level objectives, keep them in your notes and try to think of a slightly broader objective that may contain several very specific objectives. We will come back and work more on episode objectives next in the training.
Exercise: reviewing lesson objectives (15 minutes)
Swap objectives written in the previous exercise with a partner (you can also explain or show them what you wrote about your target audience, but this not essential) and review them with the following questions in mind:
- Are the objectives clear?
- Do they use “action” verbs?
- Could you directly observe whether a learner had reached this objective?
Now run the objectives through this Lesson Objective Advisor tool from the University of Manchester’s Faculty of Science and Engineering. Do the results match your assessment?
- Where do the skills described in these objectives sit on the scale?
- (optional) Are these objectives realistic, given the target audience of the lesson?
Advertising your lesson
These learning objectives, as well as the list of prerequisite knowledge you defined earlier, are very useful information to include when advertising a workshop that will teach your lesson. It will help people understand whether or not the event is a good fit for them, and manage their expectations about what they will learn if they attend.
- Defining objectives for a lesson can help to focus your content on the most important outcomes, and outline the scope of the project.
- Following the SMART framework can help make your learning objectives as useful as possible.
- Leaving objectives unrealistic or undefined increases the risk of a lesson losing focus or spending time on activities that do not help learners gain the most important skills.
Content from Example Data and Narrative
Last updated on 2025-12-12 | Edit this page
Overview
Questions
- Why should a lesson tell a story?
- What considerations are there when choosing an example dataset for a lesson?
- Where can I find openly-licensed, published data to use in a lesson?
Objectives
After completing this episode, participants should be able to…
- Find candidate datasets to use in a lesson.
- Evaluate the suitability of a dataset to be used in a lesson.
- Choose examples that will prepare learners for formative assessments in the lesson.
- Develop a story for their lesson
With your high-level lesson objectives set, now is a good time to consider any additional resources you may need to effectively communicate your message to learners before you dive deeper into writing the lesson content.
Writing your lesson as a story helps learners stay motivated and engaged, which means they will learn faster1. The story you create can also help learners more easily connect how the skills they are learning now could be useful after the workshop. You can enable learners to make connections between what they learn in your lesson and their own work, by creating a narrative that resembles a situation the learners might encounter there.
For a lot of lessons developed in The Carpentries community, the narrative is closely tied to the example data used in the lesson. A good example dataset makes it easier to teach the relevant skills, helps learners manage their cognitive load by focusing on what is most important. Just like the narrative, finding the right dataset involves striking a balance between authenticity and clarity.
Exercise: Choosing a Dataset or Narrative (30 minutes)
Referring to the advice you reviewed before this training, find an appropriate dataset or a narrative for your lesson. Identify one or more potential candidates and note down the advantages and disadvantages of each one.
As a summary, here are some aspects we suggest that you consider:
- For datasets:
- size
- complexity
- “messiness”/noise
- relevance to target audience
- availability
- license
- ethics
- For narratives:
- authenticity
- relevance to target audience
- complexity
- possibility to teach useful things first/early
Takes notes in your Lesson Design Notes document about your discussion and the decisions made. It may be particularly helpful to record:
- Which datasets and narratives did you consider?
- How and why did you choose between them?
- What implications do you think your choice of dataset and/or narrative will have for the design and further implementation of your lesson?
Summary
Remember, even if you do not need a dataset for your lesson, you should decide on a narrative. Building your lesson around a central example reduces the cognitive load of context switching throughout the lesson. Using an authentic, yet simple, dataset will also help reduce cognitive load and help learners to see how they might apply what they learned to their own projects. It is also important to consider licensing and ethical considerations when looking for a lesson dataset.
- Using a narrative throughout a lesson helps reduce learner cognitive load.
- Choosing a dataset includes considering data license and ethical considerations.
- Openly-licensed datasets can be found in subject area repositories or general data repositories.
The evidence for this is summarised well in chapter 3, What Factors Motivate Students to Learn?, of Ambrose et al. 2010. The Carpentries Instructor Training curriculum also includes a helpful summary of how lesson content can influence Learner motivation.↩︎
Content from Episodes
Last updated on 2025-12-12 | Edit this page
Overview
Questions
- How can the objectives for a lesson be used to break its content into sections?
- How should objectives be written for a smaller part of a whole lesson?
Objectives
After completing this episode, participants should be able to…
- identify appropriate parts of their lesson to break into individual sections
- define learning objectives for a section of a lesson.
So far, you have defined the learning objectives for your lesson as a whole, and came up with a narrative or example datasets that will help you tell your story.
Rather than write the lesson as a single, long document, we recommend that you break it up into chunks like chapters in a book or episodes in a season of a TV series. This can help manage learners’ cognitive load by ensuring that you organise content into coherent, more self-contained chunks, and makes it easier for instructors to schedule regular and frequent breaks while teaching. Thinking about how content can be broken down like this early in the lesson design process helps you to consider the path learners will take to reach your defined objectives, and identify the component skills and knowledge they will need to pick up on the way.
In The Carpentries, we refer to these individual parts of a lesson as episodes, to encourage lesson developers to think about them as self-contained units (with their own narrative arc) that nevertheless contribute to the larger whole (the theme or story that runs through a full season). It also helps to think about the typical length of an episode: these chunks contain 20-60 minutes of content (teaching + exercises).
Each episode will exist as a page in the website we will build for our lessons.
Planning Your Episodes
Before we can start creating the episodes of a lesson, we need to spend some time planning out the number and order of them. The learning objectives you defined for your lesson can help with this: at the very least, it is probably a good idea to have one episode dedicated to each objective. You might also find that you can “decompose” the lesson-level objectives into more finely-grained steps that learners can take towards those end points. For example, the lesson-level objective
- “create formatted page content with Markdown”
may be broken down into,
- “create bold, italic, and linked text with Markdown”
- “explain the different header levels in Markdown”
- “add images with a caption and alternative text description to a Markdown document”
Some questions you might ask yourself to help break down your lesson-level learning objectives include:
- What new knowledge and skills will learners need to acquire to be ready to fulfil the overall objectives for your lesson?
- What order should these concepts and skills be introduced in? Are some dependent on others?
- If some of these concepts and skills are complex, can they be broken down even further?
Exercise: Defining Episodes for a Lesson (25 minutes)
With your team, in the shared notes document for your lesson:
- Based on the lesson-level objectives and your knowledge of the lesson topic, divide the lesson up into logical blocks (episodes), that should each take approximately 20-60 minutes to teach. Think of these logical blocks as topics that you need to cover within your lesson but do not go too deep into defining learning objectives for individual episodes - we will cover that soon.
- Next, assign responsibility for one of these episodes to each collaborator in your team. They will focus on this episode for the rest of this training.
Some questions you might ask yourself to help break down your lesson-level learning objectives include:
- What new knowledge and skills will learners need to acquire to be ready to fulfil the overall objectives for your lesson?
- What order should these concepts and skills be introduced in? Are some dependent on others?
- If some of these concepts and skills are complex, can they be broken down even further?
If the length of the list of episodes you create is smaller than the number of collaborators you have on your team, try assigning two people to a single episode, with each taking responsibility for a subset of the objectives defined for that episode. If you plan more episodes than you have people in your team, do not assign more than one episode to each collaborator for now, but we strongly recommend that you assign yourselves consecutive episodes at the beginning of your lesson.
Defining Episode-level Learning Objectives
Now that we have broken those lesson-level learning objectives into episodes, we can use the same approach for the individual episodes of a lesson, defining objectives for the episode to make clear what we intend to teach in that section. Defining these objectives before writing the episode content helps us to:
- stay focused in the episode, without spending time on non-essential topics
- determine whether learners are attaining the skills we wish to teach them (we will discuss this more in the next two episodes)
- summarise the skills the learner can expect to gain by following this section of the lesson
As before, here are some recommendations to help you define these episode-level objectives:
- Aim for 2-4 objectives per episode. If you need to write more than that, consider breaking this section down into multiple episodes.
- To ensure your episode content aligns with the overall goals for the lesson, try to identify which lesson-level objective(s) your episode will contribute to.
- In the context of the previous recommendation, consider how the objectives for your episode fit as a component of the higher-level skills/understanding defined in the lesson-level objective(s).
Exercise: define objectives for your episode (30 minutes)
- Using the same approach as you did for your whole-lesson objectives, define a set of SMART objectives for your chosen episode. (15 minutes)
- Compare your list with those created by your collaborators on the
lesson:
- are there any gaps in these objectives, i.e. anything that should be covered in these episodes but is not captured in the objectives?
- are there any overlaps, i.e. anything that looks like it will be covered more than once?
- As a group, discuss how you will address any problems identified in the previous step, and edit your objectives accordingly.
Optional Homework: Reflection Exercise (not included in timing)
Take some time to think back on what has been covered so far, then make some notes on the most important points and actions you want to take away from that. The Trainers and other participants will not look at this - it is only for you.
If you do not know where to start, consider the following list for a starting point:
- draw a concept map, connecting the material
- draw pictures or a comic depicting one of the concepts covered
- write an outline of the topics we covered
- write a paragraph or “journal” entry about your experience of the training today
- write down one thing that struck you the most
- Learning objectives for a lesson can help you split up its content into chunks
Content from Designing Exercises
Last updated on 2026-05-27 | Edit this page
Overview
Questions
- How can you measure learners’ progress towards your lesson objectives?
- Why are exercises so important in a lesson?
- What are some different types of exercises, and when should they be used?
- Why should we create assessments before we have written the explanatory content of our lesson?
Objectives
After completing this episode, participants should be able to…
- Describe the importance of regular exercises while a lesson is being taught.
- Choose the format for an exercise based on the outcome it is intended to measure.

As we have seen previously, defining objectives for a lesson (or a teaching episode) can help to focus your content on the most important learning outcomes and outline the scope of your lesson project. The goal of the remaining steps of lesson development is to ensure that what learners learn from following your lesson matches its defined objectives as closely as possible. To do this, you need to develop assessments to monitor progression towards your learning outcomes.
Useful further reading: Course design: Considerations for Trainers – a Professional Guide.
Assessments
In order to measure progress and evaluate if and what learning occurred, we have various types of assessment available to us:
- summative assessments - used after instruction to verify whether learners achieved the stated learning objectives.
- formative assessments - used during instruction to detect changes in learner understanding or performance, to provide feedback and insight (to both instructors and learners) into the learners’ developing mental models of the topic taught and to identify any old or developing misconceptions.
Summative assessments sum up what learning has been achieved after training (e.g. via exams). They give valuable data about learning attainment by individuals and entire cohorts but are not used to guide further progress of a lesson. They may not be as suitable for short courses, but may be necessary for those that give marks/grades or certificates of completion.
Formative assessments are applied throughout a course and with several different purposes: they provide a way to move new information from working memory to long-term memory; they can inform instructors’ decisions about how to modify instruction to better promote learning; they also inform learners about changes they may need to make to improve their learning. Ideally, they should be used often (e.g. after every 15-20 minutes of teaching), providing opportunities to instructors to change pace and refocus learners’ attention. For short courses, formative assessments are usually more valuable and easier to implement in practice than summative assessments - they need not be complex or time-consuming, just informative enough about learning for both instructors and learners.
The most effective way to test learner understanding and progress is to do such assessments in class - they engage all learners and allow instructors to check learners’ confidence with the content and its delivery, can help you deal with any potential misunderstandings as soon as they arise, and maximise the value of the workshop for everyone. Such formative assessments also help with metacognition - the awareness a learner has about how their learning is progressing.
Any instructional tool that generates feedback and is used in a formative way to check for learners’ understanding can be described as “formative assessment”. For example,
- checking in - gauging learners’ satisfaction and understanding using agreed signals (e.g. raising different coloured post-it/sticky notes or Zoom reactions to indicate that the pace is too fast/slow, or that they completed/have not completed an exercise).
- group or collaborative discussions - raising questions for discussion among the group. For example, think, pair, share, where learners think individually about an answer to a question, pair up with a classmate to discuss their answer, and then share out the consensus they came to with the class.
- problem-solving or diagnostic exercises - setting (coding or non-coding) challenges for learners to tackle, testing comprehension of a subject and diagnosing any forming misconceptions (e.g. via multiple choice questions).
- individual (guided) reflections at the end of a session to help process what was learned, for example asking learners to write down, draw, or diagram things they learned, noting how things relate to one another or connect with previous knowledge, things they want to know more about, and any questions they still have.
Many other formative assessment tools can be found in Briggs’ list of “21 ways to check for student understanding” or Edutopia’s “56 Examples of Formative Assessment”.
Formative Assessments in this Training (5 mins)
Think back through the parts of this training you have followed so far. Identify two examples of formative assessment that the Trainers have employed. As an extra challenge, try to decide whether these assessments were used to assess progress towards a particular learning objective and, if so, what the relevant objective might have been.
Some examples of formative assessments used so far in this training:
- Exercises such as the one asking trainees to describe the target
audience of their lesson
- this exercise aims to assess how well trainees are able to identify the aspects of a target audience that influence the design of a lesson. It also aims to expose any inconsistencies between the visions of the target audience held by different collaborators.
- Your Trainers have probably checked in with the group at various
points in the training.
- Although these check-ins are not specific to a particular objective, they help give us an impression of how well trainees are able to follow what we are teaching.
- Tracking the progress of your lesson
repository configuration on GitHub.
- This helps us evaluate trainees’ progress towards the learning objectives we have set in relation to the lesson infrastructure.
Exercise Learners’ Memory
In a simplified model of memory, individuals are equipped with two types of memory: working (also called short-term) and long-term. Long-term memory essentially has unlimited storage but is slow to access, whereas working memory is quicker to access but can only hold a limited number of items at a time. For teaching, the goal is to help learners move the new things they’ve learned from working memory into long-term memory. Exercises help with this by providing learners an opportunity to practice what was recently learned. Exercises should occur frequently throughout the lesson to free up working memory and make space for more new information.
Creating exercises builds upon the learning objectives you created earlier in the lesson design process. You can design exercises based on the skills you described in your learning objectives (the learning outcomes you intend for the lesson). This will be easier if your wrote learning objectives with specific action verbs. Specific verbs can help you decide what action you want the learners to perform in the exercise. E.g. actions such as “explain” and “describe” may be better assessed by discussions and multiple choice questions, while “solve,” “construct,” “test” and other higher-level cognitive skills may be better assessed by debugging tasks, code-and-run, or use-in-a-different-context exercises.
Exercise: Exercise Types and When to Use Them (15 minutes)
The Trainers will assign you to pairs or small groups, and give each group an exercise type to work on. Each group should assign a notetaker, to summarise your discussion at the end of the exercise.
The Trainers will assign your group a type of exercise to focus on. Read about your given exercise type in the Exercise Types chapter of Teaching Tech Together by following the relevant link below.
(A Spanish version of Teaching Tech Together is also available.)
Then, considering the exercise type in general, as opposed to the specific example given in the text, discuss the following questions together:
- What kind of skills would an exercise of this type assess? Try to identify some action verbs like those we used to write lesson objectives earlier in the workshop (you may refer to the extended Bloom’s taxonomy for computing to help you).
- Would this type of exercise be suited to a novice audience? Or is it a better fit for intermediate or advanced learners?
- Would this kind of exercise work well in an in-person workshop setting? Would it be better suited to self-directed learning and/or a virtual workshop?
Share the major points of your discussion in the collaborative notes document.
The Trainers will assign your group a type of exercise to focus on. Read about your given exercise type on the indicated pages of Is This a Trick Question?:
- multiple choice (page 13)
- true-false (pages 20 & 21)
- fill-in-the-blank (page 34)
- authentic assessment (pages 46 & 47)
Then, discuss the following questions together:
- Could exercises of this type be used in your lesson?
- If so, can you identify any of your written objectives that could be assessed with an exercise of this type?
- Have your Trainers set you any exercises of this type in this training so far?
- Would this type of exercise be suited to a novice audience? Or is it a better fit for intermediate or advanced learners?
- Would this kind of exercise work well in an in-person workshop setting? Would it be better suited to self-directed learning and/or a virtual workshop?
Exercise: Exercise Types and When to Use Them (15 minutes) (continued)
Trainers will lead a discussion about your findings for your chosen exercise type with the rest of the participants.
Both of the resources linked from the exercise above, the Exercise Types chapter of Teaching Tech Together and Is This a Trick Question? are worth reading in full. They collect a lot of insightful discussion and illustrative examples, which can prove very useful when designing exercises for your lesson.
As you discussed with your group in the last exercise, different types of learning objectives work better for novices, while others are a better fit for competent practitioners or experts.
This can be understood in terms of the types of exercises that suit the objective: exercise types that help manage cognitive load for the learner, such as fill-in-the-blanks, faded examples or Parsons problems (which all provide a lot of the guiding process/scaffolding code and allow the learner to focus on a specific concept or skill) are a good fit for a novice, to whom all elements of the topic are new. However, these kinds of exercise do not provide an opportunity for learners to develop higher-level skills, such as the ability to create whole new functions or scripts, or to extrapolate from the examples they have seen to solve a different kind of problem. Indeed, example and exercise types that are helpful to novices may even be counter-productive for learners with a greater level of expertise1.
Thus you want to choose your objectives to fit your intended audience and your exercise formats to fit your objectives.
An Expert’s View on Objectives and Audience Expertise
“Different types of lesson objectives (LOs) are better fit for novices, while others are better fit for competent practitioners, etc. and if exercises (formative assessments) are well aligned to LOs, [they] will automatically serve the corresponding audience. Thinking in terms of LOs (What should a learner do in order to achieve this specific LO? Is this LO exactly what learners are expected to achieve by the end of this piece of instruction? etc.) is easier than thinking in terms of LOs + audience + content. LOs should be tailored to the audience, and, if this is well done, you may stop worrying about the audience. Create LOs for the specific audience and create assessments for specific LOs.”
- Dr. Allegra Via, Carpentries Instructor Trainer
Detecting and correcting misconceptions and fixing learners’ incorrect/broken mental models is as important as presenting your learners with new knowledge and correct information. When mental models are broken, learning can occur more slowly than you might expect2. The longer a prior incorrect model is in use, and the more extensively it has to be “unlearned”, the more it can actively interfere with the incorporation of the new correct knowledge (since it will contradict the misconceptions already present in the mental model).
When designed well, multiple choice questions can diagnose misconceptions you predict that learners might have, and help you correct them quickly.
We recommend that you read the sections of the Instructor Training curriculum and Teaching Tech Together linked above. You may also find it interesting and helpful to review our supplementary page digging into misconceptions and multiple choice questions in more detail.
Exercise: Assessing Progress Towards an Objective (30 minutes)
Using one of the exercise formats you have learned about so far, design an exercise that will require learners to perform one of the actions described in the objectives you wrote earlier, and that assesses their ability to do so.
These should be assessments of the lower-level objectives defined for individual episodes in the lesson, as opposed to the lesson-level objectives you wrote first.
Trainees working as a team can choose whether to work together on discussing and designing a single exercise to assess a single objective, or to divide their efforts and each focus on an exercise for their own episode. If you choose to take the latter approach and finish with time to spare, spend the remainder reviewing and providing feedback on one another’s assessments.
The same approach to designing exercises within a lesson can also be used to create a short “pre-assessment” questionnaire for potential learners to complete when they register for a workshop teaching the lesson (or for self-evaluation before following the lesson on their own). You can use the list of prerequisite knowledge that you defined earlier to help with this.
If you collect the results of this questionnaire, use it to follow up with people who have registered for the workshop but do not fit the intended target audience, to manage their expectations about how useful the workshop will be for them.
You should aim to create all your assessments before you write the explanatory content of your lesson (recall Nicholls’ backward design). These assessments will guide your lesson design process by making sure you know exactly what knowledge you’d expect from your learners at any point in the lesson.
Well-designed exercises are one of the most valuable resources for an instructor and any time spent on this during lesson design is well invested.
- Assessments are a way to determine whether the objectives you defined for the lesson have been reached.
- Exercises help learners commit what they’ve learned to long-term memory.
- Some types of exercises are better for particular audiences and to address certain objectives.
- Formative assessment happens during teaching and provides feedback both to an instructor and a learner - about progress and whether learning of new concepts occurred but also about any misunderstandings and misconceptions which can hinder further learning.
See chapter 1, How Does Students’ Prior Knowledge Affect Their Learning?, of Ambrose et al. 2010.↩︎
See chapter 1, How Does Students’ Prior Knowledge Affect Their Learning?, of Ambrose et al. 2010.↩︎
Content from How to Write a Lesson
Last updated on 2025-11-24 | Edit this page
Overview
Questions
- Why do we write explanatory content last?
- How can I avoid demotivating learners?
- How can I prioritise what to keep and what to cut when a lesson is too long?
Objectives
After completing this episode, participants should be able to…
- Estimate the time required to teach a lesson.
- Summarise the content of a lesson as a set of questions and key points.
- Connect the examples and exercises in a lesson with its learning objectives.

Writing Explanatory Text
Explanatory text (including examples) help connect your exercises together into a cohesive lesson. If your exercises are train stations and scenic views, the explanatory text is the train tracks that connect them. Often times the examples and exercises may seem like a good draft for you to teach. However, the explanatory text makes it possible for other instructors and self-directed learners to follow along by providing all the relevant information directly in the lesson. It can also help you remember your goals and stay on track teaching.
How much text to include is often a question of personal style while balancing the needs of potential users, both other instructors and learners. You want to find the balance between providing enough information for learners to meet the learning objectives without increasing cognitive load with extraneous information. In this section we will discuss factors to consider when you are writing explanatory text.
There are trade-offs to consider when preparing a site for use as an instructional guide vs use as a self-directed learning resource. Typically, self-directed learning resources are more verbose where instructional guides are aimed at an audience that can fill in the gaps on their own. However, very sparse text is less likely to be re-usable by other instructors as instructors may have different skill levels with the lesson content or differing mental models. In general, it is not a good idea to assume others, learners or instructors, will know what you were thinking when you wrote the content so, if in doubt, be explicit.
Exercise: Examples Before Exercises (20 minutes)
Looking back at one of the exercises you designed before: what examples could you include in your narrative to teach learners the skills they will need to apply to complete the formative assessments you have designed?
Outline one of these examples in your lesson design notes.
In the Software Carpentry Plotting and Programming with Python Lesson there is an exercise to load and inspect CSV file for Americas. In the lesson, before the exercise, the Instructor demonstrates an example of how to load the data table for another continent (Oceania) and explores the values with a few different functions. This shows learners how to call the function to load the CSV into a data frame, and demonstrates what success looks like for their exercise.
In the Python Interactive Data Visualization Lesson in the Incubator, there is an exercise to find the correct widget (a slider) for an action and modify the script to use it. In the lesson, before the exercise, the instructor introduces a cheatsheet and documentation for interactive widgets and then creates a dropdown widget for the application. The slider widget required in the exercise has not been demonstrated but the preceding example shows all of the necessary steps to add a widget, and provides the supporting information that learners can consult to discover how to implement the specific tool.
Less is More
Trying to fit too much content into a lesson is counter-productive. It is better to cover less and provide a smaller but stable foundation for learners to build upon.
You should also consider a realistic workshop length for teaching your lesson. It is difficult to keep learners attentive for many hours over many days. Most Carpentries workshops are two work days of lesson material as it is difficult for learners to attend 4 full days of a workshop. Although, there are some in the community who will run workshops that are three days to cover additional material.
As you consider the length of your lesson discuss with your collaborators and ask yourself:
- What is essential to include?
- What can be left out if needed?
- Are there checkpoints where the lesson could end if needed?
- Can important concepts be moved up earlier to ensure they are covered?
In the end, the only way to know for sure is to teach the lesson, measuring how long it takes to teach. Borrowing from television, The Carpentries community calls these early workshops, pilot workshops. As you run pilot workshops, you can note the length of time spent in each episode. Instructors commonly report running short on time in workshops. Thus, it is better to assume that you are under-estimating rather than over-estimating the length. It is better to have additional time for discussion, review, and wrap-up than to rush through material to fit it into the remaining time.
If, after piloting your new lesson, you find that you did not have time to cover all the content, approach cutting down the lesson by identifying which learning objectives to remove. Then take out the objective(s) and the corresponding assessment(s) and explanatory content. You may consider making a concept map to help identify which objectives depend on one another.
Alternatively, if you decide to keep certain objectives in the lesson, you can add suggestions on which objectives can be skipped to the Instructor Notes for the lesson. Instructor Notes are meant to convey teaching tips and advice to other instructors teaching your lesson and will be discussed in more detail later on in section “Preparing to Teach”.
As you add notes and think about what to cut, remember, reducing the number of lesson objectives can help with managing learner (and instructor) cognitive load.
“the five ways to handle an extraneous overload situation are to:
- eliminate extraneous material (coherence principle),
- insert signals emphasizing the essential material (signaling principle),
- eliminate redundant printed text (redundancy principle),
- place printed text next to corresponding parts of graphics (spatial contiguity principle), and
- eliminate the need to hold essential material in working memory for long periods of time (temporal contiguity principle).”
Lesson Time Management (10 minutes)
(5 minutes) In the shared notes document, note down your answers to these questions:
- Most people have experienced a workshop or another event where there
was too much material to cover in the time available.
- In what ways have you observed event facilitators and instructors respond to these circumstances?
- How did this affect your experience as a learner/participant?
- Can you recall any strategies that have worked particularly well?
- What are some advantages and disadvantages for the learner when an instructor breaks up a lesson into smaller chunks over a longer time period?
(5 minutes) In the remaining time, your Trainers will lead a discussion based on the responses.
Other Important Considerations for Lesson Content
Language
When writing your lesson text you also want to avoid unintentionally demotivating your learners. Make time to review your text for:
- dismissive language - e.g. ‘simply’, ‘just’
- use of stereotypes (check learner profiles for stereotypes too)
- expert awareness gaps, i.e. places where you may be assuming the learners know more than they actually do
- use of different terms or notations with the same meaning interchangeably without explanation, e.g. using the terms “shell”, “bash”, “terminal” and “console” to describe the command line interface, or “variables” and “columns” for column headings in data tables
- unexplained or unnecessary jargon/terminology (as your learners may come from different backgrounds, may be novices, not native English speakers, and a term in one domain/topic may mean something else entirely in another)
- unexplained assumptions
- sudden jumps in difficulty/complexity
You may want to check out Julia Evans’ blog post on “Patterns in confusing explanations” to help review your explanatory text for common patterns in language that can make your explanatory text confusing.
Accessibility
You should also review your text thinking about accessibility. This includes:
- Avoiding regional/cultural references and idioms that will not translate across borders/cultures
- Avoiding contractions i.e. don’t, can’t, won’t etc.
- Checking that all figures/images have well written alternative text, including writing alternative text for data visualizations. An alternative text contains an invisible description of an image which is read aloud to blind users by screen readers providing alternative text-based format for images. See the Workbench documentation for directions on how to add alternative text and captions to images in a lesson
- Checking the header hierarchy - no h1 headers in the lesson body, no skipped levels
- Using descriptive link text - no “click here” or “this page”, etc.
- Checking the text and foreground contrast for images
Optional Exercise: Alternative Text for Images (5 minutes)
Which of the following is a good alt-text option for the image below?

- Graph of data
- Graph with increasing lines
- Line graph of increasing carbon dioxide in ppm at the Mauna Loa Observatory from 1958 to present
- Line graph of increasing carbon dioxide in ppm at the Mauna Loa Observatory, Hawaii, United States, from 1959 to present including values from each year. Red line shows variation in each year and black line is average for each year. 1959 = 315.90 ppm, 1960 = 316.91, 1961 = 317.64 …
Data/Image provided by NOAA Global Monitoring Laboratory, Boulder, Colorado, USA
The third option, “Line graph of increasing carbon dioxide in ppm at the Mauna Loa Observatory from 1958 to present”, is the best option. It describes the type of plot, what is measured, and the trend.
The first two options are too vague. They mention a graph but don’t give enough info to know what the graph is actually showing.
The last option is overly descriptive and starts to list the data itself. It is better to include a shorter, but informative, description and a link to the data instead.
Glossary of Terms
When writing a lesson, you should also consider adding key terms or jargon to the lesson glossary for the lesson. In your shared notes document, you can start such a glossary as you develop your lesson, to keep a record of the terminology your audience needs to be familiar with.
Many of these terms may also be useful for other lessons and can be added to Glosario, a multilingual glossary for computing and data science terms.
Exercise: Explain Your Terminology (5 minutes)
In your shared notes document, add a list of terms or jargon from your lesson, along with their definitions.
You do not have to have a complete list now, but it is good to start working on it - you can always come back and update it later.
Questions and Keypoints
In addition to objectives, a completed episode also requires questions the episode answers and the keypoints a lesson covers.
The questions helps learners understand what to expect from a lesson as they might not yet understand the learning objectives.
The keypoints wrap up the lesson by providing answers to each of the questions. Keypoints also help self-directed learners review what they learned, remind instructors to recap what was covered in an episode, and help you ensure you answered all the questions you intended for an episode.
Exercise: Completing episode metadata (10 minutes)
In your shared notes document, add key points and questions for your episode.
Polishing a lesson
Lessons do not need to be perfected prior to teaching them the first time. In fact, keeping things relatively basic leaves you some flexibility while you run through the first few iterations of teaching the lesson, collecting feedback, and using that to guide improvements.
However, once you find that the lesson is beginning to reach something like a stable state, you may find the checklist for lesson reviewers in The Carpentries Lab useful as a guide for polishing the design and content. The checklist describes criteria for a lesson to meet a high standard in terms of its accessibility, design, content, and supporting information.
- The objectives and assessments provide a good outline for an episode and then the text fills in the gaps to support anyone learning or teaching from the lesson.
- It is important to review your lesson for demotivating language, cognitive load, and accessibility.
- To reduce cognitive load and ensure there is enough time for for the materials, consider which lesson objectives are not needed and remove related content and assessments.
Content from The Carpentries Workbench
Last updated on 2025-05-02 | Edit this page
Overview
Questions
- How is a lesson site set up and published with GitHub?
- What are the essential configuration steps for a new lesson?
Objectives
After completing this episode, participants should be able to…
- Identify the key tools used in The Carpentries lesson infrastructure.
- Complete the fundamental setup steps for a new lesson repository.
- Edit Markdown files using the GitHub web interface.
At this stage in the training, you will have gone through the first three stages of the lesson design. You should have a clear idea of who the people are that you want to teach this lesson to, and what exactly the skills are that you want them to learn while they are following it. You also have an outline of your lesson and its episodes. It is now time to begin creating a website that will present that lesson to the world!
GitHub Pages
The source of all The Carpentries lessons is made publicly-available in repositories on GitHub. By making our repositories public like this, we encourage others to help us maintain and improve our lessons, and make it as easy as possible for them to re-use and modify our lessons for their own purposes.
GitHub provides a hosting service to open source projects such as these, allowing users to present their projects to the wider world. The repository includes a complete history of the changes made between versions of the individual files in the project, and provides many features that facilitate collaboration on projects. We will learn more about some of those collaborative features later in this training. For now, we will focus on one other important feature that GitHub provides: website hosting.
Via a system called GitHub Pages, users can build and host websites from the files present in any repository on GitHub. For many years, this has been how The Carpentries presents its lesson websites to the world.
Using The Carpentries Workbench
Carpentries lesson websites are built with The Carpentries Workbench, a toolkit that converts Markdown and R Markdown files into the HTML that can be served by GitHub Pages. We will use it now to initialise a new lesson.
In the past, our lesson sites were generated by software called Jekyll, a tool built into GitHub Pages that allows the webpage content, written in the text files of the repository, to be combined with descriptions of settings, structure, and styling, to create a website. The template used by Jekyll to structure and style lessons was initially developed in 2013/2014 by Abby Cabunoc Mayes, Greg Wilson, Jon Pipitone, and Michael Hansen for Software Carpentry. It was expanded and maintained by many members of the community over almost a decade, to also support Data Carpentry, Library Carpentry, and many other lessons.
In 2022, we adopted a new infrastructure for our lesson sites: The Carpentries Workbench. Lesson sites built on the Workbench are still hosted with GitHub Pages, but no longer use Jekyll. Instead, the lessons are built using a programming language, R, and pandoc, a software designed for converting content between file formats. The Workbench combines three R packages:
- sandpaper: converts a collection of Markdown or R Markdown files into the structure of a lesson website.
- varnish: provides the files and folders that add styling and additional functionality to a lesson website.
- pegboard: a programmatic interface to the lesson, enabling various automated validation tasks.
For lesson developers, the Workbench makes The Carpentries lesson repositories much simpler to navigate and work with.
Developing lessons using the Carpentries Workbench in GitHub might seem intimidating, especially for those who are less experienced with collaborative GitHub workflows or unfamiliar with the Workbench. However, most of the complex infrastructure is hidden from lesson developers, and some setup tasks only need to be completed once or infrequently. The table below outlines common tasks that lesson developers perform in GitHub (which you will learn about shortly) along with how often they are needed.
| Task | Frequency |
|---|---|
| Create repository | Once |
| Add collaborators | Rarely |
| Edit global lesson configuration file | Rarely |
| Edit lesson front page | Rarely |
| Create a new episode | Often in the early stages of lesson design, rarely after that |
| Edit episode content | Often |
Creating a Lesson Repository
To get started, we first need to create a new repository for our lesson. We will use a template to do this, so that the new repository contains the basic files and folders that the Workbench needs in order to build a lesson site. There are currently two templates to choose between:
- A Markdown template
- An R Markdown template, best suited to lessons you expect to include R source code that will generate output.
One member of each participating lesson team should choose one of these templates, following the link above and completing the configuration as follows:
- click on the green “Use this template” button near the top right of the window
- add a name for the repository
- The name should be descriptive but fairly brief, with hyphens
(
-) to separate words - the name can always be changed later, via the repository settings
- The name should be descriptive but fairly brief, with hyphens
(
- make sure the “Include all branches” box is checked to copy all
branches from the template repository
- this is important as lessons are developed in branch
mainbut rendered into websites from branchgh-pages
- this is important as lessons are developed in branch
- in the “Description” field, write the title of your lesson
- choose “Public” visibility
After pressing the Create repository button, you should be presented with a brand new lesson repository, like in the picture below.
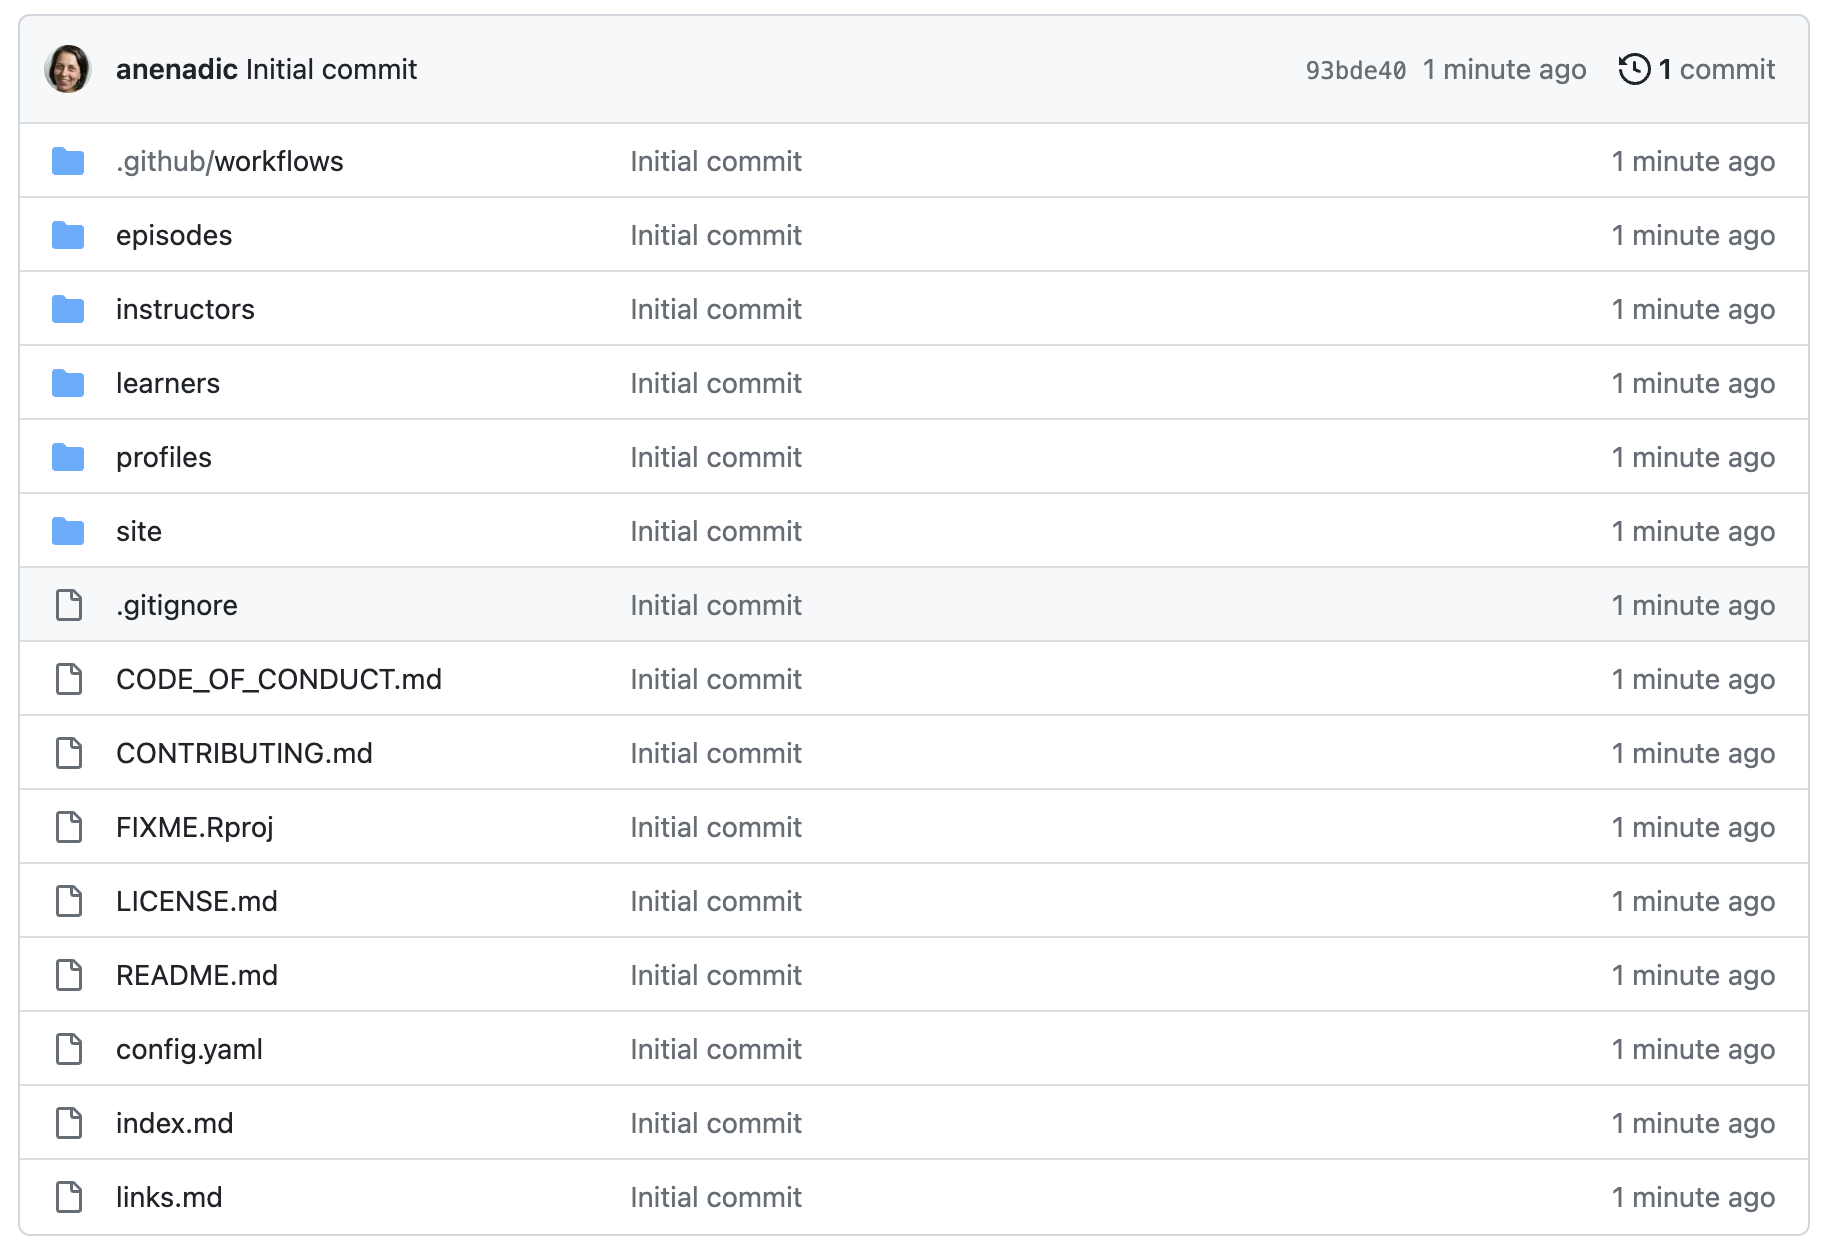
renv/ directory.Adding collaborators
To be able to add content to the lesson, your collaborators on this project will need access to the repository. To add collaborators to the repository, navigate to Settings, then choose Collaborators from the left sidebar. Now repeat the following steps for every collaborator working with us on the project.
- Click Add people and enter the GitHub username of one of our collaborators.
- Click Add USERNAME to this repository.
Your collaborator should receive an email inviting them to join the repository. After they have accepted this invitation, they should be able to edit the repository, adding new files and modifying existing ones. Only the person who created the repository will be able to adjust the repository settings.
Note, the above directions assume your repository is owned by a personal account not an organisation account. The options for permissions are different when adding collaborators for an organisational account. On a personal account, you only have two permission options “owner” or “collaborator”, where organisations have more roles with varied permissions.
See the GitHub access permissions webpage for more details.
Repository Files
The repository contains a number of files and folders. Most of these are source files for the content of our new lesson, but a few are accompanying files primarily intended for the repository itself rather than the lesson website. These are:
CITATION.cffCODE_OF_CONDUCT.mdCONTRIBUTING.mdLICENSE.mdREADME.md.gitignore- and the
.github/folder.
We will address all of the files later in the training. For now, we will move on to complete the basic setup of the lesson.
Configuring a Lesson Repository
Since your lesson was created from a lesson template which contains
gh-pages branch, GitHub Pages should already be generating
a rendered version of your lesson from this branch. If it isn’t, the
instructor should work with groups to activate GitHub Pages.
Although we configure GitHub Pages to serve the lesson website from
the gh-pages branch, the default working branch for
a lesson will be main. For the rest of this
training, you should add and edit files on main, and in
future, when you open Pull Requests to update the lesson content, these
should also be made to main. The gh-pages
branch should never be modified by anyone other than the automated
actions-user account.
To see the rendering of the gh-pages branch by the
automated actions-user, you can click the “Actions” tab from the main
repo page. This tab shows the actions triggered by each commit and if
they are in-progress or completed (sucessfully or with an error). You
can also see the details of actions in more depth by clicking on an
individual commit in this page.
On the repository home page (e.g. by clicking the name of the project near the top left of the window), click the gear wheel icon near the top right, to edit the About box. Check the box that says “Use your GitHub Pages website” to add the address of your lesson site to the About box.
After following these steps, when you navigate to the pages URL, you should see a lesson website with The Carpentries logo and “Lesson Title” in the top-left corner. You may need to wait a few minutes for the website to be generated.
config.yaml
The lesson title can be adjusted by modifying the
config.yaml file in the repository. The
config.yaml file contains several global parameters for a
lesson - to determine some of the page styling, contact details for the
lesson, etc. config.yaml is written in YAML, a structured file format of
key-value pairs in the form key: value. For example, a YAML
file of personal data might include lines such as
name: 'Mei', height_m: 1.84, and
birthdate: 1899-01-12. As well as the title of the lesson,
you can and should adjust some of the other values in
config.yaml, but you should not need to add new values or
learn a lot about YAML to be able to configure your lesson. You should
also only have to add or modify single-line string values and list
entries, and not deal with multi-line strings or other data types
(e.g. numbers, booleans, dictionaries) that YAML supports. The template
config.yaml aims to guide users through examples and
annotations on how to format the values they provide e.g. if you are
modifying a value wrapped in quotation marks in the template file, it is
safest to replace it with another value within quotation marks.
Practice with config.yaml (5
minutes)
Complete the configuration of your lesson by adjusting the following
fields in config.yaml. Remember that FIXME values with
quotes should be replaced with another value still in quotes and FIXMEs
without quotes should be replaced by values without quotes.
-
contact: add an email address people can contact with questions about the lesson/project. -
created: the date the lesson was created (today’s date) in YYYY-MM-DD format. -
keywords: a (short) comma-separated list of keywords for the lesson, which can help people find your lesson when searching for resources online. At a minimum, include ‘lesson’, ‘pre-alpha’, and your lesson’s (human) language. For example, ‘lesson, pre-alpha, español’. -
source: change this to the URL for your lesson repository.
We will revisit the life_cycle and
carpentry fields in config.yaml later in this
training.
.Rproj file
The repository also contains a file called FIXME.Rproj,
a project file that RStudio (a commonly-used editor for working on
lessons) can use to track some options and preferences for working on
your lesson on your local machine. This file should be renamed. You can
call this file whatever you like, but the convention is for its name to
match that of the lesson repository.
README.md
The README.md file is the “front page” of your lesson repository on GitHub, and is written in Markdown. You should use it to provide basic information about the project, for anyone who finds their way to the source files for your lesson.
Improving the README.md (5
minutes)
Take a few minutes to update it with some basic information about the project:
- the lesson title
- a short description of the lesson
- a list of the names of the authors, optionally linked to their GitHub profile
We will revisit README.md later in the training with
more details on what to include in this file.
- Lesson sites are built with GitHub Pages from source repositories located in GitHub.
- A new lesson repository can be created from a template maintained by
The Carpentries, and configured by adjusting the
config.yamlfile.
Content from Adding Lesson Content
Last updated on 2026-06-09 | Edit this page
Overview
Questions
- How do you create and modify the pages in a lesson?
- How should different structural elements be presented in a lesson website?
- How can you include quality control in the editing process on GitHub?
Objectives
After completing this episode, participants should be able to…
- Add lesson episodes as individual pages of a lesson website.
- Use fenced divs to create different structural elements within a page to format objectives, questions, keypoints, exercises and their solutions in a lesson website.
Now that we have completed the basic configuration of a lesson site, it is time to move on and look at where the actual lesson content will be written.
As we have seen previously, lesson content is composed using Markdown (or R Markdown), a lightweight markup language that simplifies the formatting of plain text. While Markdown provides structured elements like headings, lists, links, images, and code blocks, the Workbench enhances this by allowing the creation of additional structured text blocks that visually stand out from standard paragraphs on lesson websites. These elements, known as fenced divs, will be demonstrated shortly.
Let’s start by writing our lesson’s home page.
Lesson Home Page
The “home page” of a lesson is created from the index.md
file: this file should contain a brief introduction to the lesson,
designed to give visitors to the page a first impression of the lesson
and whether it is appropriate for them. The file begins with a short
header, written in the same key-value pair syntax we encountered in
config.yaml.
This header configures how the site will be built by
sandpaper, one of the components of The Carpentries
Workbench, and should be left untouched. The page content begins after
the blank line that follows this header.
To get started on this home page, let’s replace the template text in
index.md with the same short description of your lesson you
added to your README.md.
After that, it might be a good idea to add your lesson objectives to our lesson’s homepage.
Exercise: more practice editing Markdown in GitHub
Add the objectives you defined for your lesson as a bullet list in
the index.md file of your lesson repository.
Below those, let’s add the prerequisite skills you determined earlier
for your lesson. This time, instead of committing directly to the
main branch - we will save our changes on another branch
and then do a pull request to merge them to main that will
allow us to review and spot any issues.
Proposing Changes with Pull Requests
So far, we have been editing the files in our lesson repository directly. This is a quick way of working and pretty safe for simple and small changes, especially when your whole lesson team is present (like in this training). But it has a number of drawbacks:
- There is not much opportunity for quality control: if you make typos or other mistakes, those will be directly published in your lesson as soon as the site finishes building.
- There is little room for discussion of potential changes.
- Only one person can work on a given file at the same time without risking the introduction of conflicting changes.
GitHub offers a workflow for making changes that can be very powerful for collaborative teams, especially those whose members often work on the project asynchronously: pull requests. A pull request is a way of proposing changes to one or more files in a project so that they can be reviewed, discussed, and adjusted before they are included in the main version (in our case, the lesson website). It can be helpful to think of pull requests like the “Suggest changes” feature of collaborative writing platforms like GoogleDocs.
Pull requests work through a feature of the Git version control
software called branches. A project can have multiple branches,
which each represent a particular state of the project as a whole. We
briefly encountered branches when we were configuring our lesson
repository in the previous episode: when we make changes to the
main branch of the project, the files in that branch are
processed by the lesson build workflows and deposited as webpage source
code into the gh-pages branch, which is then served to the
internet.
When you want to make some more changes to the project, you can
create a new branch to contain those changes before opening a pull
request to propose the inclusion of your changes into the
main version of the project. The pull request interface
then allows your fellow team members to explore and comment on the
changes you propose, and decide whether/when to include them.
Opening a pull request
Let’s make another change to the index.md, adding the
bullet point list of prerequisites, this time via a pull request.
When commiting these changes to the index.md, we can
choose the “Create a new branch for this commit and start a pull
request” option. It can be helpful to choose a descriptive name for the
branch.
- After pressing “Propose changes”, you will be prompted to open a pull request.
- Choose a title for your pull request, e.g. “Add prerequisites to index.md” and write a short description of the changes you are proposing.
- After pressing “Create pull request”, your proposed changes will be presented to your other team members (and anybody else who visits the project).
Team members who have been granted access to the repository as collaborators will be able to do several things with this pull request:
- Review and comment on the proposed changes, via the “Files changed” tab of the pull request.
- Discuss the pull request in the “Conversation” tab.
-
Merge i.e. accept the changes into the
mainbranch of the project to be built into the content of the lesson website.
You will have an opportunity to practice this pull request workflow in a moment.
We just added the prequisites as a bullet point list in
index.md, but the Workbench provides a special formatted
block for lesson prerequisites, so they appear visually distinct on the
page. Specially formatted blocks of content like this are added to our
lesson as fenced divs.
Fenced divs
Fenced divs are structural elements within the page, which get rendered in a visually distinct way on the lesson website. Fenced divs include regular Markdown content surrounded by special tags to mark the start and the end of such a block.
To mark the beginning of a fenced div, start a line with an opening
tag - at least 3 colon characters followed by a blank character and a
keyword denoting the type of a fenced div you are creating
(::: fenced_div_keyword). Then you add the Markdown content
of this structural block. Finally, end your fenced div with a closing
tag consisting of at least 3 colons (:::).
There are many types of fenced divs available in the lesson infrastructure and we will explore most of them in this episode.
A screenshot below provides an example of how prerequisites block appears in a webpage.
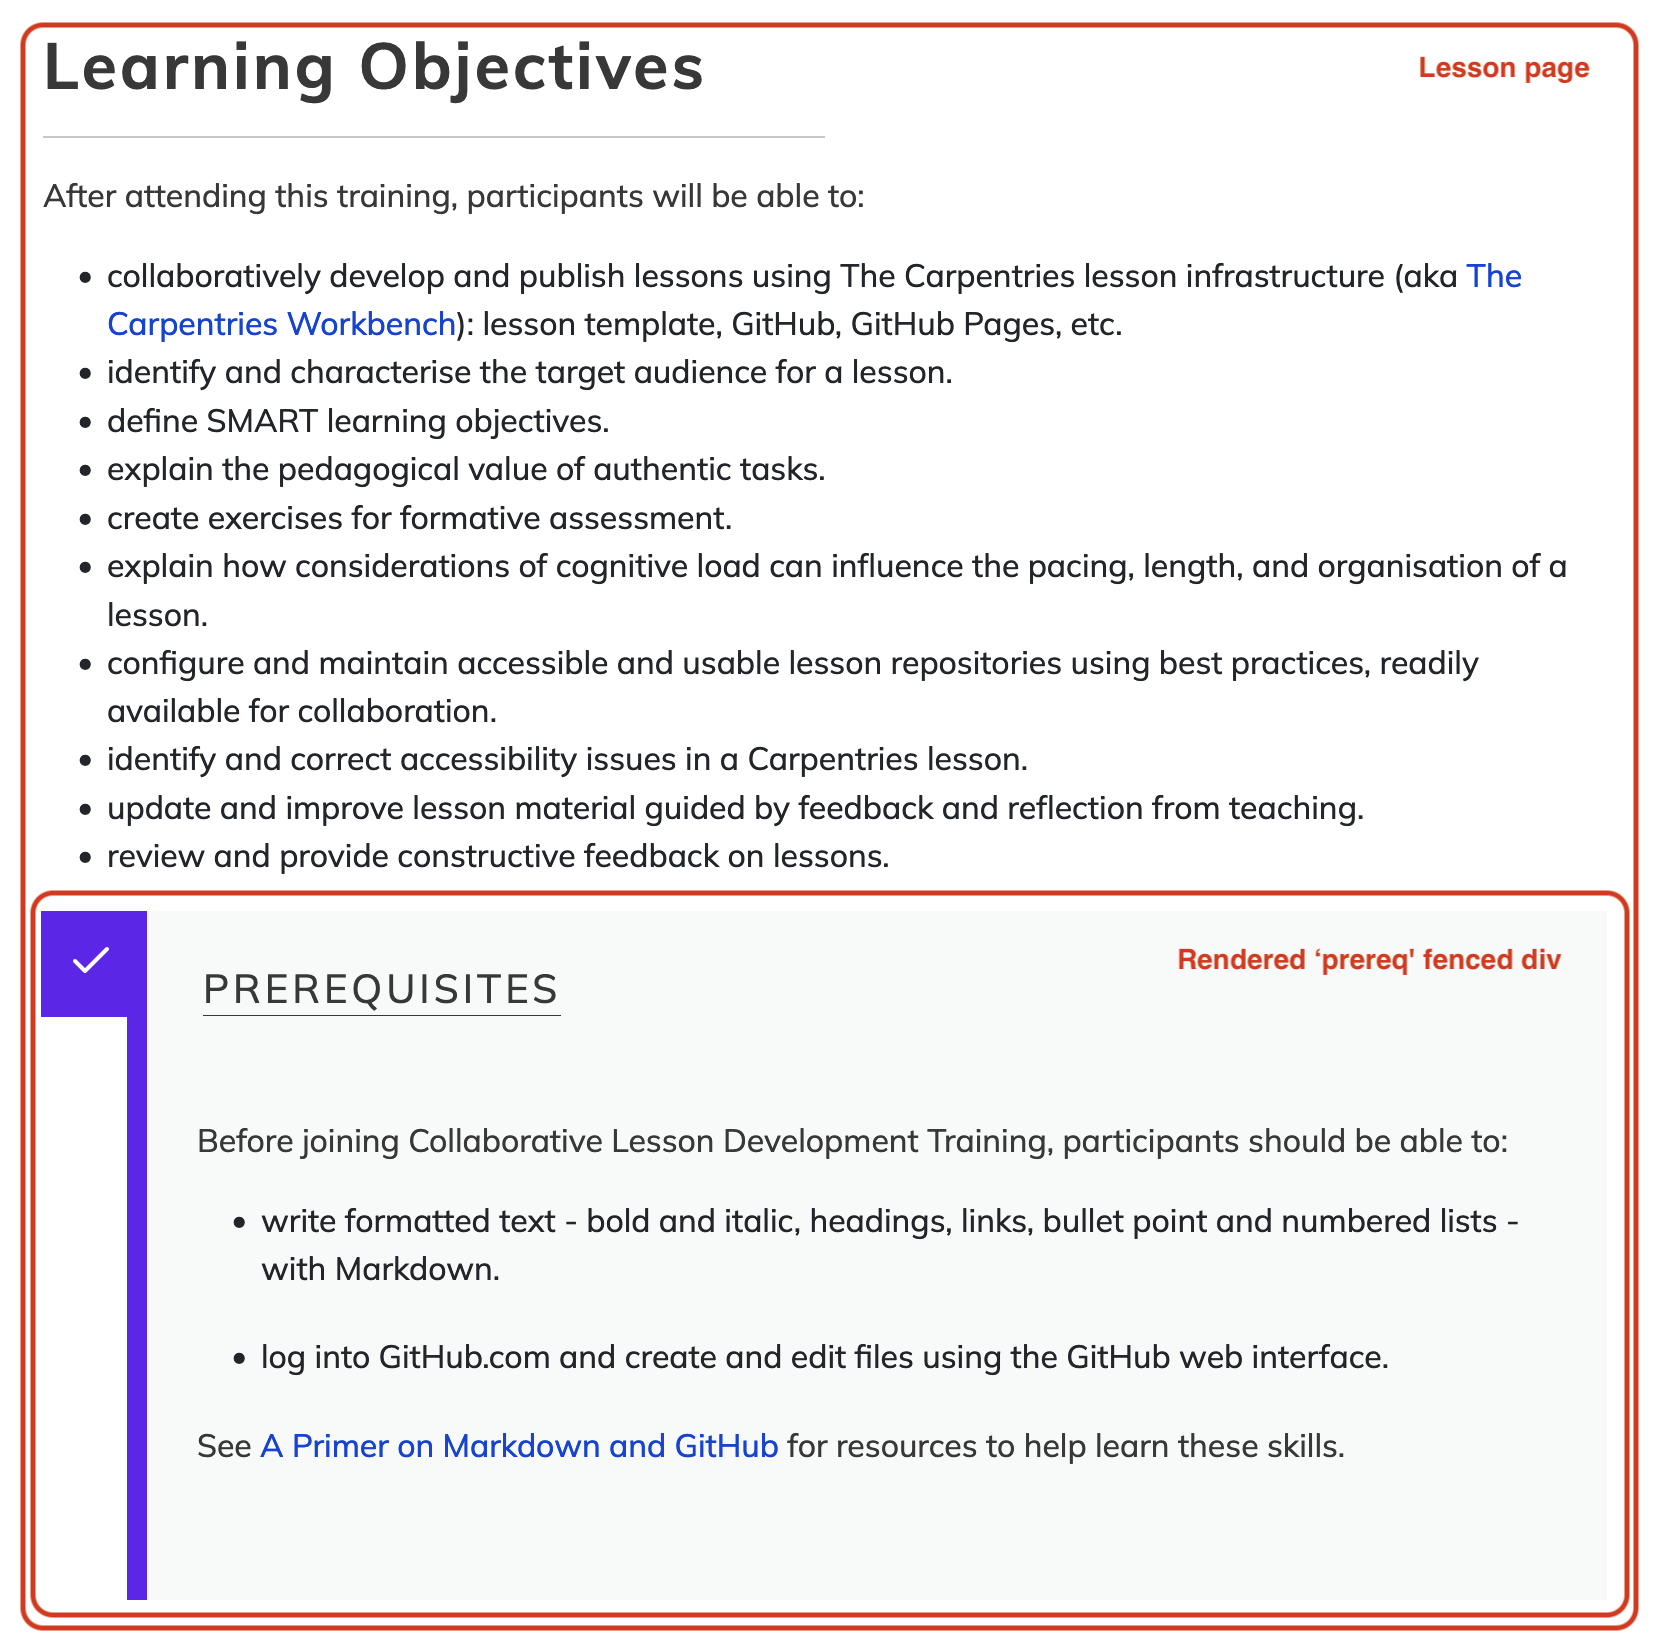
Practice with Pull Requests (10 mins)
Once your changes have been merged and your lesson site rebuilds, check how prerequisites block appears on your lesson’s home page.
You might have noticed by now that GitHub provides a preview of
content in Markdown files, and displays an interpreted (“rendered”)
version of Markdown file content by default in its web interface. You
might also notice that the content of index.md is displayed
differently when viewed on GitHub from how it appears on the homepage of
your lesson website: the yaml header mentioned above appears in a
tabular layout on GitHub, but is not visible on the lesson homepage.
This is because the lesson infrastructure accepts an expanded set of elements in the source Markdown files: syntax for components of a lesson website that are not part of the standard set of Markdown features, e.g. page metadata such as the YAML header above, or fenced div blocks to make certain content visually distinctive. In these cases, you may see GitHub render the content differently from how it appears on your website, or not at all.
We will encounter more examples of this throughout the lesson, but the important thing to remember for now is that how GitHub displays source (R) Markdown files is not a reliable indicator of how content will be displayed in your website.
Episodes
The main body of the lesson is written in episodes: the
individual chunks or sections that the lesson is separated into. The
episode pages of the lesson site will be constructed from Markdown or R
Markdown files in the episodes folder of the lesson
repository.
The episodes folder of the new repository contains a
single example episode file, introduction.md. The content
of this file includes some help with and examples of how to write
Markdown files for The Carpentries Workbench. Like
index.md, the episode file begins with a short header. The
fields in this header describe the episode title and the estimated time
(in minutes) required to teach it and complete the exercises.
Creating a new episode
Let’s create a new episode file, for one of the episodes you have
identified earlier in the training. First, open the “raw” view of the
introduction.md example episode, and copy its contents to
make it easier to structure the new episode we are creating.
MARKDOWN
---
title: "Intro to Markdown"
teaching: 10
exercises: 2
---

:::::::::::::::::::::::::::::::::::::: questions

- How do you write a lesson using Markdown and `{sandpaper}`?

::::::::::::::::::::::::::::::::::::::::::::::::

::::::::::::::::::::::::::::::::::::: objectives

- Explain how to use markdown with The Carpentries Workbench
- Demonstrate how to include pieces of code, figures, and nested challenge blocks

::::::::::::::::::::::::::::::::::::::::::::::::

## Introduction

This is a lesson created via The Carpentries Workbench. It is written in
[Pandoc-flavored Markdown](https://pandoc.org/MANUAL.txt) for static files and
[R Markdown][r-markdown] for dynamic files that can render code into output.
Please refer to the [Introduction to The Carpentries
Workbench](https://carpentries.github.io/sandpaper-docs/) for full documentation.

...

::::::::::::::::::::::::::::::::::::: keypoints

- Use `.md` files for episodes when you want static content
- Use `.Rmd` files for episodes when you need to generate output
- Run `sandpaper::check_lesson()` to identify any issues with your lesson
- Run `sandpaper::build_lesson()` to preview your lesson locally

::::::::::::::::::::::::::::::::::::::::::::::::
You may have noticed a few more fenced divs in the episode file -
questions, objectives and
keypoints. These are all compulsory elements of every
episode - the Workbench will refuse to build your lesson if any of these
are missing.
Now open a new pull request to create a new file in the
episodes folder. Based on the episodes you planned out
earlier, choose a name for your episode that concisely describes the
intended content, e.g. data-visualisation.md (or
data-visualisation.Rmd for a lesson based on R Markdown).
It is vital to include the file extension when naming this file: only
files with the .md or .Rmd extensions will be
built into webpages by the lesson infrastructure.
For the content of your episode, paste everything from the
introduction.md file you copied earlier and:
- replace the title in the header with the title of your episode
- set the
teachingandexercisesfields to zero for now - replace the contents of the
questionsdiv with the questions for your episode you defined earlier - replace the contents of the
objectivesdiv with the episode-level objectives you defined earlier - replace the contents of the
keypointsdiv with the key points for your episode you defined earlier - Ignore or delete the rest of the content of the episode (i.e. only focus on the three structural elements - questions, objectives and keypoints).
Adding a new episode to the lesson navigation
This new episode will not yet appear in the navigation of your lesson
site, even after the pull request has been merged. To enable this, we
need to specify where the episode should appear in the order of the
lesson. That episode order is defined in the episodes field
of the config.yaml file:
Add the name of the new episode file you created to this list in
config.yaml and open a new pull request to commit this
change, for example:
After the pull request has been merged and the lesson site has been rebuilt on GitHub, you should see the episode title appear under EPISODES in the left sidebar navigation of your lesson site after refreshing the webpage. Clicking on that title will take you to the episode page built from the file you created. At the top of the page body, you will find the episode title and an Overview box containing a list of the questions and objectives defined for the episode. At the bottom of the page, you will find the keypoints. Later, we will add more content to your chosen episodes.
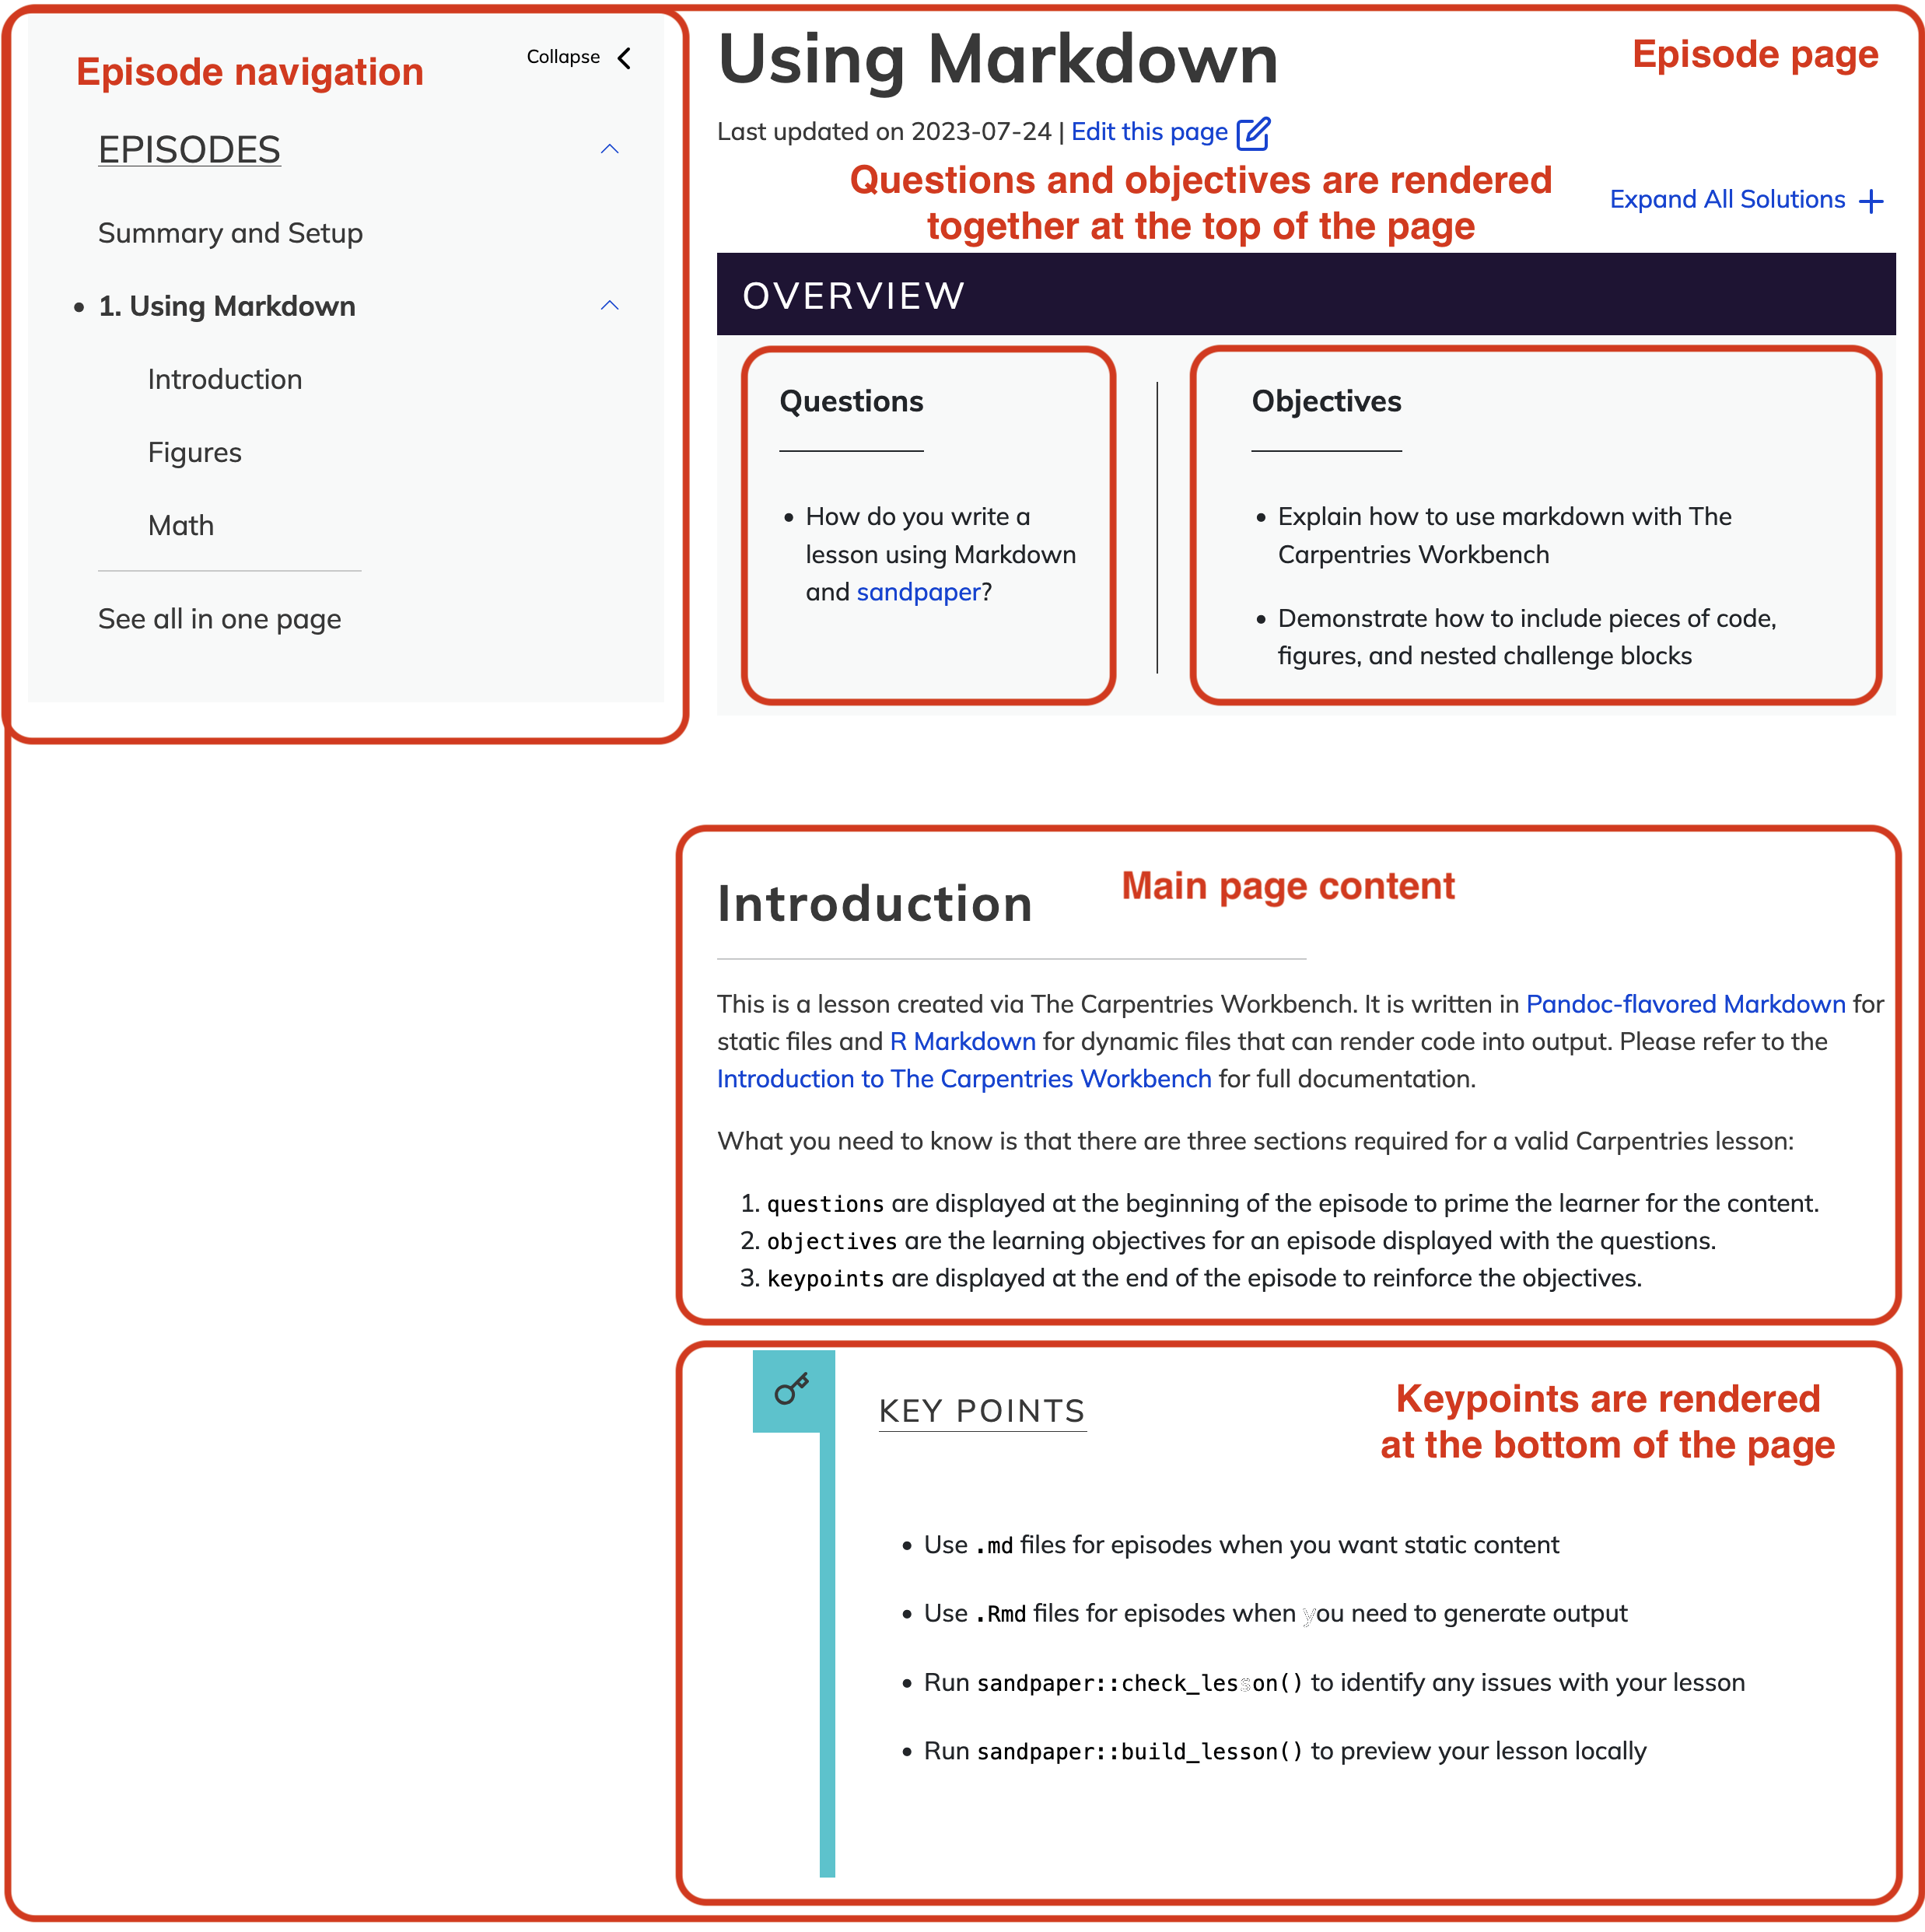
Exercise: practice creating episodes (10 minutes)
Repeat the steps you just saw, to create another new episode file and add it to the lesson site navigation. Propose these changes as pull requests when you do so. If you know what another episode in your lesson will be about, create the page for that. Otherwise, feel free to use any values you like for the file name and episode title.
Using this approach, we can build up our lesson one episode at a time.
Adding Exercises
To create an exercise in The Carpentries Workbench, we use two types of fenced div:
-
challenge, where the main task is a problem to be solved. -
discussion, where the main task is for participants to discuss a topic or prompt
To start a challenge fenced div, write an opening tag of
at least 3 colons as usual, then follow it with the
challenge keyword. Add the content of the challenge on the
following lines. Finally, close the fenced div using another line with
least 3 colons.
MARKDOWN
:::::::::::::::::::::::::::::::::::::: challenge

### Challenge Title

Challenge text, code, and other information goes here

::::::::::::::::::::::::::::::::::::::::::::::::::
If you also want to include an expandable solution box for the
challenge you can nest a solution fenced div within the
challenge div. The format is the same as for a challenge
except the fenced div tag is solution instead. Note the
solutions can all be expanded for more accessible reading using the
“Expand All Solutions” option at the top of each episode.
:::::::::::::::::::::::::::::::::::::: challenge

### Challenge Title

Challenge text, code, and other information goes here

:::::::::::::: solution

### Solution Title

Solution text, code, and other information

:::::::::::::::::::::::::

::::::::::::::::::::::::::::::::::::::::::::::::::
For readability, you may want to have the length of the closing lines match the opening lines. See in the above how the challenge and the nested solution’s closing lines are similar lengths to the their corresponding opening lines. For more information about creating exercises see the Workbench Documentation for Exercises.
Exercise: Formatting Exercises in a Lesson Site (15 minutes)
Using the approach demonstrated above, format the exercise you designed previously as an exercise in your lesson site.
Important, Optional and Cautionary Material
The Carpentries Workbench includes a fenced div for highlighting key
material that should not be skipped during instruction using the
callout keyword.
Calling Attention to Important Points
For important points in the lesson, you can add them to a
callout box to emphasize their importance.
There is also a fenced div for optional content that can be covered
if time permits (spoiler keyword).
Often lessons have more content than can be reasonably taught in the amount of time allotted. This is especially true for collaboratively developed lessons as each contributor/instructor may have additional items they’d like to see included, leading to “scope creep”.
To address this issue, in many Carpentries lessons,
spoiler boxes are used for asides and short tangents,
e.g. points that might be relevant to some audiences but are not
essential to the flow of the lesson. These spoilers should still be kept
to a minimum as they can be disruptive to instructors and readers.
Note, this use of the spoiler box is to use the expandable box functionality as nothing will be “spoiled” by expanding this box. Also, note that the spoiler box titles should be very clear so instructors need not expand the spoiler to know if they want to teach that extra.
You may notice that many of the older lessons use callouts for both additional material and to highlight important points interchangeably. Spoilers were developed in 2023 to help with separating these two different use cases.
Finally, the Workbench also supports the caution fenced
dev, which can be used to draw attention to common pitfalls, potential
issues or otherwise emphasise something that might negatively impact the
user.
Calling Attention to Potential Problems
Be careful to close an opened fenced div with at least three colons
(:::) to avoid failed lesson builds.
Glossary of Terms
You have already started on compiling a glossary of terms for your
lesson. The Workbench offers a standardized location for lesson
terminology: learners/reference.md.
More Practice with Lesson Content
Exercise: More Practice (15 minutes)
Use this time to add more content to your lesson site. Generally speaking, you should try to transfer the drafted content from your lesson design notes into the lesson website. Here are some suggestions for things you might try:
- Add other exercises - e.g. add a
discussion. Note that the lesson infrastructure does not supportsolutiondivs attached todiscussions. - Add some tabbed content in your episode.
- Start a glossary of terms in the
learners/reference.mdfile, referring to the Workbench documentation on how to add a list of term definitions. - Look through the Workbench component guide and try implementing some of the other flavours of fenced div.
- Add a new Markdown file to the
learners/orinstructors/folder and see if you can find the built page in your lesson site.
Troubleshooting the Lesson Build
Sometimes, formatting errors and typos in the files of your repository can cause the process that builds your lesson website to fail.
You will likely first notice the failure to build the lesson if the lesson website is not showing the changes you made. You may also receive an email from GitHub about the build failure if that is your preferred way of receiving notifications (but it may take you some time to realise this). The good thing is that GitHub keeps your previous lesson version online until the error is fixed and a new build is completed successfully. If you are not yet familiar with the GitHub interface, it can be difficult to pinpoint the problem.
Here are some points of advice that you can follow to help find and fix the problem when you notice the build process fail.
- When you first notice that there is a problem, stop editing your lesson: any subsequent changes that you make will not be included in your lesson site until the problem is fixed, and might introduce additional issues, making it more difficult to find the original cause.
- Look at the history of commits (the link with a reversing stopwatch icon and “NN commits” at the top of the listing of files and folders in the repository homepage). Is there a place where the build has a red cross instead of green circle? If so, click on that commit to look at the “diff” (where it shows which lines have been modified). The error is likely to have been introduced by these changes.
- Ask for help: you can open an issue on your repository and tag a member of The Carpentries team to ask for help finding the problem. Alternatively, you can also ask for help in The Carpentries Slack workspace. (More about communication channels for discussing lesson development coming later in this training.)
- Waiting for the GitHub Actions process that builds the website to run can be tedious, and slow down the process of troubleshooting: it can take a few minutes for the process to reach the point where it encounters the problem. It can be helpful to download the files for your lesson and try to build a version of the website on your local computer, where the build process will be much faster. The Workbench documentation provides instructions for installing the infrastructure and building a local preview of the lesson website.
Keeping your infrastructure up to date
New versions of the workflows that build your lesson site will be released occasionally, and the Workbench includes a maintenance workflow that can help you keep your infrastructre healthy. If you are using R Markdown source files in your lesson, you will also need to update the package dependencies of your lesson and the Workbench provides a second maintenance workflow that can take care of that for you too. Both of these maintenance workflows will open pull requests on your lesson repository, which you will need to merge for the updates to be applied. If your lesson is hosted in The Carpentries Incubator, these workflows will be configured for you. If you are keeping your lesson repository somewhere else instead (e.g. with your personal GitHub account or an organisation of your own), you will need to take care of a few configuration steps to allow these maintenance workflows to open pull requests on the project on your behalf.
- The main pages of a lesson website (lesson episodes) are created
from individual Markdown or R Markdown files in the
episodesfolder of a lesson repository - Objectives, questions, keypoints, exercises (and solutions), and other “special” structural page elements (other than plain text) can be formatted using fenced div blocks - they are rendered visually differently in the lesson website.
- There are many types of fenced divs available to lesson developers.
- Pull requests are a way of suggesting changes so that they can be reviewed and discussed by other team members before being included in the lesson website.
Content from How we Operate
Last updated on 2026-06-09 | Edit this page
Overview
Questions
- What are the important milestones in the development of a new lesson?
- How can The Carpentries lesson development community help me complete my lesson?
Objectives
After completing this episode, participants should be able to…
- Describe the role that feedback plays in the life cycle of a lesson.
- Connect with other members of the community.
Until now, this training has focused on the internals of a lesson development project. Now it is time to consider the evolution of a lesson over time, and the context in which lesson development can take place.
The Lesson Life Cycle Revisited
At the beginning of this training, you were introduced to the concept of a lesson life cycle, which The Carpentries promotes to help developers communicate the status of an open source lesson project to instructors and learners.
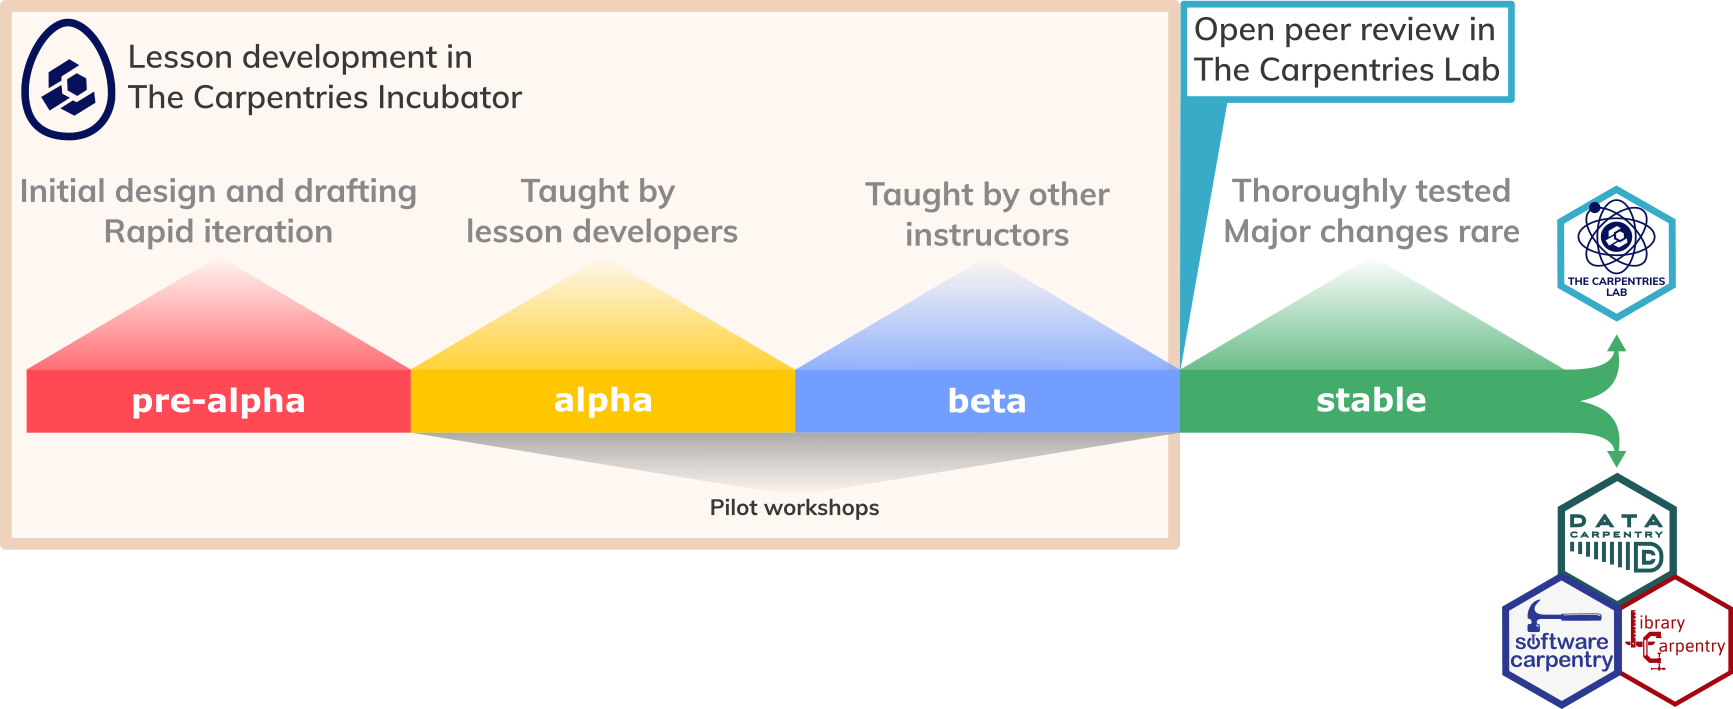
Indicating Your Lesson’s Progress
The life cycle stage of a lesson is displayed as a banner on the lesson site, as a label on the lesson GitHub repository, and alongside the lesson whenever it is shown on The Carpentries websites and lesson listings.
The life cycle stage for a lesson is configured in the
config.yaml file we encountered when we were first
introduced to The Carpentries
Workbench, as a value for the life_cycle field. For new
lesson repositories, this value is already set to ‘pre-alpha’, so you
should not have to change it yet.
The config.yaml file also contains a
carpentry field, which can be used to adjust the styling
applied to a lesson website e.g. to make it look like a lesson from the
Software, Library, or Data Carpentry Lesson Programs.
For community-developed lessons, where no official relationship
exists with one of these Lesson Programs, you should keep using the
incubator setting, before potentially switching over to
another styling when the lesson moves e.g. into The Carpentries Lab.
Pathways out of Lesson Incubation
The Carpentries provides pathways for mature lessons to leave the Incubator.
- A mature lesson may join an existing lesson program, e.g. Data Carpentry, HPC Carpentry, Library Carpentry, or Software Carpentry, subject to review and approval by the relevant Curriculum Advisory Committee. In rare cases, lessons may leave the Incubator to form a whole new lesson program of The Carpentries. In 2026, following a process of incubation and approval by The Carpentries Board of Directors, HPC Carpentry was adopted as a new officieal lesson program.
- Developers can submit their lessons for open peer review in The Carpentries Lab, which hosts a growing collection of high-quality, stable lessons created by the community. Developers submitting to the Lab have the option of publishing their lesson in The Journal of Open Source Education (JOSE).
It takes a sustained community effort for a project to become a new Carpentries lesson program. The Lesson Program Incubation process is designed to ensure that any new lesson program already has a strong open source community built around good, mature curriculum. Once a project is adopted as a lesson program, it can benefit from the established platform and reach of The Carpentries community, as well as ongoing maintenance supported by the Curriculum Team.
If you are want to explore the possibility of your new lesson(s) joining an existing lesson program or entering incubation to become a new one, we recommend that you contact the Curriculum Team early. They will be able to answer your questions about the process and connect you with other community members who can advise you further.
A lesson does not need to be stable to be useful to the community: lessons with alpha and beta status are already valuable resources to be taught and reused.
Pilot Workshops
In line with the importance we placed on evaluation of lesson content earlier in this training, the life cycle described above places considerable emphasis on the testing of lessons in pilot workshops.
For these pilot workshops to provide an effective evaluation of the lesson, it is essential to seize the opportunity they provide to collect feedback and data. For example, a pilot workshop offers a chance to answer questions like:
- How much time does it take to teach each section of the lesson?
- How much time is required for each exercise?
- What technical issues were encountered during the lesson?
- What questions did learners ask during the workshop?
- Which parts of the lesson were confusing for learners?
- Which exercises could be improved to provide more information to the instructors?
The pilot workshop notes template provides a starting point, but it takes a lot of time and effort to keep track of all this information during a pilot workshop. It can be helpful to assign this task to a member of the lesson development team, who can dedicate themselves to observing the pilot and taking notes. As soon as the pilot has finished, it is a good idea to take some time to share the notes with the other lesson authors, to reflect on and discuss the experience of teaching the lesson, and to synthesise the lesson notes and any action items that come from this debrief into specific action items to improve the lesson. These should be added as new issues on the lesson repository, to help you keep track of the work that needs doing for the next iteration.
For beta pilot workshops, where the lesson is taught by instructors who have not yet made a major contribution to its development, it is vital that instructors have the opportunity before the workshop to learn about the lesson from the authors, and to debrief with the authors afterwards so that they can share their experience and observations about how the lesson could be further improved.
Hosting and Teaching Pilot Workshops
The Carpentries community handbook includes guidance for community members who want to teach and/or host pilot workshops.
Connecting with the Lesson Developer Community
The Carpentries Incubator hosts a thriving community of lesson developers, working on lesson projects at every stage of the life cycle.
You can add your lesson project(s) to the Incubator by submitting an issue to the Incubator Proposals repository. Lesson developers working in the Incubator benefit from increased visibility for their projects and dedicated support from The Carpentries team.
Connecting with the lesson developer community can be a great way to find collaborators to contribute to or test your lesson, to stay up to date with the latest support provided to the community, and to learn from the experience of others.
Here are a community activities and channels that you might be interested in joining:
- The
lesson-devchannel on The Carpentries Slack workspace. This is a platform for the community to ask questions and make announcements about lesson development. You could also browse the other channels on the workspace for any that are relevant to the topic of your lesson.- You may also find it helpful to create a new channel on Slack for discussion of your lesson. Chat channels like this can be valuable ways for a remote team to communicate and collaborate.
-
The
incubator-developerslist on TopicBox. The Carpentries Curriculum Team uses this mailing list to make relevant announcements to the community of lesson developers working in Incubator. - The Carpentries Curriculum Team hosts Lesson Development Coworking Session on occasion, which are a good opportunity to engage with other lesson developers and make regular progress on your project. The sessions are listed on The Carpentries community calendar.
The Carpentries Workbench does not yet support multiple (human)
languages in a single lesson site, e.g. to see the lesson in Spanish and
Afrikaans as well as English. Nevertheless, a thriving subcommunity
exists of people translating/localising lesson content for other
languages and regions, making use of the CrowdIn translation platform and tooling
developed by Joel Nitta that extends the Workbench. To connect with
the internationalisation (often abbreviated to i18n)
subcommunity, join the #internationalisation channel on The
Carpentries Slack workspace. Some of the groups translating lessons to a
particular language meet for regular coworking sessions. These events
are typically listed on the community calendar (linked above).
Build your Skills for Collaborative Development
The Carpentries lesson development community works together on GitHub, taking advantage of the open source nature of these projects to foster collaboration and re-use of lesson content. GitHub is a powerful platform for this kind of collaborative development, with a number of features that make it easier and more enjoyable to create a lesson with other people. Unless you are a GitHub expert already, we recommend that you participate in one of the GitHub Skill-up sessions hosted by The Carpentries after this training has finished. Access to that skill-up is included as part of your training, and the session will teach you several approaches and skills to make collaboration more effective with GitHub.
Exercise: join relevant channels (5 minutes)
Use this time to explore the options listed above and join/subscribe to any communication channels that you find interesting. You may also want to sign up to participate in an upcoming GitHub Skill-up session.
Further Reading
The Carpentries Lesson Developer Handbook provides guidance and a list of resources for lesson developers to consult as they move through the different stages of development.
- Teaching a lesson for the first time is an essential intermediate step in the lesson development process.
- The Carpentries lesson developer community shares their experience on multiple communication channels.
Content from Preparing to Teach
Last updated on 2025-12-12 | Edit this page
Overview
Questions
- What can I do to prepare to teach my lesson for the first time?
- How should I communicate lesson setup instructions to learners?
- What information should be recorded for instructors teaching a lesson?
- How should information be collected as part of the feedback process?
Objectives
After completing this episode, participants should be able to…
- Summarise lesson content as a teaching plan.
- Add Setup Instructions and Instructor Notes to the lesson site.
- Create a feedback collection plan.

By now you should have developed objectives, exercises/formative assessments, and examples for at least one of the episodes in your lesson. In order to prepare to teach it (for the first time in particular) you’ll need to create a teaching plan and design a method to collect feedback on your lesson.
Teaching Plan
A teaching plan outlines the structure of your teaching session, including details, estimated duration and materials needed to deliver it. For example, a teaching plan may contain the following:
- welcome, introductions and motivation for the lesson - to introduce yourself, aims and objectives of the lesson and how it will help learners
- setup - to check if everyone is ready to proceed with the lesson
- segments of teaching and exercises from the lesson and any other planned activities (e.g. group discussions, wrap-up and feedback)
- checkpoints - places where you have planned to stop to check-in with learners
- slides, figures and other visual aids needed to deliver teaching and other parts of the teaching plan
- resources/references/recommended reading
Checkpoints in a Teaching Plan
Checkpoints are especially useful at the beginning of a lesson when you may not have as many exercises but the learners need to have the data downloaded or tool opened to be able to follow along. A checkpoint could include stopping to ask what questions learners have or having them indicate if they have completed the most recent step shown by the instructor.
Perspective on Preparing a Teaching Plan
“I usually create detailed notes organised in a concept map/workflow in order to make everything consistent. I also write next to each bit of teaching the time approximately needed. For each lesson I create (and reuse when I teach again the same lesson) very detailed notes of what happens during the lesson, including teaching goals and learning objectives I mean to achieve with each bit of lesson. This rich lesson plan requires a lot of work the first time I teach a lesson, but reduces a lot the preparation time of future lessons and are super useful to other teachers.”
- Dr. Allegra Via, Carpentries Instructor and Instructor Trainer
Exercise: Prepare a teaching plan (15 minutes)
Create a bullet point list or brief notes describing what you will say and do when teaching the episodes you have been focussing on during this training.
You could create this teaching plan in a document just for yourself or write it into your Lesson Design Notes document.
Figures and other visual aids are great tools to help participants understand the content being presented and make associations between pieces of information. The Instructor View of the lesson website includes a link in the top menu to Extract All Images, providing a single page containing all of the images in the lesson and their captions: this can be useful as an alternative to a slide deck when refering to figures and other visual aids during a workshop.
Setup Instructions
If your lesson requires participants to use any software, tools or
data, it is worthwhile investing time now into creating clear download,
installation and setup instructions for participants to follow and
circulating them ahead of the workshop. This will give you more time at
the pilot for teaching the lesson as troubleshooting setup problems on
the spot can be time-consuming and stressful. Each Carpentries lesson
has a dedicated place for setup instructions within The Carpentries
Workbench located in the file learners/setup.md off the
lesson project root.
Exercise: Add Setup Instructions (10 minutes)
Add setup instructions (in the learners/setup.md file)
with a list of software/tools/data needed by participants to follow your
lesson and links on how to obtain and install them.
Rather than producing a separate page in the lesson site, the
contents of learners/setup.md will be combined with
index.md to produce the Learner View of the landing page of
your lesson.
Instructor Notes
Another standard piece of The Carpentries Workbench are the
Instructor Notes pages - intended to help you and other
instructors deliver your lesson by providing useful tips for how to best
run a workshop or explain “sticky” points in the lesson. Instructor
Notes for your lesson are located in the
instructors/instructor-notes.md file off your lesson
project root - this page is displayed in the header menu when in
“Instructor View”.
You may consider adding the following information to your lesson’s Instructor Notes:
- rationale, strengths and/or weaknesses of the lesson design
- what has been tried before and what worked/did not work
- tips for teaching the lesson/particular episodes
- challenges encountered
- troubleshooting common setup/installation/exercise issues
- parts that seem to cause trouble or most confusion for learners (i.e. where to tread carefully, spend more time explaining)
You can also add notes in a specific episode of the lesson using fenced div with tag “instructor”. Instructors can see such notes within the lesson and the “Instructor Notes” tab in the header menu of the website by changing the view in the upper right-hand corner of the lesson to “Instructor View”. These notes are hidden when in ‘Learner View’
It may initially be difficult to create Instructor Notes until you have taught the lesson yourself for the first time - but after the first pilot you will have enough feedback to draft them.
Exercise: Add Instructor Notes (5 minutes)
Add Instructor Notes (in the
instructors/instructor-notes.md file) with an initial list
of points that will help you and other instructors deliver the
lesson.
Add a single instructor note in one of your episodes using the “instructor” fenced div.
Then try out the “Instructor View” of your lesson and seeing the Instructor Notes in the header menu and the in-line hidden instructor note in your episode.
The concept of hidden curriculum describes curricular effects that influence learning but are not explicitly addressed in the lesson content - e.g. (unofficial) social and cultural norms, behaviours and values that are transferred by instructors to learners, often unconsciously. These are all the additional things that people learn about the topic from the way your lesson is taught, rather than from its official content. It is worthwhile to spend some time thinking about what learners could pick up from the way your lesson is taught, as well as from its written content. You can use Instructor Notes to guide instructors on some of the aspects of the hidden curriculum of your lesson, e.g. to encourage them to follow certain tried and tested practices.
Feedback Collection Plan
There is a lot to collect feedback on when trialling a new lesson and this is arguably the most important part of your teaching plan. It can be hard to capture all this information yourself while you are teaching, hence you will need help from your team - make sure you assign the feedback collection roles ahead of your pilot. Additionally, when you are advertising your workshop, try and make it clear to the participants you are piloting a new lesson and that they will be actively helping you refine it as well as learning new things themselves. This can help focus their attention on the feedback you need to collect from them, which you should be doing:
-
constantly and throughout the workshop
- As notes taken by an observer/co-instructor - refer to the “Pilot Workshops” episode for suggestions on things to track and the pilot workshop notes template and other suggested feedback collection mechanisms to help you gather such information.
- As “minute card” feedback from learners - minute cards are short comments from learners on what is working well and what could be improved, provided frequently (e.g. at the end of each session). Like exercises used as formative assessment, minute card feedback can be provided by learners while there is still time for instructors to act on it and adjust their approach. You may find the Virtual Minute Card template helpful for workshops run online, and the Instructor Training curriculum describes how sticky notes can be used at in-person events.
- at a designated wrap-up and feedback session at the end of the workshop. Here, you can cover any other feedback that was not addressed up to that point and any specific questions you may want to ask your audience (e.g. about the choice of topics for the lesson, difficulty level, workshop operations). You may design a special form that participants can fill in anonymously - here is a post-workshop survey template for workshops that pilot a lesson in The Carpentries Incubator. You can use it as a starting point for a post-workshop survey to be shared with your learners at the end of the pilot workshop and you can supplement it with additional questions.
Training Pilot Operations Guide
You may find the “Training Pilot Operations Guide”1, compiled by the Software Sustainability Institute and UNIVERSE-HPC project, a useful resource to have a look at as you prepare to pilot your lesson.
Running your own pilot workshop
We recommend that you look for an opportunity to teach some or all of your new lesson as soon as possible. The feedback you collect and the experience you gain will help you improve on your lesson design and content.
While it may feel early or scary to pilot part of your workshop early in the development process, the feedback you can get from learners is highly valuable and can focus or speed up your development process. The feedback below from workshop participants demonstrates the importance of trial runs.
Testing with a ‘Real’ Audience
Presenting our lesson in front of a ‘real’ audience as a trial run gave us valuable feedback on things we hadn’t fully considered in the planning phase. It helped us to better understand how much time is needed for the exercises, how difficult the exercises are for the learners and how some examples used can be misunderstood by the learners. I think that learner feedback is more useful the more the audience closely matches your own target audience, so the insights are more practical and relevant for improving the content.
- Julia Tolksdorf
Getting Feedback Early
Doing a trial run of our lesson so early in the process felt a bit intimidating at first, it seemed like we weren’t ready and everything needed more work. But that’s exactly why the trial run was so helpful. It gave us a clear picture of what worked and what didn’t, like realizing we’d packed in way too much content and spotting some technical issues we hadn’t thought of before. The participants were understanding and gave us really useful feedback, which made the next version of the lesson so much better. It was a great reminder that progress matters more than perfection.
- Olga Minaeva
After the training
Before obtaining certification as a Carpentries Lesson Developer, trainees are required to complete two “checkout” tasks:
- Teach one or more episodes of your lesson to a real audience.
- Join a Pilot Workshop Debrief session, reporting on your experience teaching your new lesson and your plans for the next iteration of the content and design.
See the Checkout Process page for full of these steps.

Some feedback from participants that demonstrates the importance of piloting a lesson.
What questions do you have? (15 minutes)
The checkout process for Lesson Developer certification includes a pilot event of at least one of the episodes you have been developing in your lesson, to a real audience.
After reading the information provided about the checkout tasks and thinking about the lesson pilot, what questions do you have about how you should approach teaching it? Is there anything you are unsure of? What resources might help you prepare for that experience?
- Spending time on preparing your teaching and feedback collection will make you and your participants get the most out of your workshop pilot.
- Creating clear setup instructions as part of your lesson and circulating them ahead of the pilot is time well-invested and will give you more time when teaching the lesson.
- Instructor Notes are teaching tips that you should include with your lesson to help you (a few months down the line) and other instructors, who have the relevant topic knowledge but have not been involved in the lesson design and development, deliver your lesson more successfully.
Crouch, S., & Broadbent, P. (2024). Training Pilot Operations Guide (1.0.0). Zenodo. https://doi.org/10.5281/zenodo.14066425↩︎
Content from Wrap-up
Last updated on 2026-01-30 | Edit this page
Overview
Questions
- What steps will you take after this training?
- How could this training be improved?
Objectives
After completing this episode, participants should be able to…
- Summarise the lesson development process introduced in this training.
- Identify next steps to take that will ensure further progress towards a completed, thoroughly tested lesson.
We have reached the end of this training. Throughout this training we promoted an iterative, collaborative approach to lesson development (as many other initiatives in The Carpentries community are conducted). The iterative approach ensures that you regularly receive feedback that will help you adjust and refine the design and content of your lesson. Collaboration helps bring different skills and perspectives to a project and share the load of the work required to bring the project successfully past the finishing line. For lesson projects, this shared effort also extends to maintaining and updating the lesson after the initial development phase.
Next steps
Here are some suggestions for what to do next, to make sure that you finish drafting your lesson, test it out, and eventually bring it to a stable state.
Complete your Lesson Developer certification!
The checkout process is designed to help you complete the first cycle through the iterative backward design process, giving you an opportunity to deliver some lesson content, gather feedback, and use that information to evaluate how effective your lesson is in teaching what you want learners to learn. In addition to making you a certified Lesson Developer, Checkout will help you identify what could be improved in your lesson and help you plan the next iteration of development.
Learn more skills for effective collaboration
Trainees with less experience working in GitHub will benefit from joining a GitHub Skill-up session after this training. The skill-up teaches good practices and features of the GitHub interface that will help you manage tasks, review contributions, and work together more effectively.
Learn more about best practices in lesson design
Explore the literature references for this curriculum for greater insight into the principles underpinning what you learned in the training. The training has given you a strong foundation but there is a lot more to be learned about effetive curriculum design and these resources are a great place to start.
Identify oustanding tasks
This training covers a lot of concepts and leads you through many different tasks in a limited amount of time. To help you prioritise what to work on next, consider the following prompts and make notes of your answers.
- Which of the exercises set so far in this training did you not have time to complete?
- What do you still need to add/work on in your lesson?
- What can you remove/consider removing from your lesson?
- How will the narrative and example data you have chosen for your lesson support teaching and assessment?
- What diagram or other visual aids could you create/add to supplement your text?
Organise your knowledge
Take some time to think back on what has been covered so far, then make some notes on the most important points and actions you want to take away from that.
If you do not know where to start, consider the following list for a starting point:
- draw a concept map, connecting the material
- draw pictures or a comic depicting one or more of the concepts
- write an outline of the topics we covered
- write a paragraph or “journal” entry about your experience of the training today
- write down one thing that struck you the most
Assess your lesson design
(This exercise is adapted from Via et al. 2020.)
When the first draft of your lesson content is nearly complete, consider mapping out the relationships between the objectives of your episode and the examples and exercises via which they will be taught and assessed. For example,
The read CSV and inspect demo supports Objective 2 (load a simple CSV data set with Pandas) and will be delivered using participatory live coding. The objective will be assessed with an exercise that requires learners to apply the read_csv function to another file and count the rows in the resulting DataFrame object.
- Does any of your planned content not support any learning objectives?
- Is there at least one piece of content planned for each learning objective?
- Is there a formative assessment planned for each learning objective?
Add your design notes to the lesson site
Consider adding the Design Notes you have been working on as a page on your lesson site, to provide context for future discussions of the intended target audience and scope of the lesson.
- Replace the first 13 lines of your Design Notes document with
---
title: Lesson Design Notes
---- Save the file to the
instructors/directory, and any images used in the file to theepisodes/figdirectory. Adjust the paths to source files for images to beginepisodes/fig/. - Add the filename below
instructors:inconfig.ymlas you did for episode filenames belowepisodes:previously. For example, if your file is saved with the name ‘design-notes.md’:
This will make the page accessible from the ‘More’ dropdown in Instructor View.
Feedback
The Trainer(s) will ask for feedback on the training. Take some time to provide this feedback, before moving onto the second part of this task.
One Up, One Down (10 min)
Provide one up, one down feedback on Collaborative Lesson Development Training.
- Say only one thing, and try not to repeat points others have already raised. This gets harder for those who come later!
- Trainers should try not to respond, only record responses (e.g. in the CodiMD). This is also hard, but important!
Good luck and keep in touch as you continue to develop and refine your lesson!
- Although this training is over, your lesson development journey has only just begun.
- The Carpentries lesson development community offers support with the rest of the process.